Information
GridPane WordPress Multitenancy is available on our Developer Plus and Agency plans.
Introduction
In conjunction with the new Git features, our multitenancy solution has been updated to take advantage of the same scripts and feature integrations. You’ll find that there is a lot of cross-over between how the two work inside of your GridPane account, and now for both the GridPane Git integration and GridPane multitenancy, setting up your Git repositories follows the same process as detailed in this article:
How to Configure Git Repositories for GridPane Hosted Websites
Unlike the standard Git integration, when using multitenancy you set your Git repo once inside the server customizer and it automatically applies to every website created on that server. This means there’s one immutable codebase for all individual websites, and when you push updates via Git, they apply to all websites on that server.
In this article, we’ll walk you through the process of setting up your multitenancy servers and take a look at the primary use cases and how it compares to WordPress multisite.
OpenLiteSpeed & Git
OpenLiteSpeed is currently not available for our Git integration or Multitenancy.
About WordPress Multitenancy
Multitenancy is the ideal solution for building a WordPress-based SaaS. Your websites will share a central immutable codebase on a per server basis that’s managed via Git, but will each have their own PHP resources, database, and uploads folder like your regular WordPress websites, and can be scaled independently of one another.
It effectively allows you to build your own WordPress-driven version of a SaaS platform like Wix and Squarespace.
There’s no limit to how many different Git repositories you can use for multitenancy, so you have the ability to offer different website packages, including functionality such as WooCommerce and Learning Management Systems (LMS), which is a notoriously bad idea on WordPress multisite.
Why Use Multitenancy Over WordPress Multisite?
WordPress multisite is a single installation of WordPress where network sites exist as subsites within this single installation. It has one shared database, one system user, and all the sites live together sharing the same resources.
Multitenancy is a solution to the problems that come built-in with multisite/WaaS networks. Unlike multisite, multitenancy shares the same WordPress codebase, but each site within the network has its own PHP user and its own database, keeping them entirely independent from one another.
The WordPress codebase that each site runs off is immutable, making multitenancy sites more secure than even regular WordPress sites, and far more secure than regular multisites. Updates to the WordPress codebase are made via GIT and go out instantly across the network.
This approach allows sites to be split across as many servers as needed, spreading “risk” across many baskets instead of everything being on the same server, same database. You can even add sites to their own individual servers, which means multitenancy also works for WooCommerce and other complex websites which can be a disaster when running inside one multisite installation.
Multitenancy Performance
Multitenancy performance is straightforward. There’s very little difference to managing regular domains, so you can give each individual site the resources they need, you can host them on their own servers if you want to, and scale those servers up as these sites grow.
All the standard advice applies – use higher frequency CPUs, fast RAM, fast storage, etc. You can also tune your PHP workers on a per-site basis, as well as all your other PHP settings. Getting high performance out of your sites isn’t as complicated as most people think. Check out this guide for more information:
About Git
Git is a professional development tool that allows you to develop and update your websites with the additional benefits of version control and a historical record of your code changes.
You can learn more over in the Git section of our knowledge base here.
Summary
- Multitenancy runs on an immutable code base that is managed via Git.
- All multitenancy network sites have their own database, system user, and PHP resources, which means they are isolated from one another and can be scaled individually.
- Multitenancy sites can run on their own individual servers.
- Multitenancy sites are far more secure than a traditional multisite installation due to the immutable codebase, separate databases, separate uploads folder, and server-level isolation.
- Multitenancy is ideal for offering e-commerce and other advanced, resource-intensive functionality that is a nightmare in a traditional multisite installation.
Part 1: GridPane Base "Full" Git Repositories
Before You Begin
This article assumes that you’re familiar with and comfortable with the fundamentals of using Git and that you know how to create and push changes to repositories.
If you’re brand new to Git but are looking for a place to start, please check out this article:
A Beginners Quick Start Guide to Git for WordPress
In part 3 you’ll also find links to two intro videos that also demonstrate the fundamentals, as well as a link to some excellent courses.
Download GridPane’s Base Full Repositories
Before you attach a repository to GridPane, first you need to make sure that your file structure is set up correctly. To assist with this, we’ve created base repo’s that you can fork and use to create your own repos.
Multitenancy uses Full repositories, not Hybrid repositories. Learn more about repo types here.
1. Full Repository: All GridPane Plugins
This repo contains all of our mu-plugins, which includes wpFail2Ban, our SSO plugin, caching plugins, etc. This is an example of a properly configured repo for a site with all our app settings enabled that require these plugins.
You can view/fork/download the full repository here:
https://github.com/GridPane-Dev/gridpane-wordpress-template-all-plugins
Branch: main
2. Full Repository: Basic
This repo is essentially an empty repo with only what you need to begin using our Git integration. You can view/fork/download the full repository here:
https://github.com/GridPane-Dev/gridpane-wordpress-template
Branch: main
Additional Info
Each of the repos contains extensive README.md files on how to work with these repos and our Git integration.
These repos are automatically kept up to date with the latest WordPress version.
Important
Please ensure that your repository does not contain a wp-config.php file. As with regular sites at GridPane, this is stored one level up from the /htdocs directory, and a competing wp-config.php can cause strange behavior and break your sites. Learn more here:
Working with the wp-config.php on GridPane and an introduction to user-configs.php
Public vs Private Repos
Both public and private repos will work with GridPane multitenancy. These are exactly what they sound like – a public repo can be viewed and forked by anyone, and a private repo can only be seen by you and those you give access to.
Using public repos is a simple process – all you need is the public URL and you’re all set.
Private repos require more initial setup but if you’re using any premium plugins or themes, you’ll most likely want to use a private repository.
Multitenancy uses the same structure as regular Git websites, and you can learn more about configuring Git repositories for your GridPane websites in this article:
How to Configure Git Repositories for GridPane Hosted Websites
Once you’ve configured your repository you can proceed with the steps below.
Part 2: Add Your Repository to GridPane
1. Add a Repo
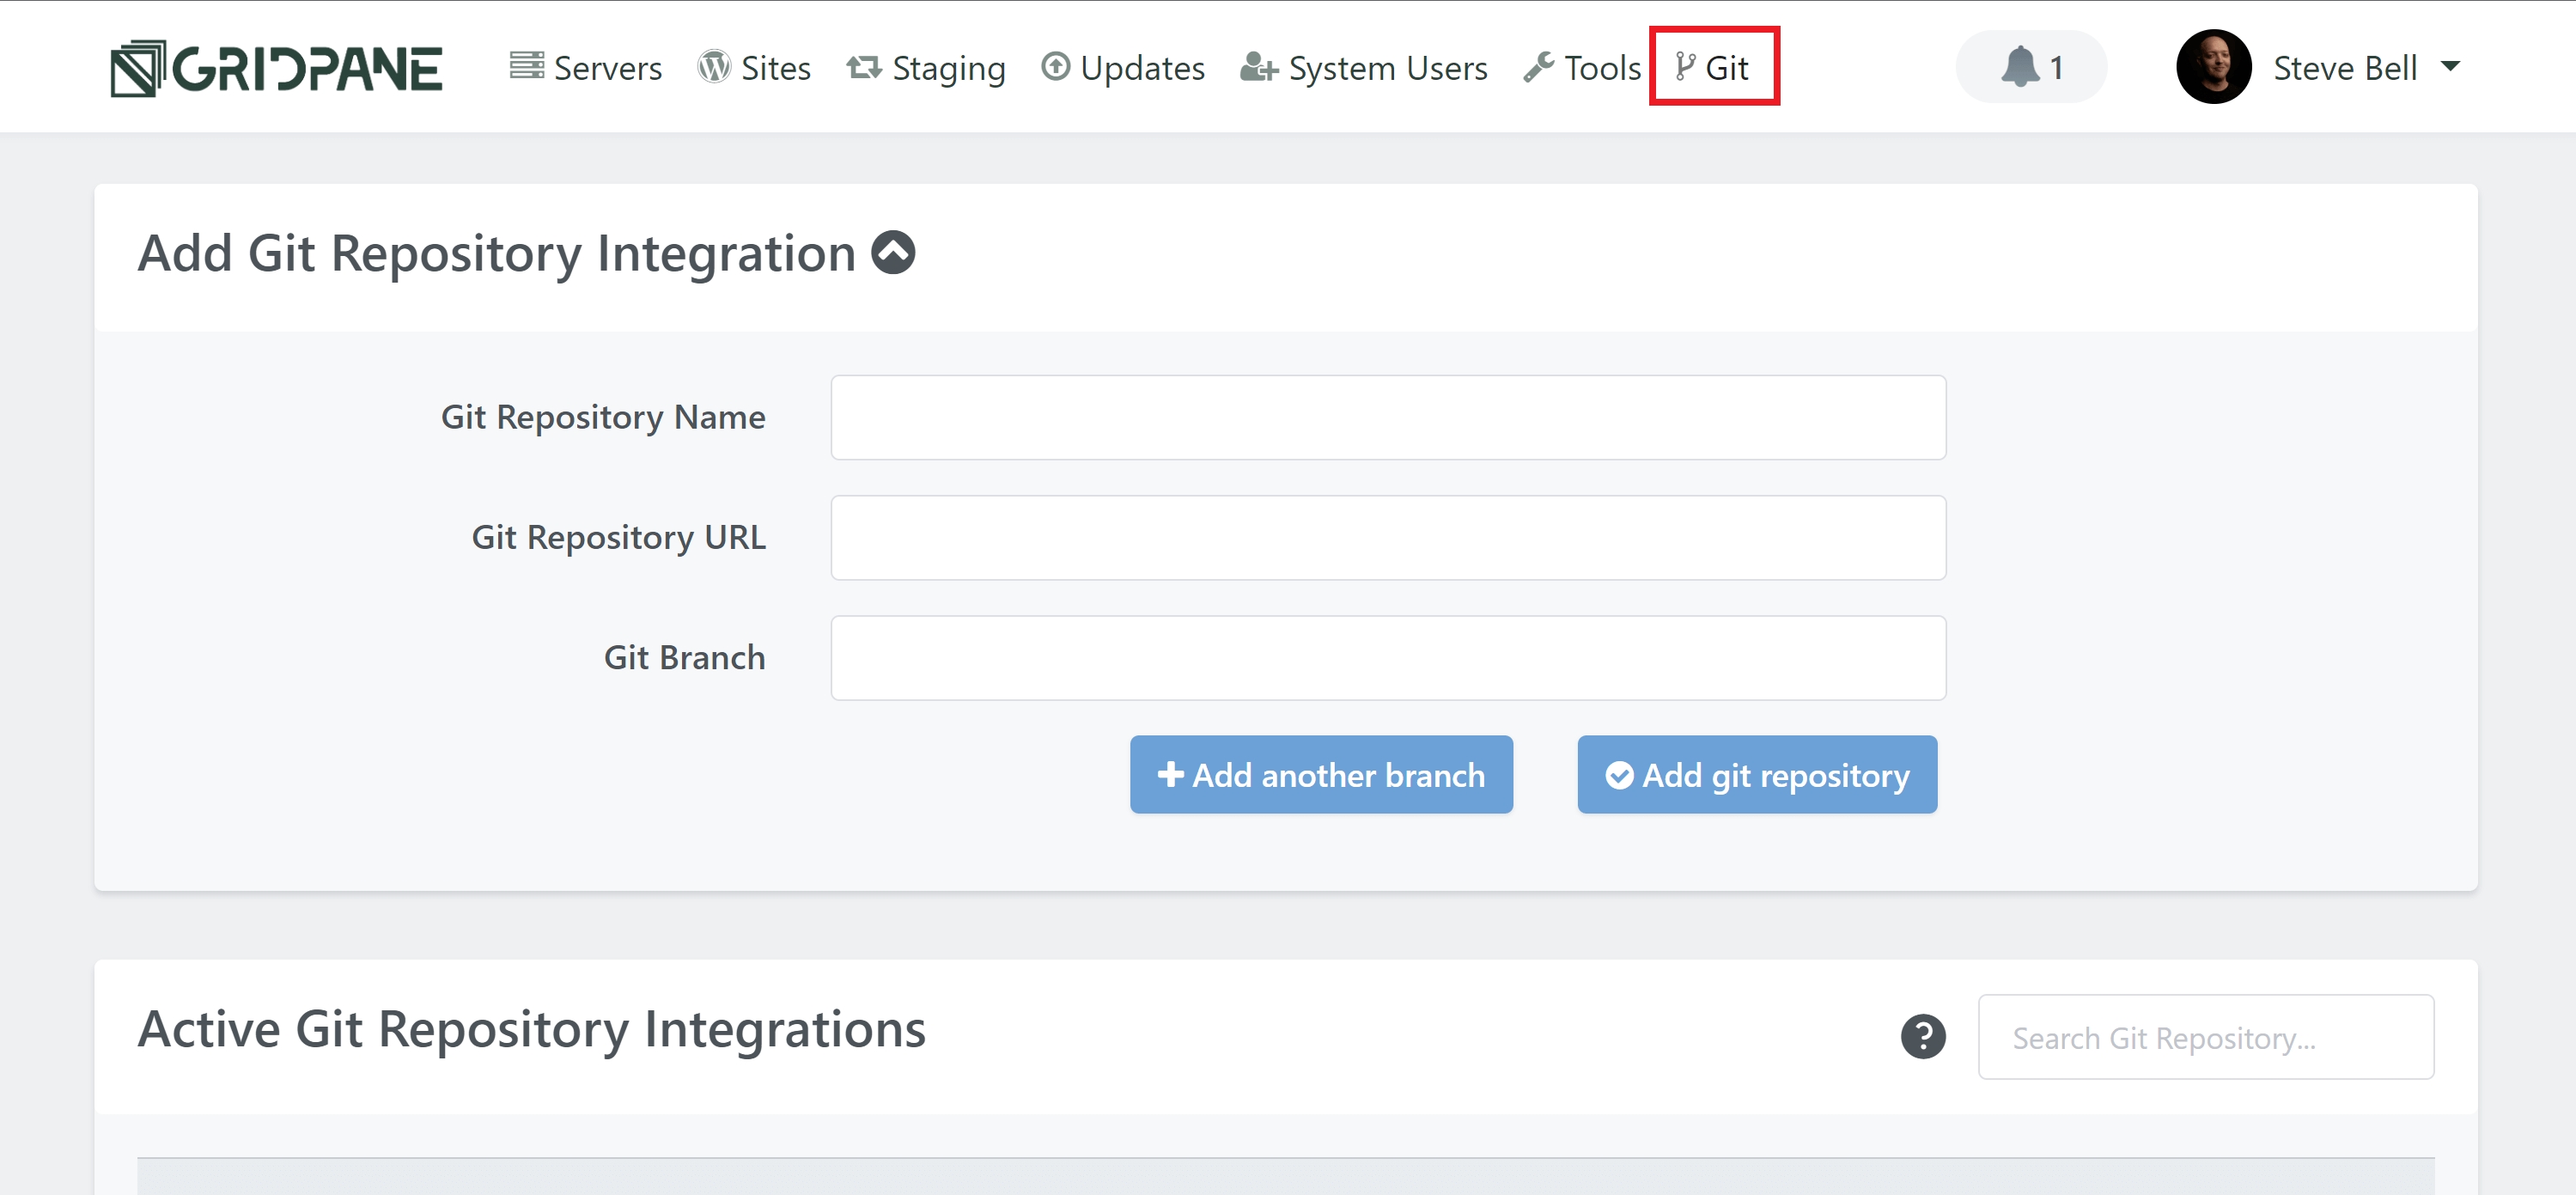
Inside your GridPane dashboard, navigate to the Git page. Here you can add your Git repositories and branches (you will need to add at least one branch in the beginning, but you can easily add more in the future).
Next, add your repo. Please note that:
- Your repo names need to be unique and can’t contain spaces
- URLs need to be unique
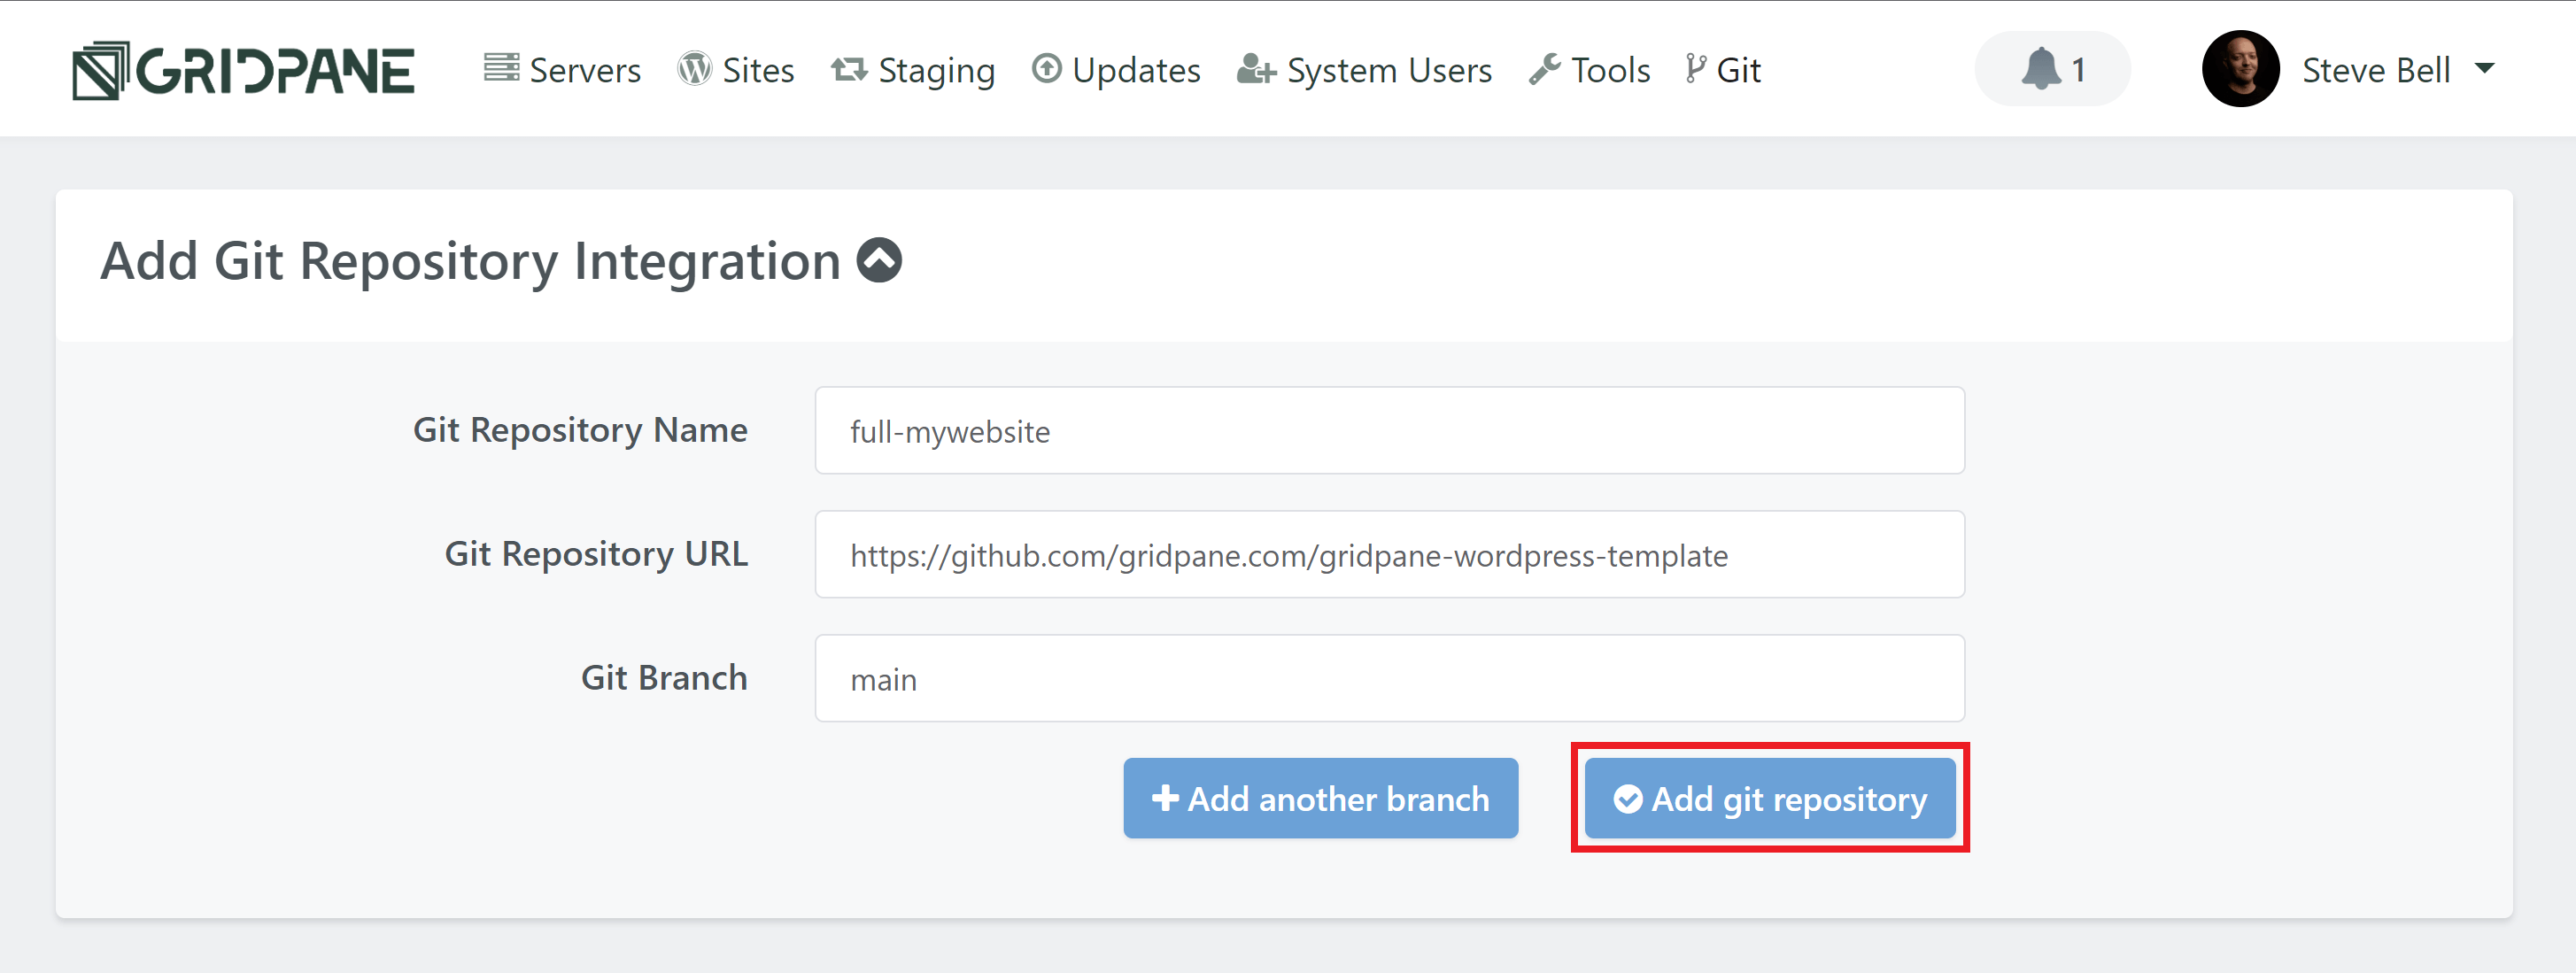
Fill in your repository name, repository URL, and Git branch name, for example:
If you would like to add additional branches, click the Add another branch button. Once you’ve entered all your details, click the Add Git repository button.
Once added, you can see and manage your different branches in the Active Git Repository Integrations section below.
2. The Git Integration Manager
On the Git page in your account, click the cog to open the manager:
Here you can update the integration name, and if no sites o servers have been connected to the repository yet you can also update the URL.
On the Deployed Branches tab, you can manage the branches associated with the repo.
On the Connected Multitenancy Servers tab, you can see the servers connected to this repo:
Part 3: Convert Your Server to Multitenancy
Add Your Git Repo to Your Server
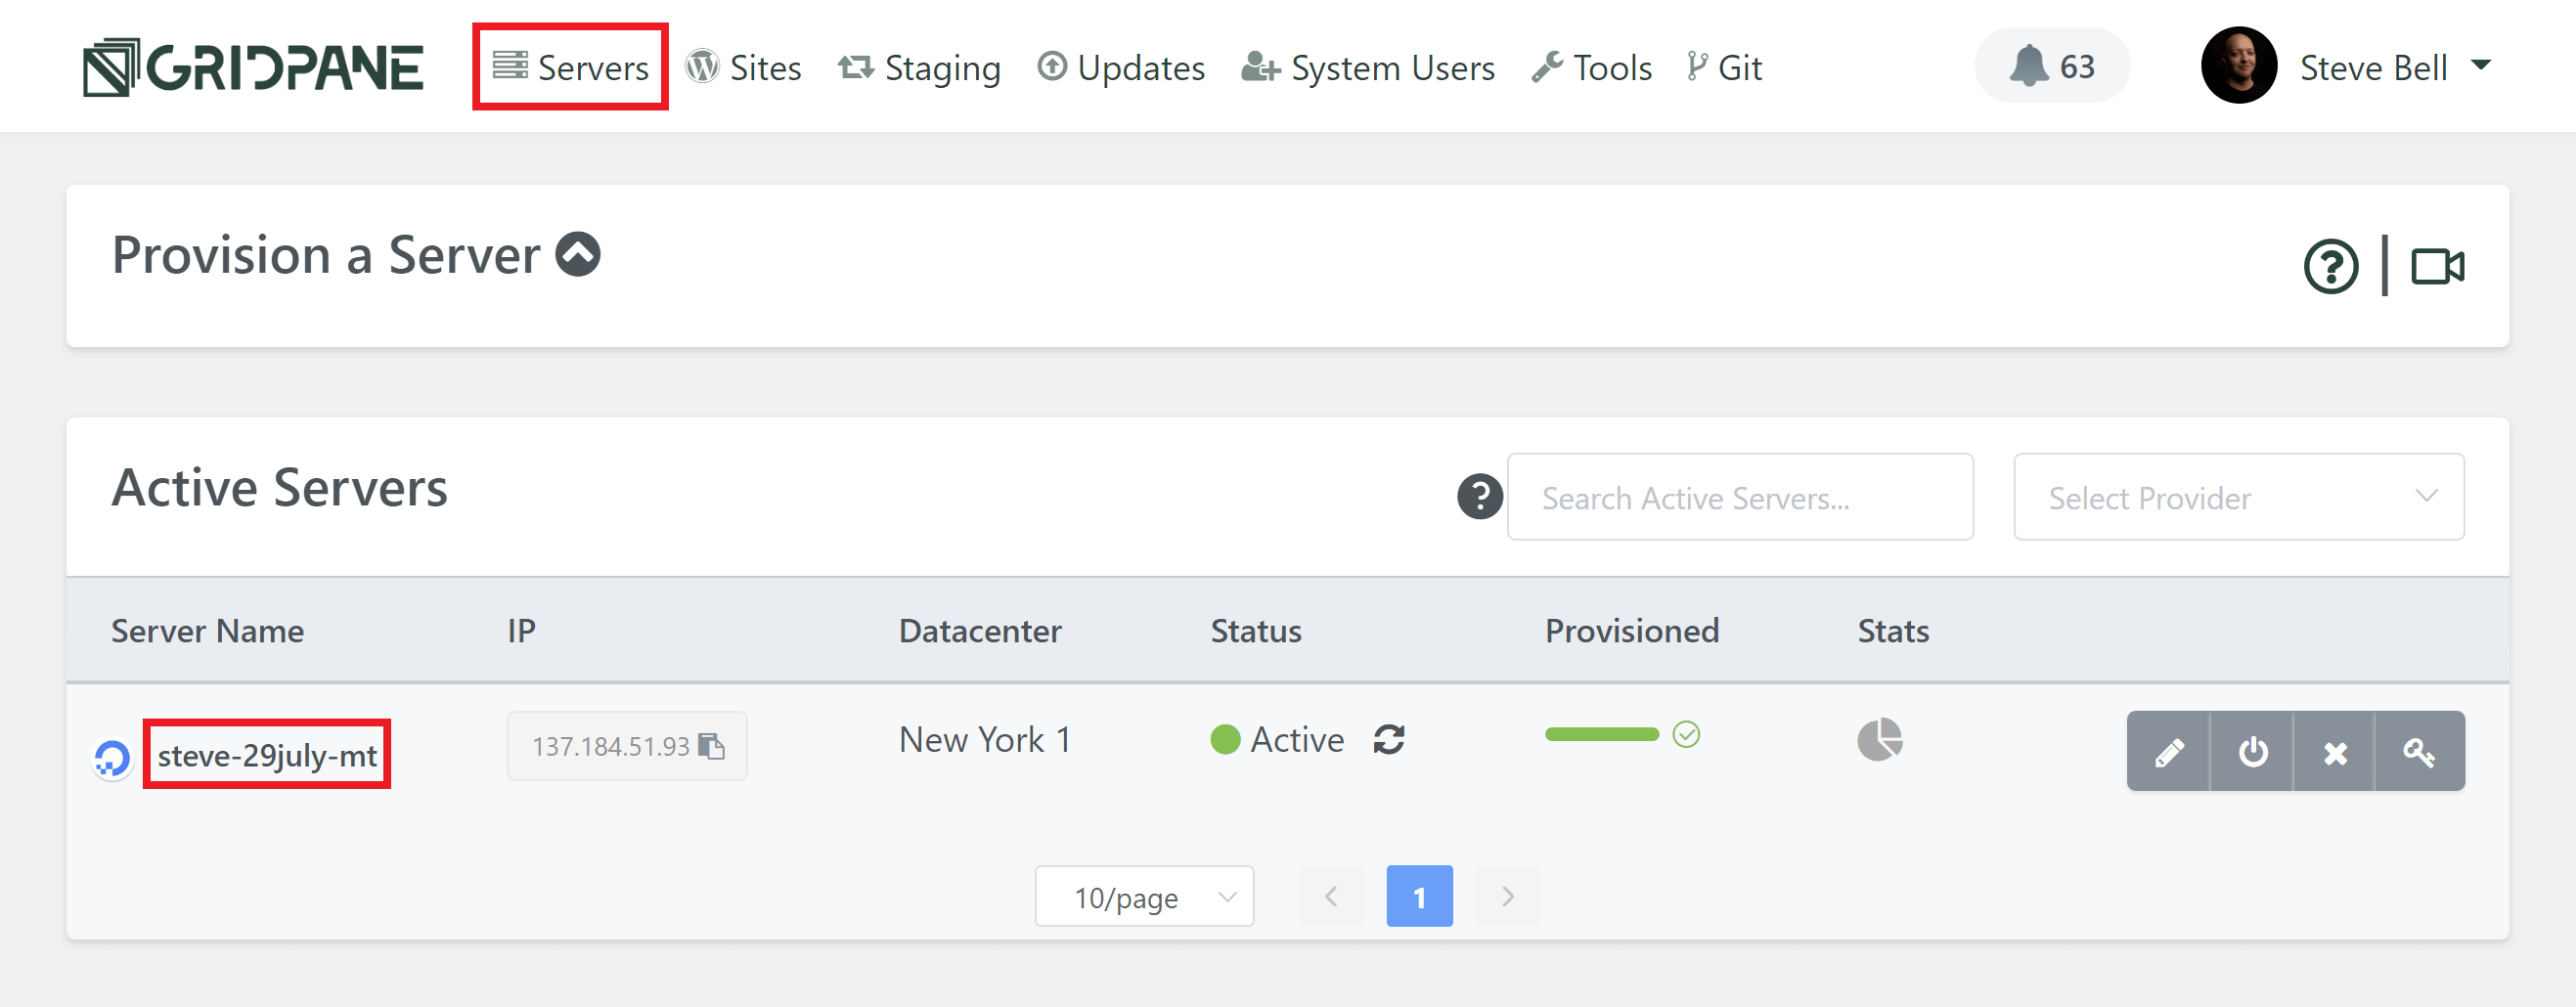
Head over to the Servers page inside your account and click on the server you wish to convert to a multitenancy server:
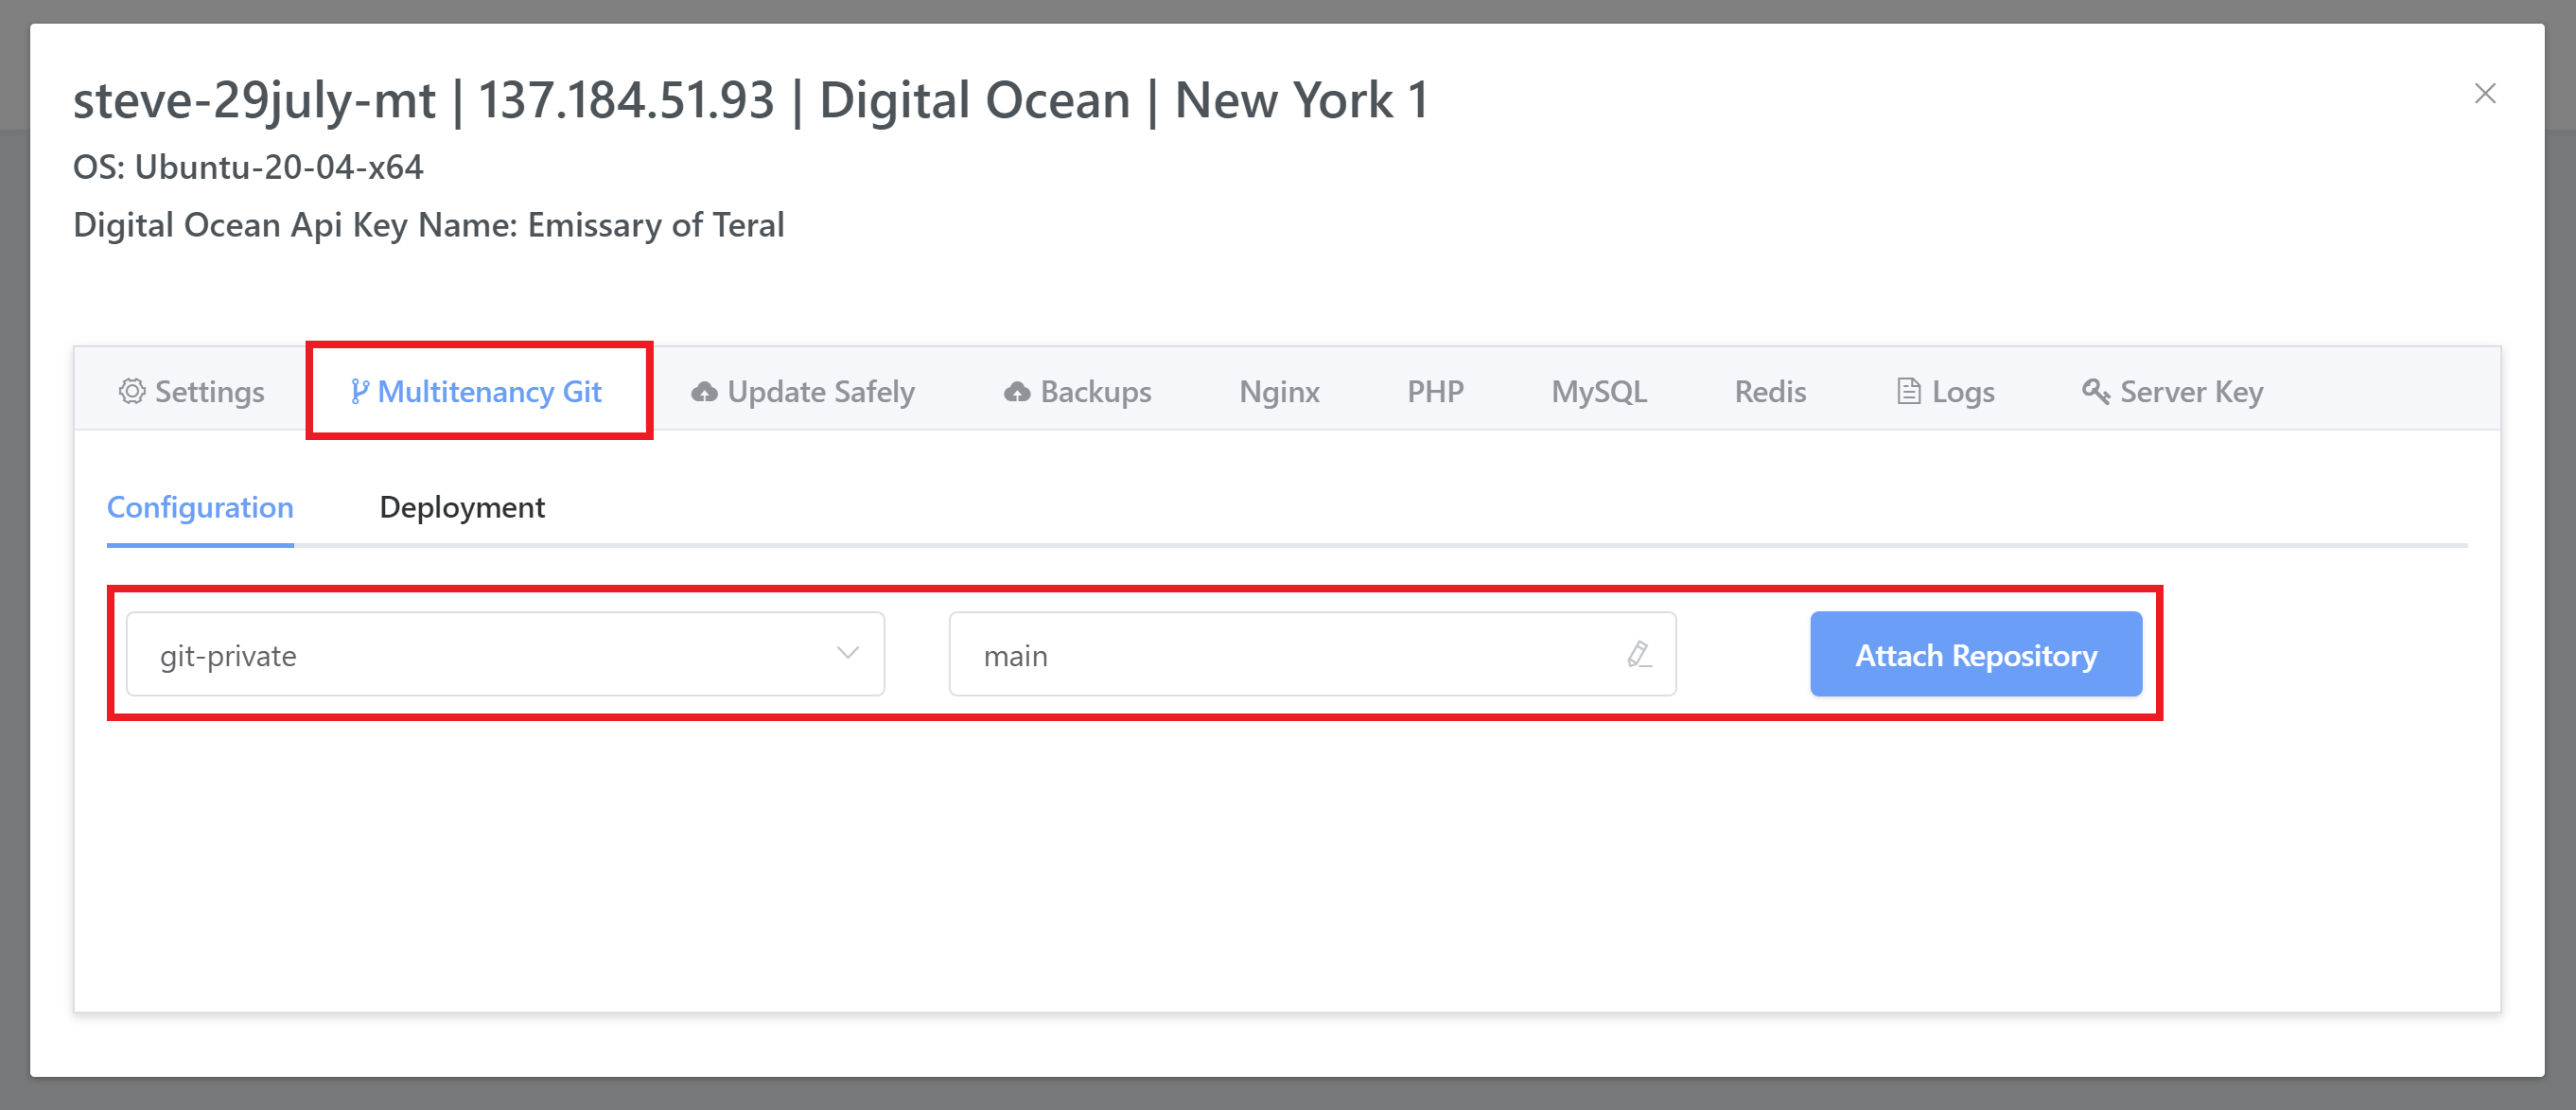
Inside the server customizer click through to the Multitenancy Git tab. Here you can select the Git repository you’ve set up in the previous steps. Once selected click the Attach Repository button:
Note that this can only be done if there are no websites on the server. Also, once a server has been converted to a multitenancy server, this action cannot be undone.
Part 4: Git Deployments
1. First Deployment
Your first deployment will automatically take place once you add your repository to your server. The websites you create on this server will now all automatically use the WordPress codebase in this repo.
2. Run Manual Deployments
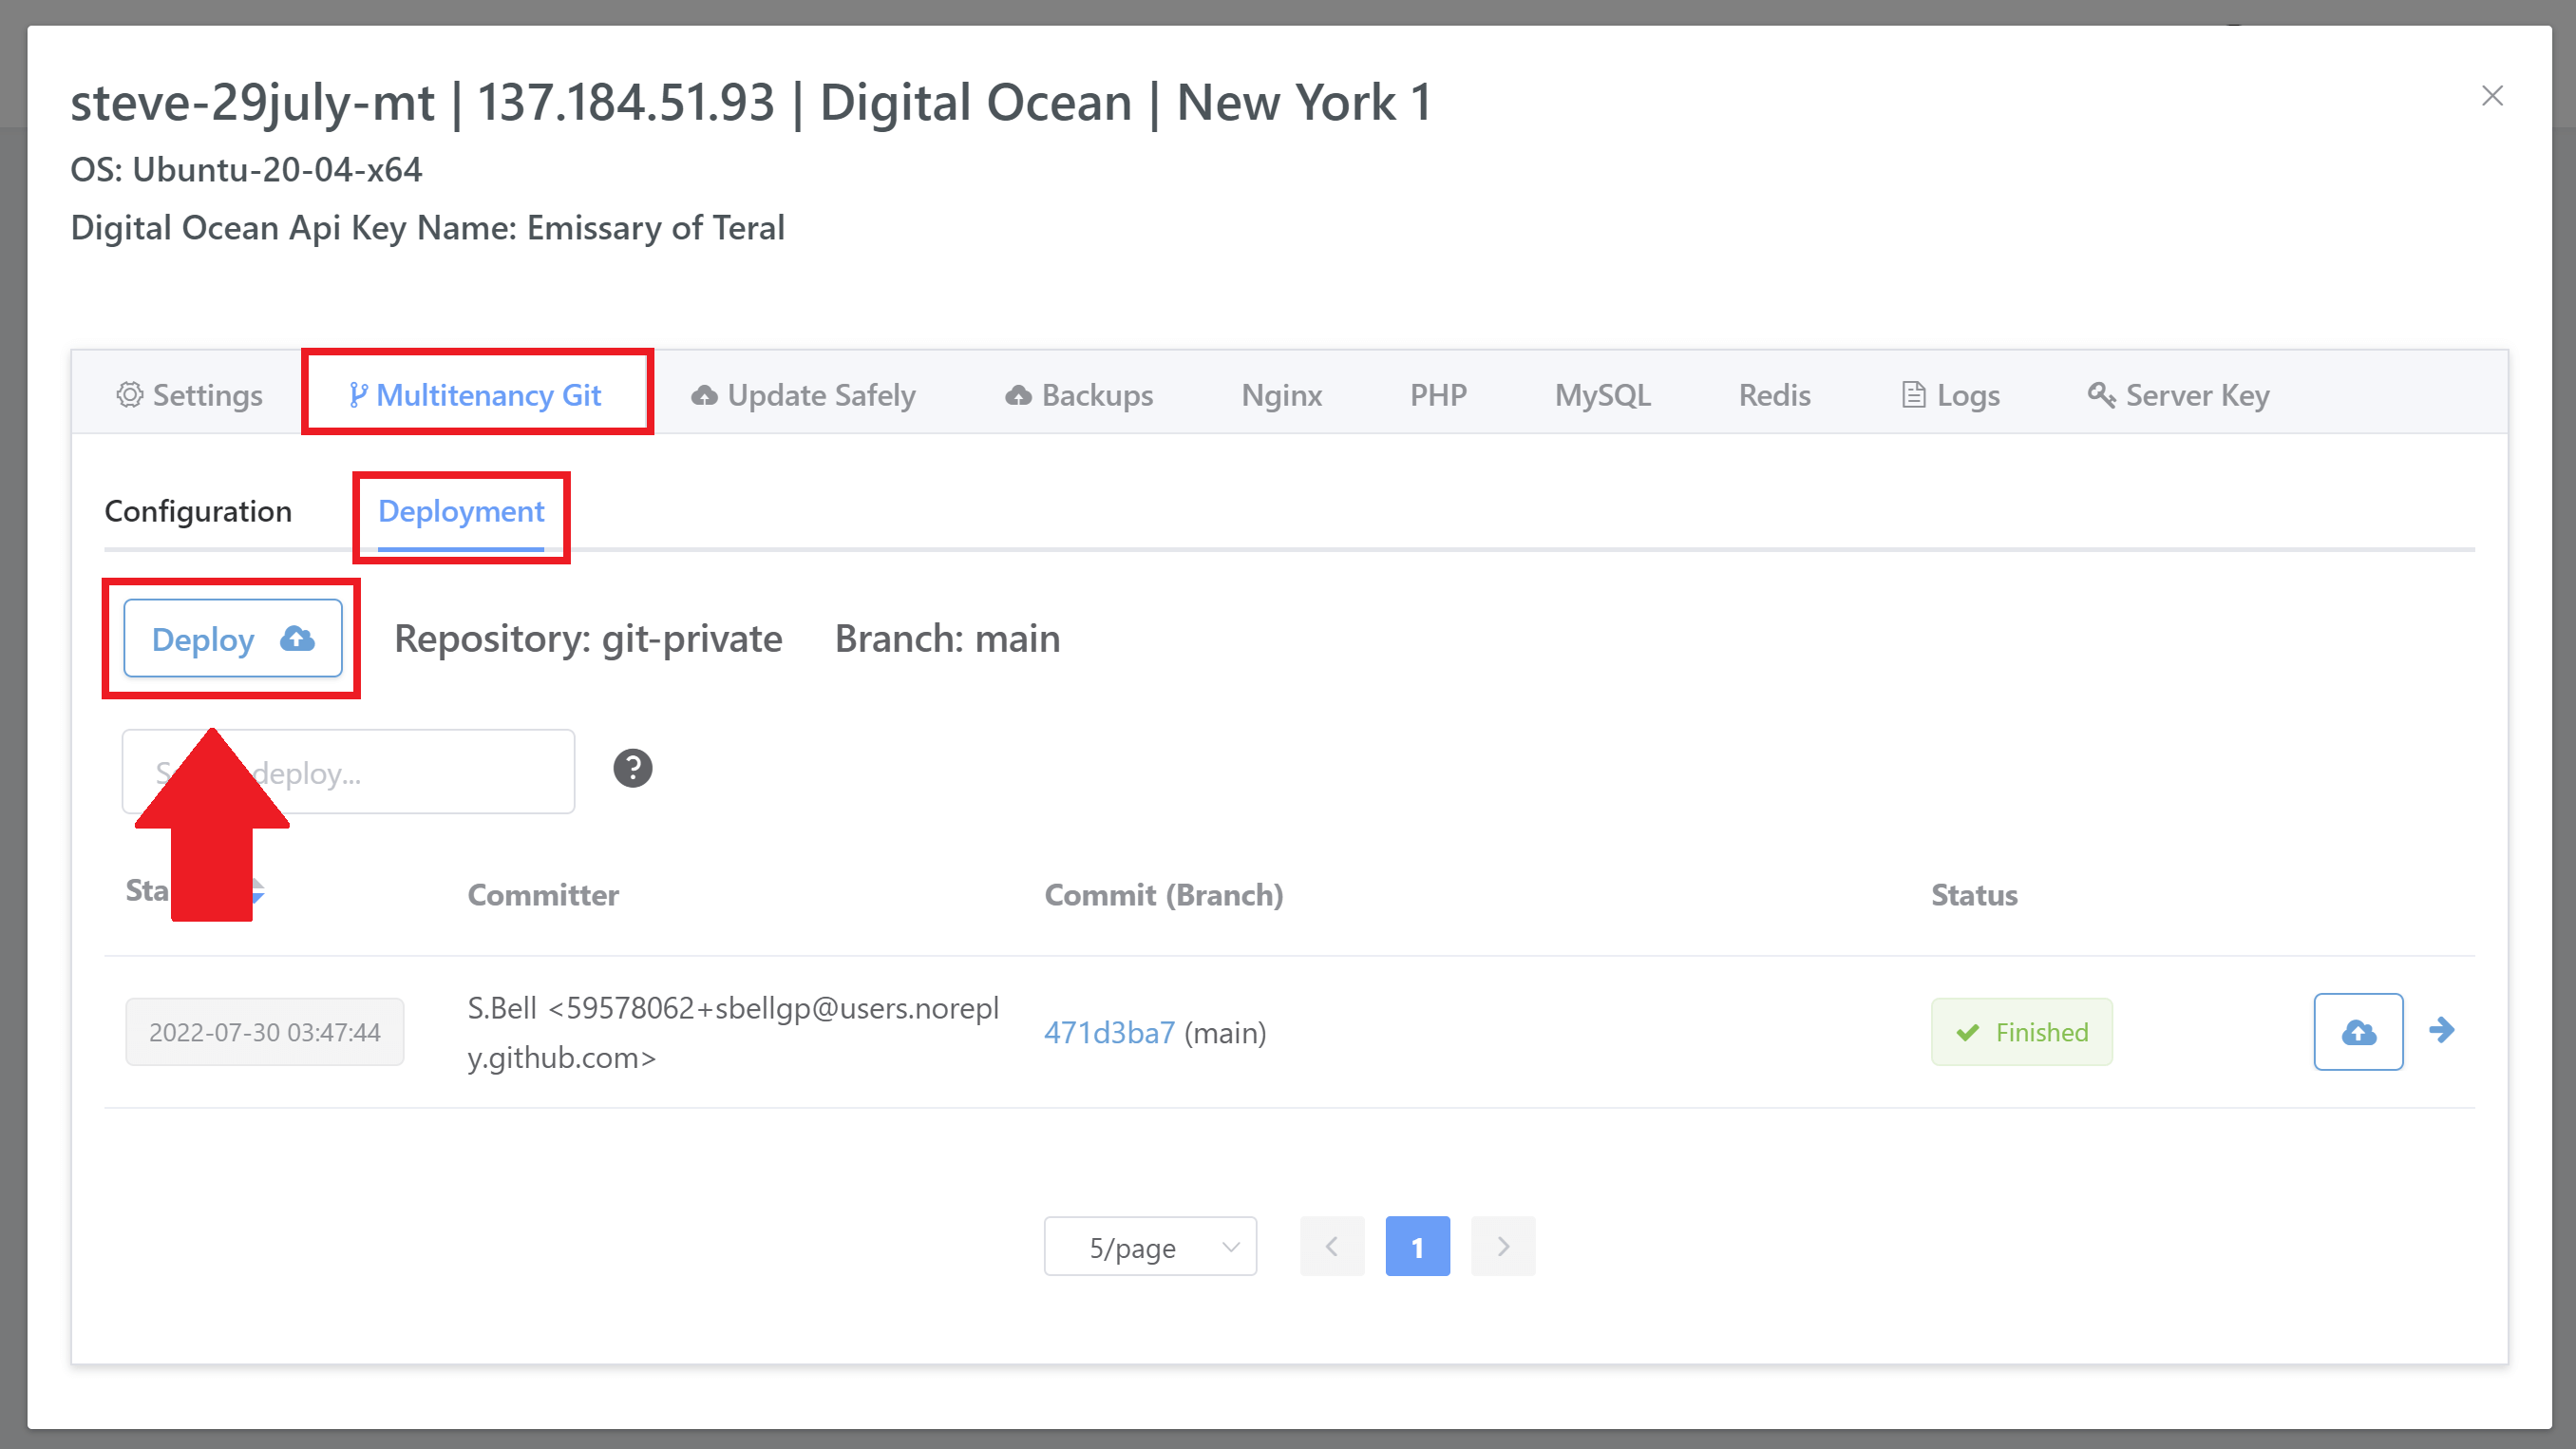
Manual deployments can be ran from the server customizer inside the Multitenancy Git > Deployments tab:
Once you’ve committed new changes to your repo you can manually deploy them by clicking the Deploy button highlighted in the image above.
If you want to redeploy any previously deployed commit then you can also do this from here as well.
3. Run Automated Deployments – Push to Deploy
Step 1. Get Your Push to Deploy Webhook
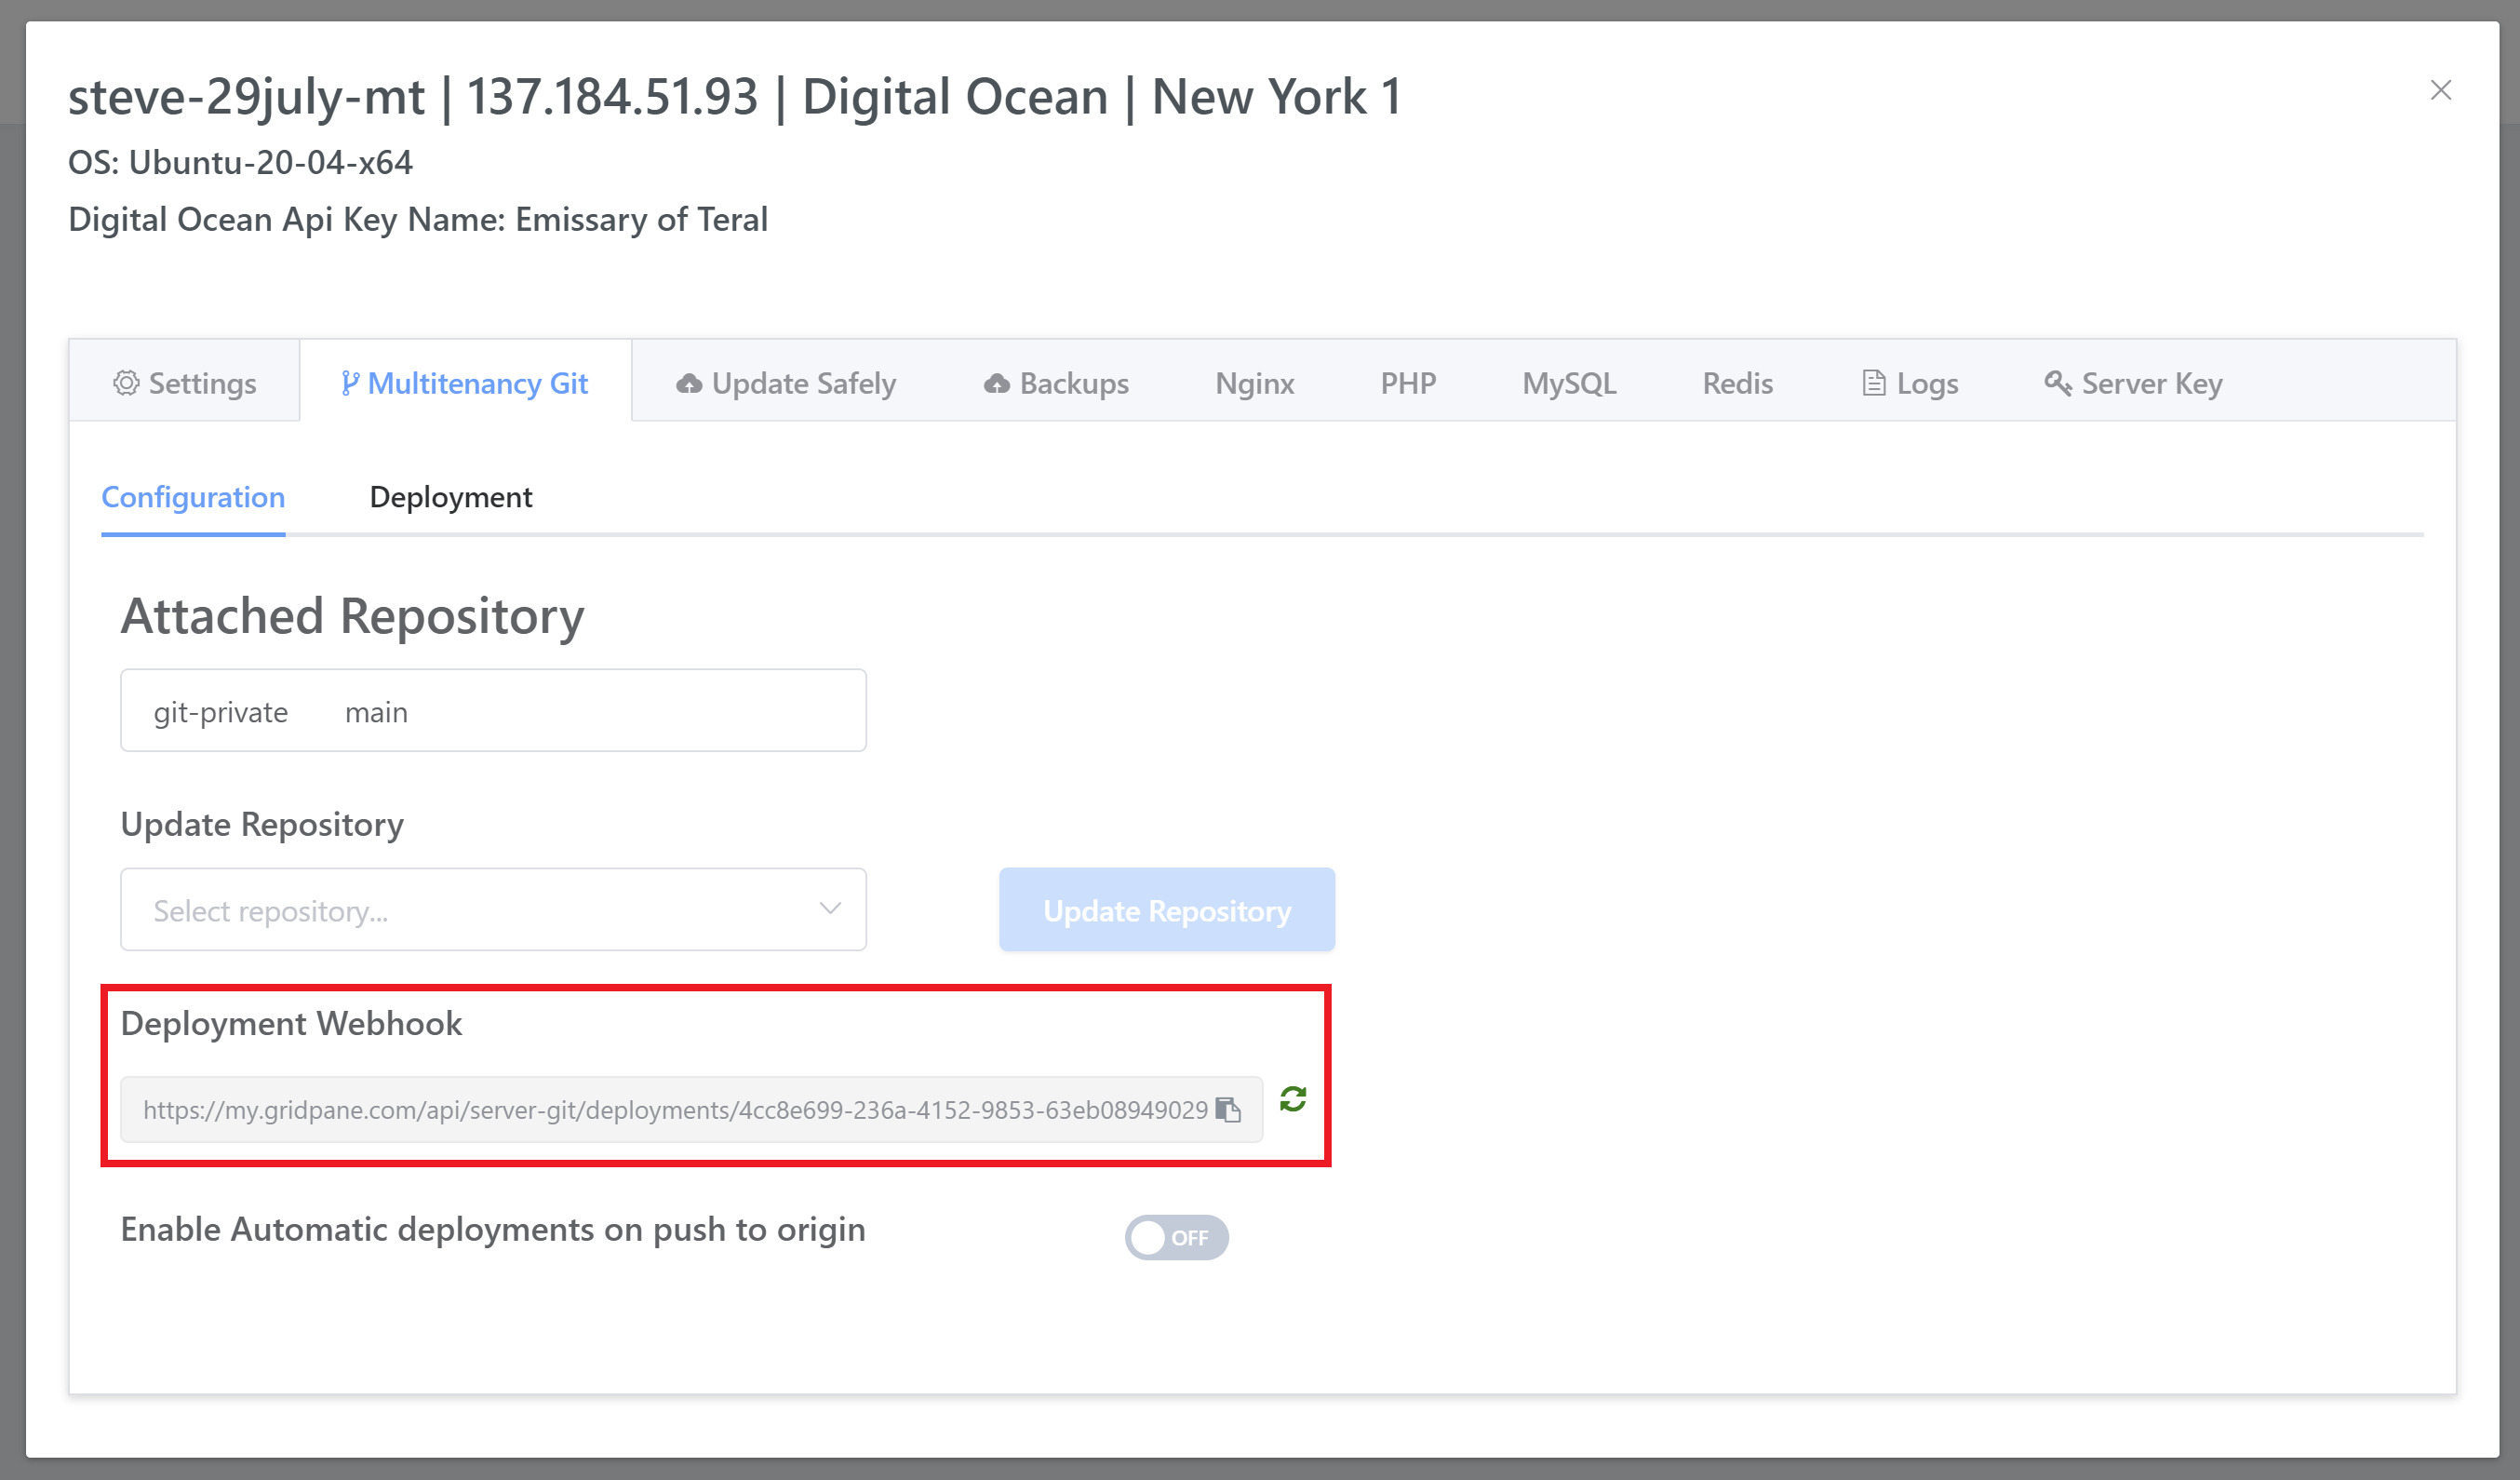
You can find your webhook inside the server customizer Multitenancy Git tab.
Under Configuration, you will see the Git deployment hook with a copy/paste symbol:
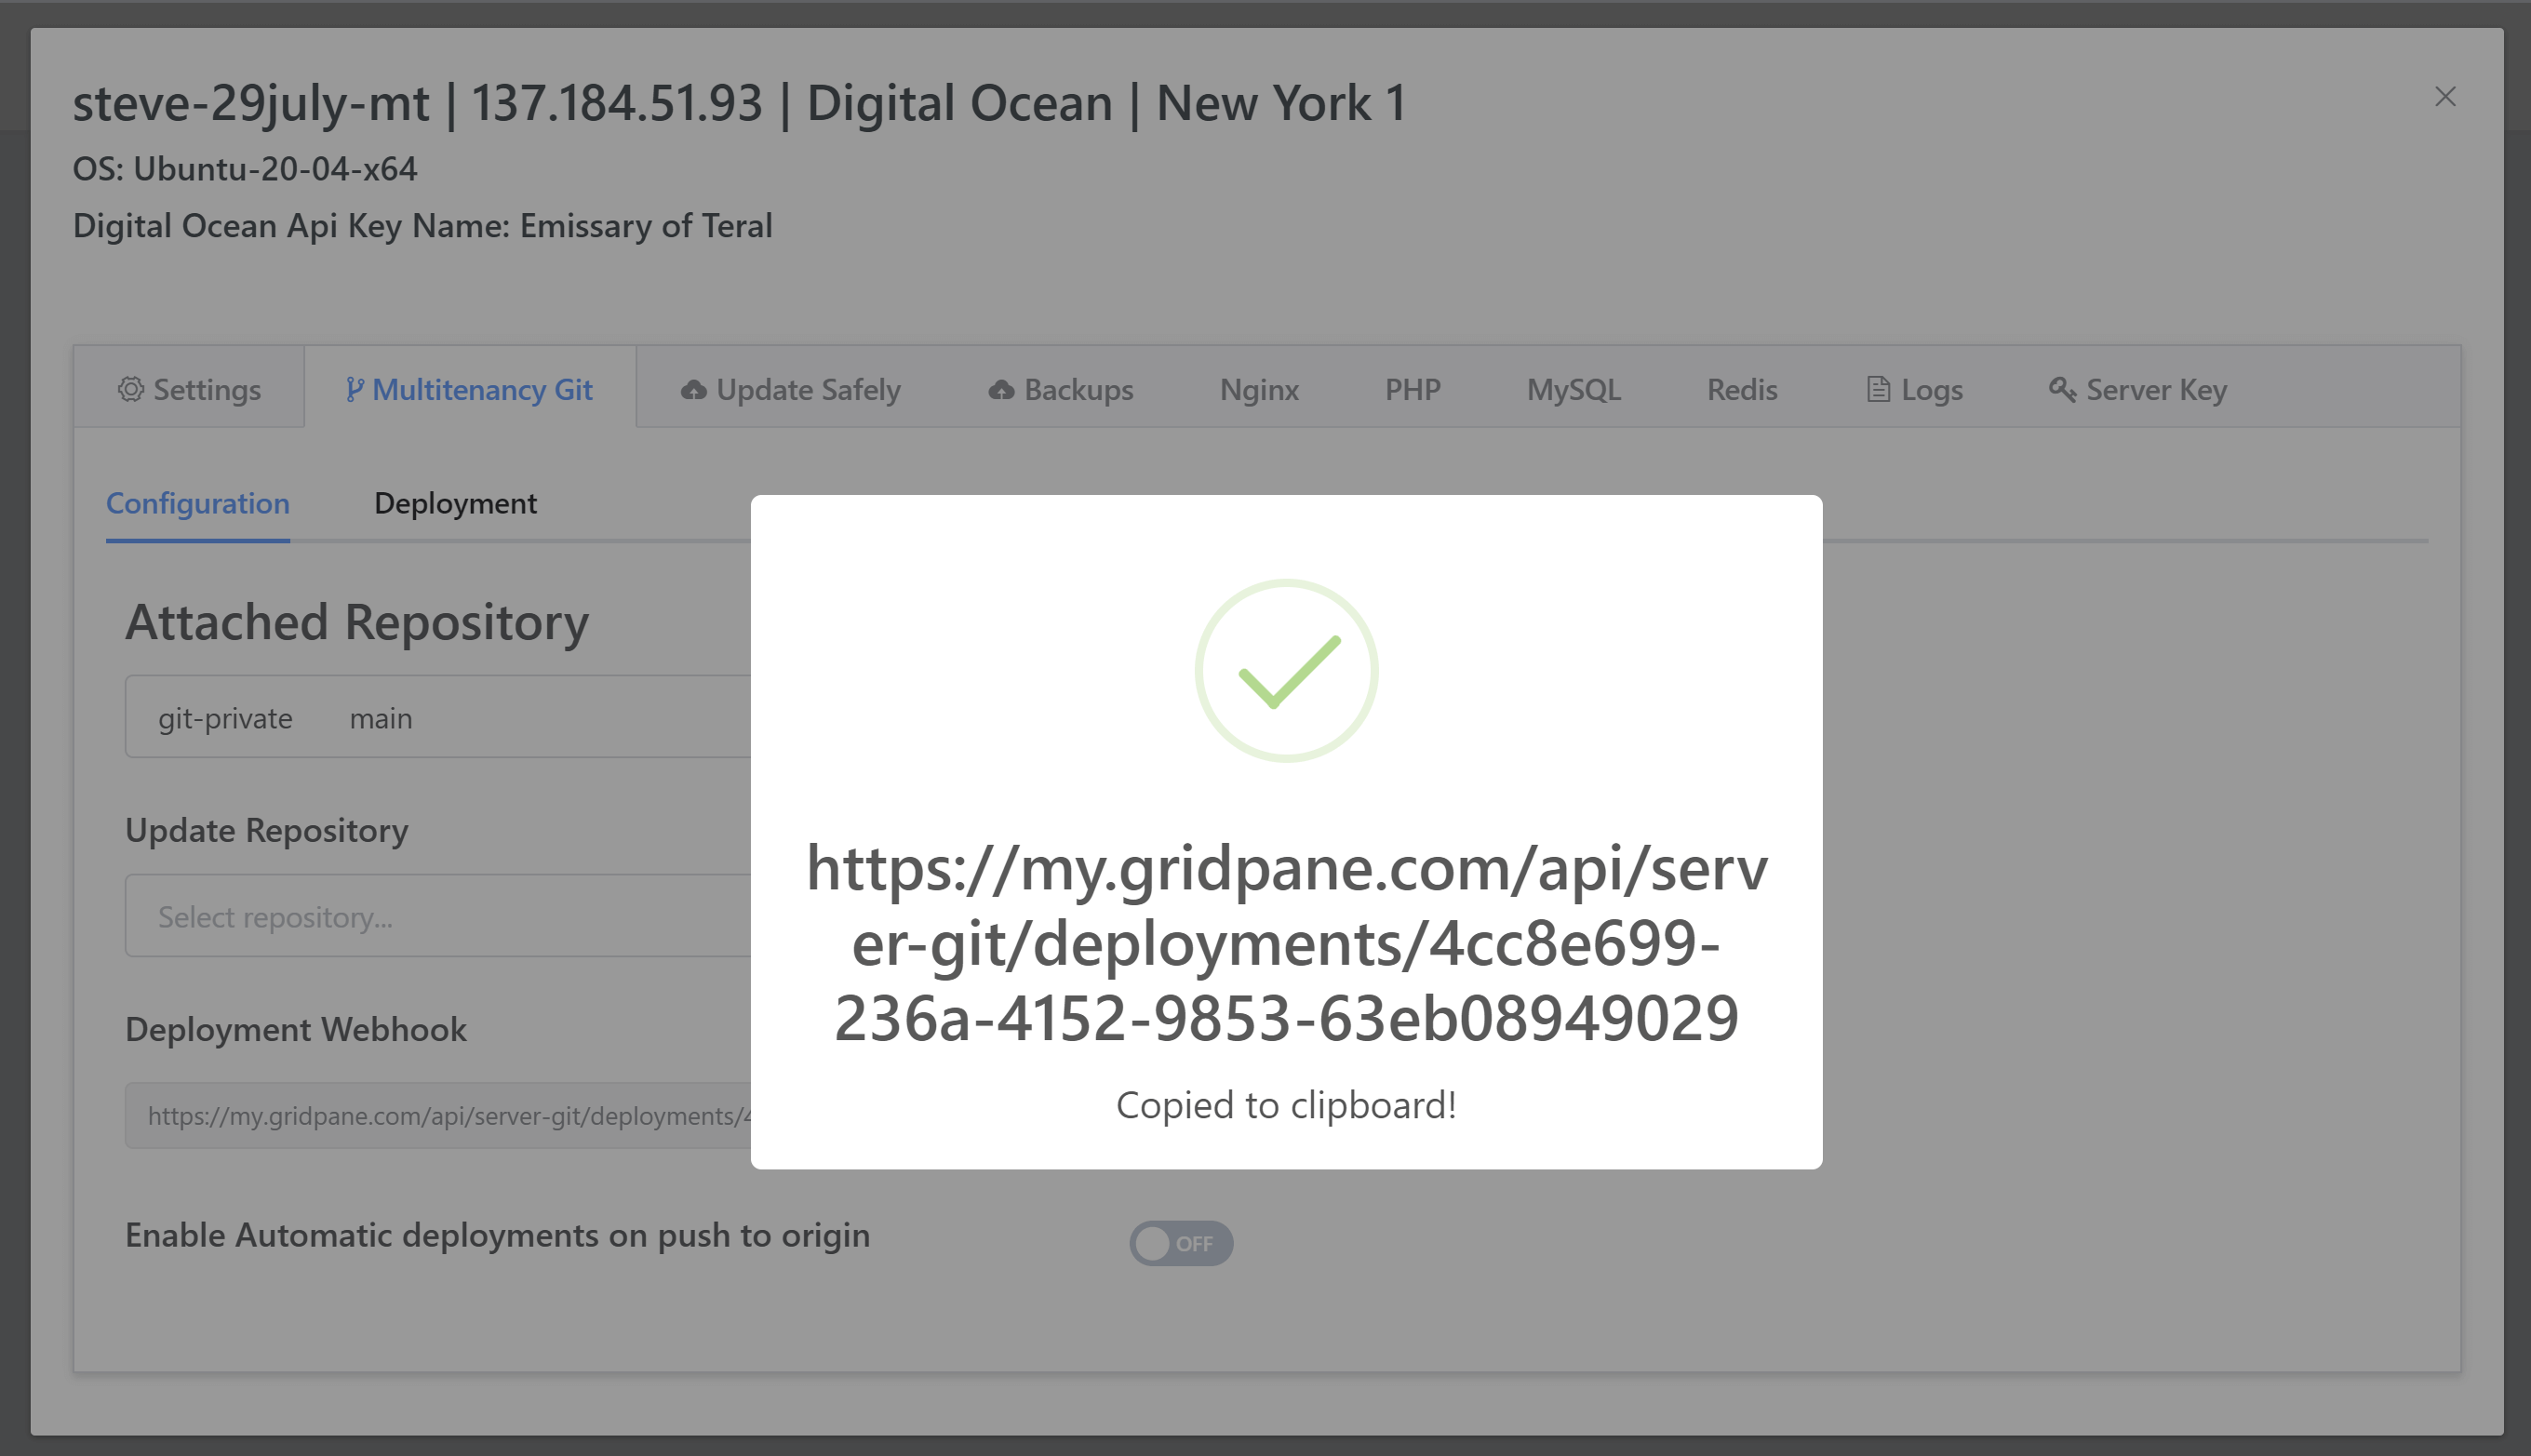
If you click on this it will copy your deployment webhook to your pasteboard, for example:
https://my.gridpane.com/api/site-git/deployments/4f478219-1234-abcd-a829-b3d1b47ol473
Step 2. Add your webhook to your Git repo
At your hosted Git provider there will be a section to configure the platform to hit a webhook whenever an event such as a push to your repo occurs.
For demonstration purposes, we will use GitHub as the example.
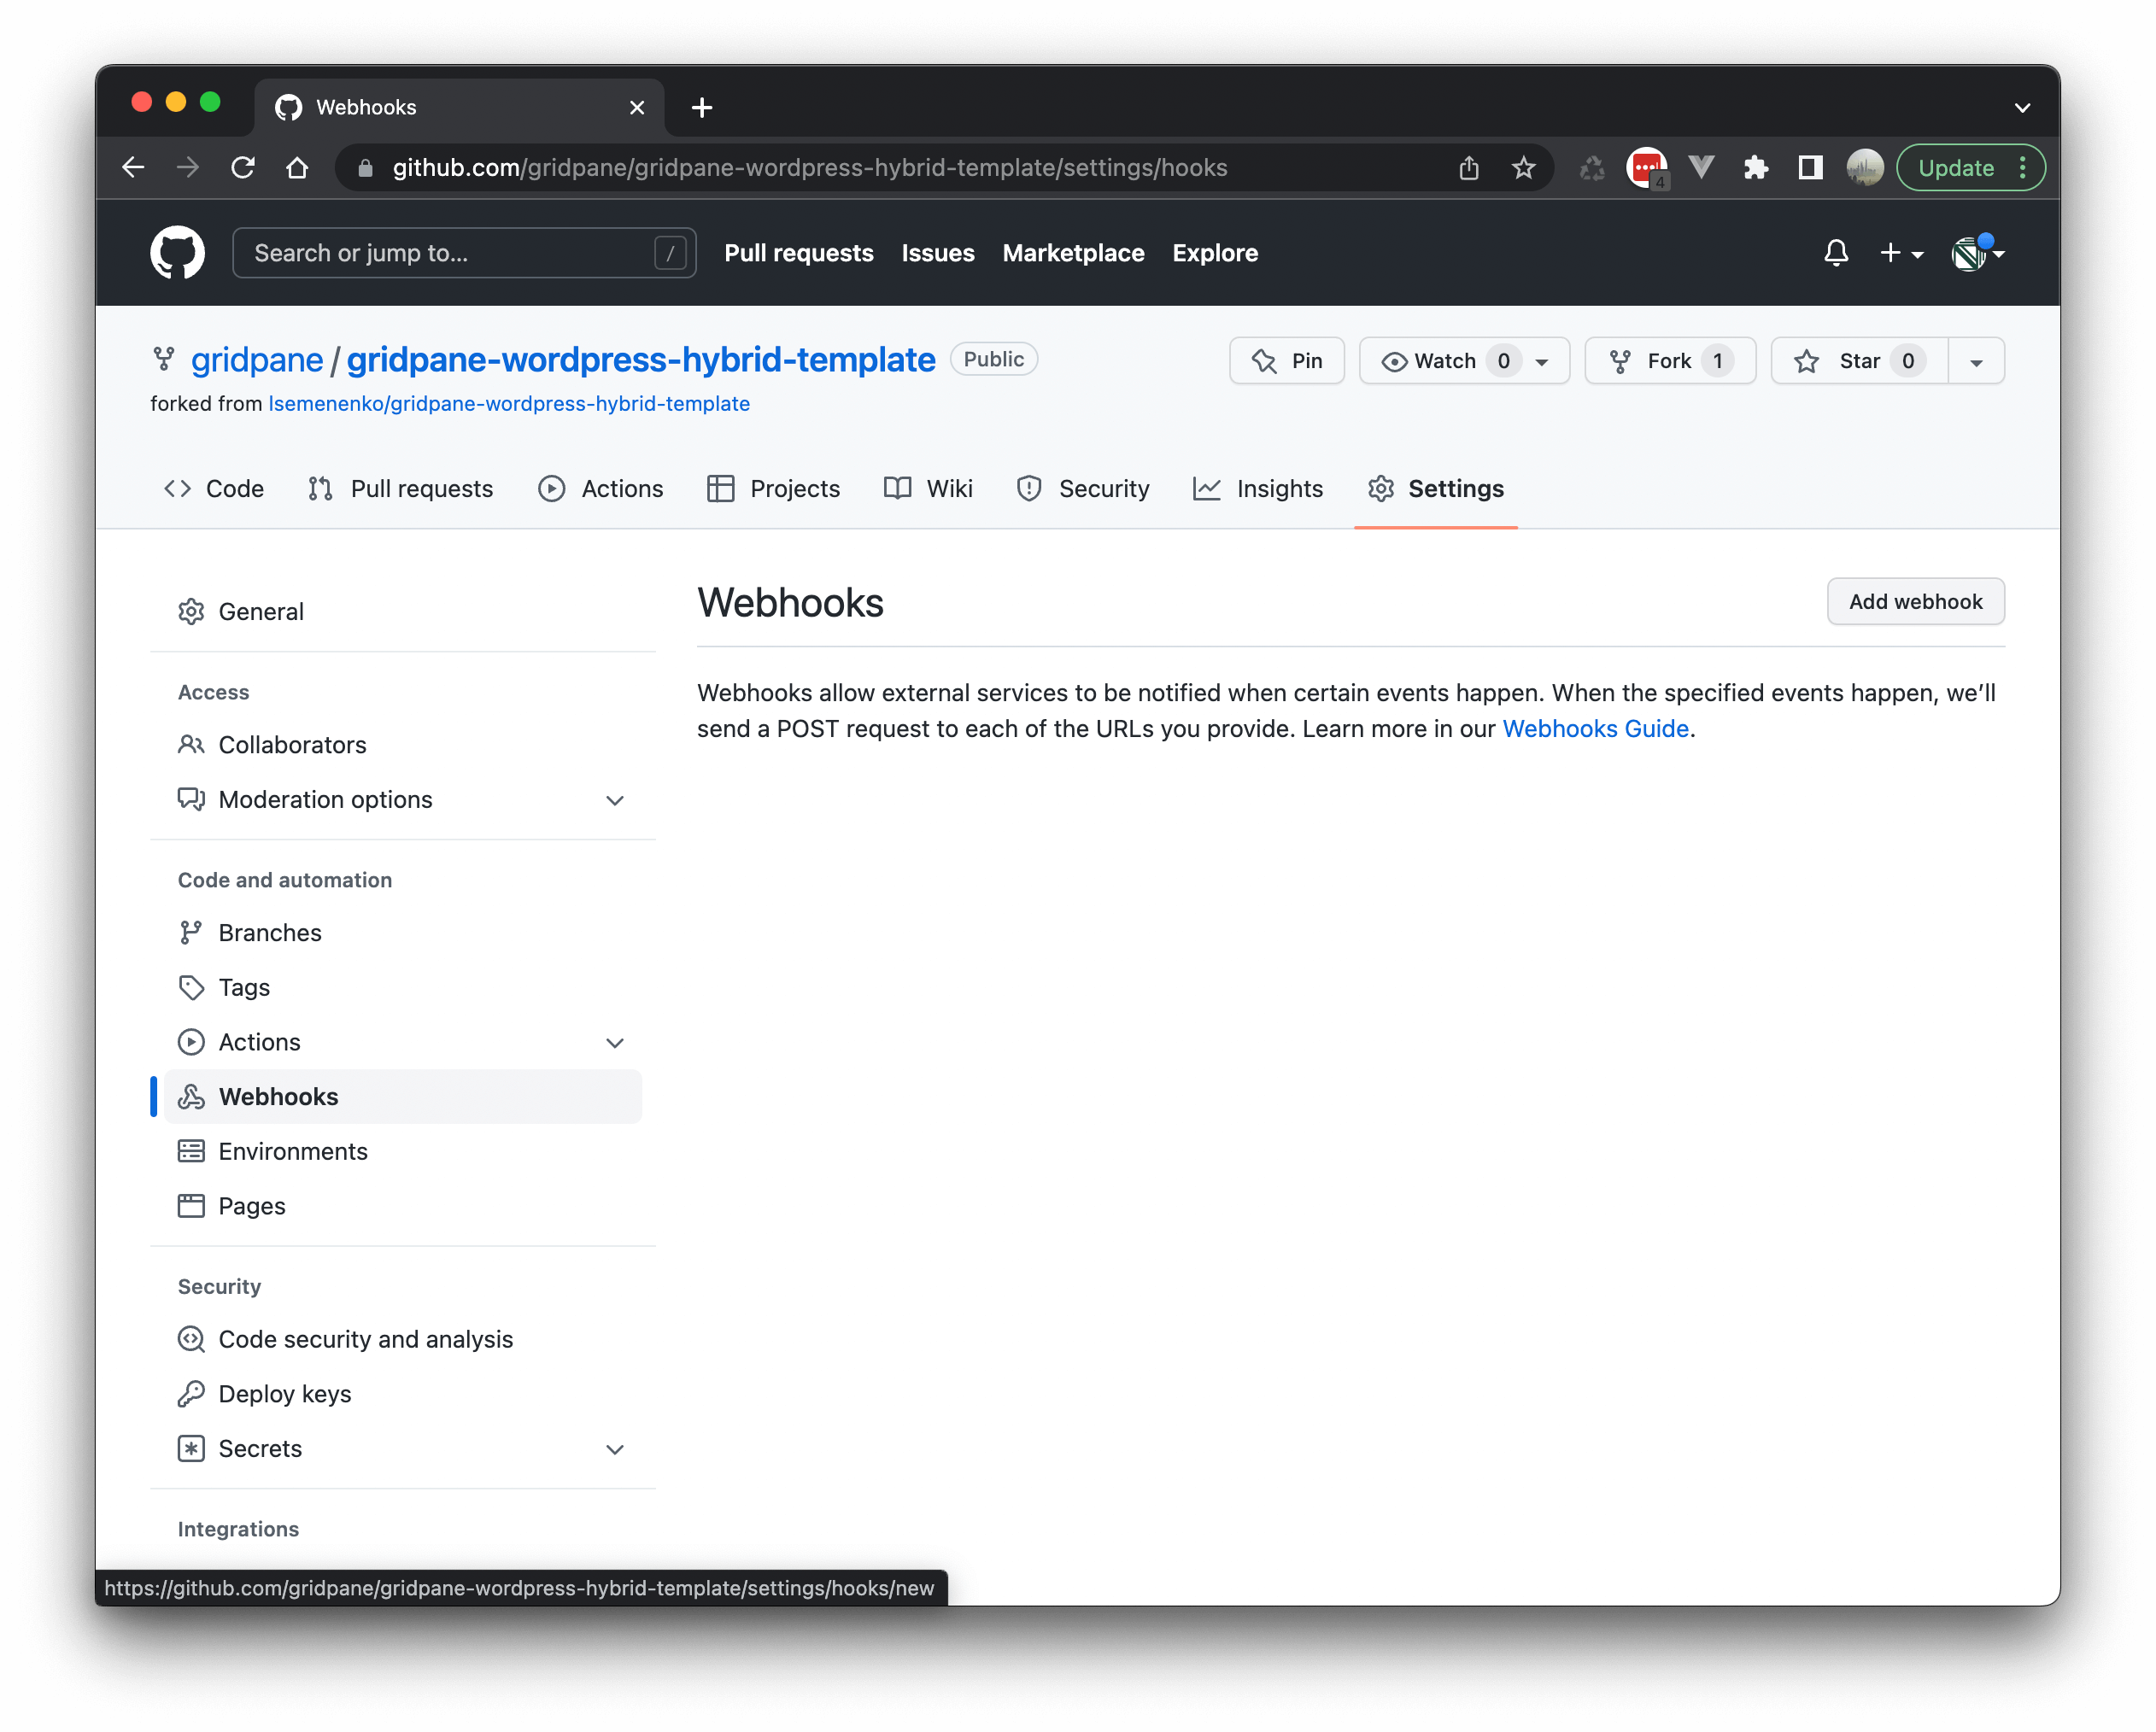
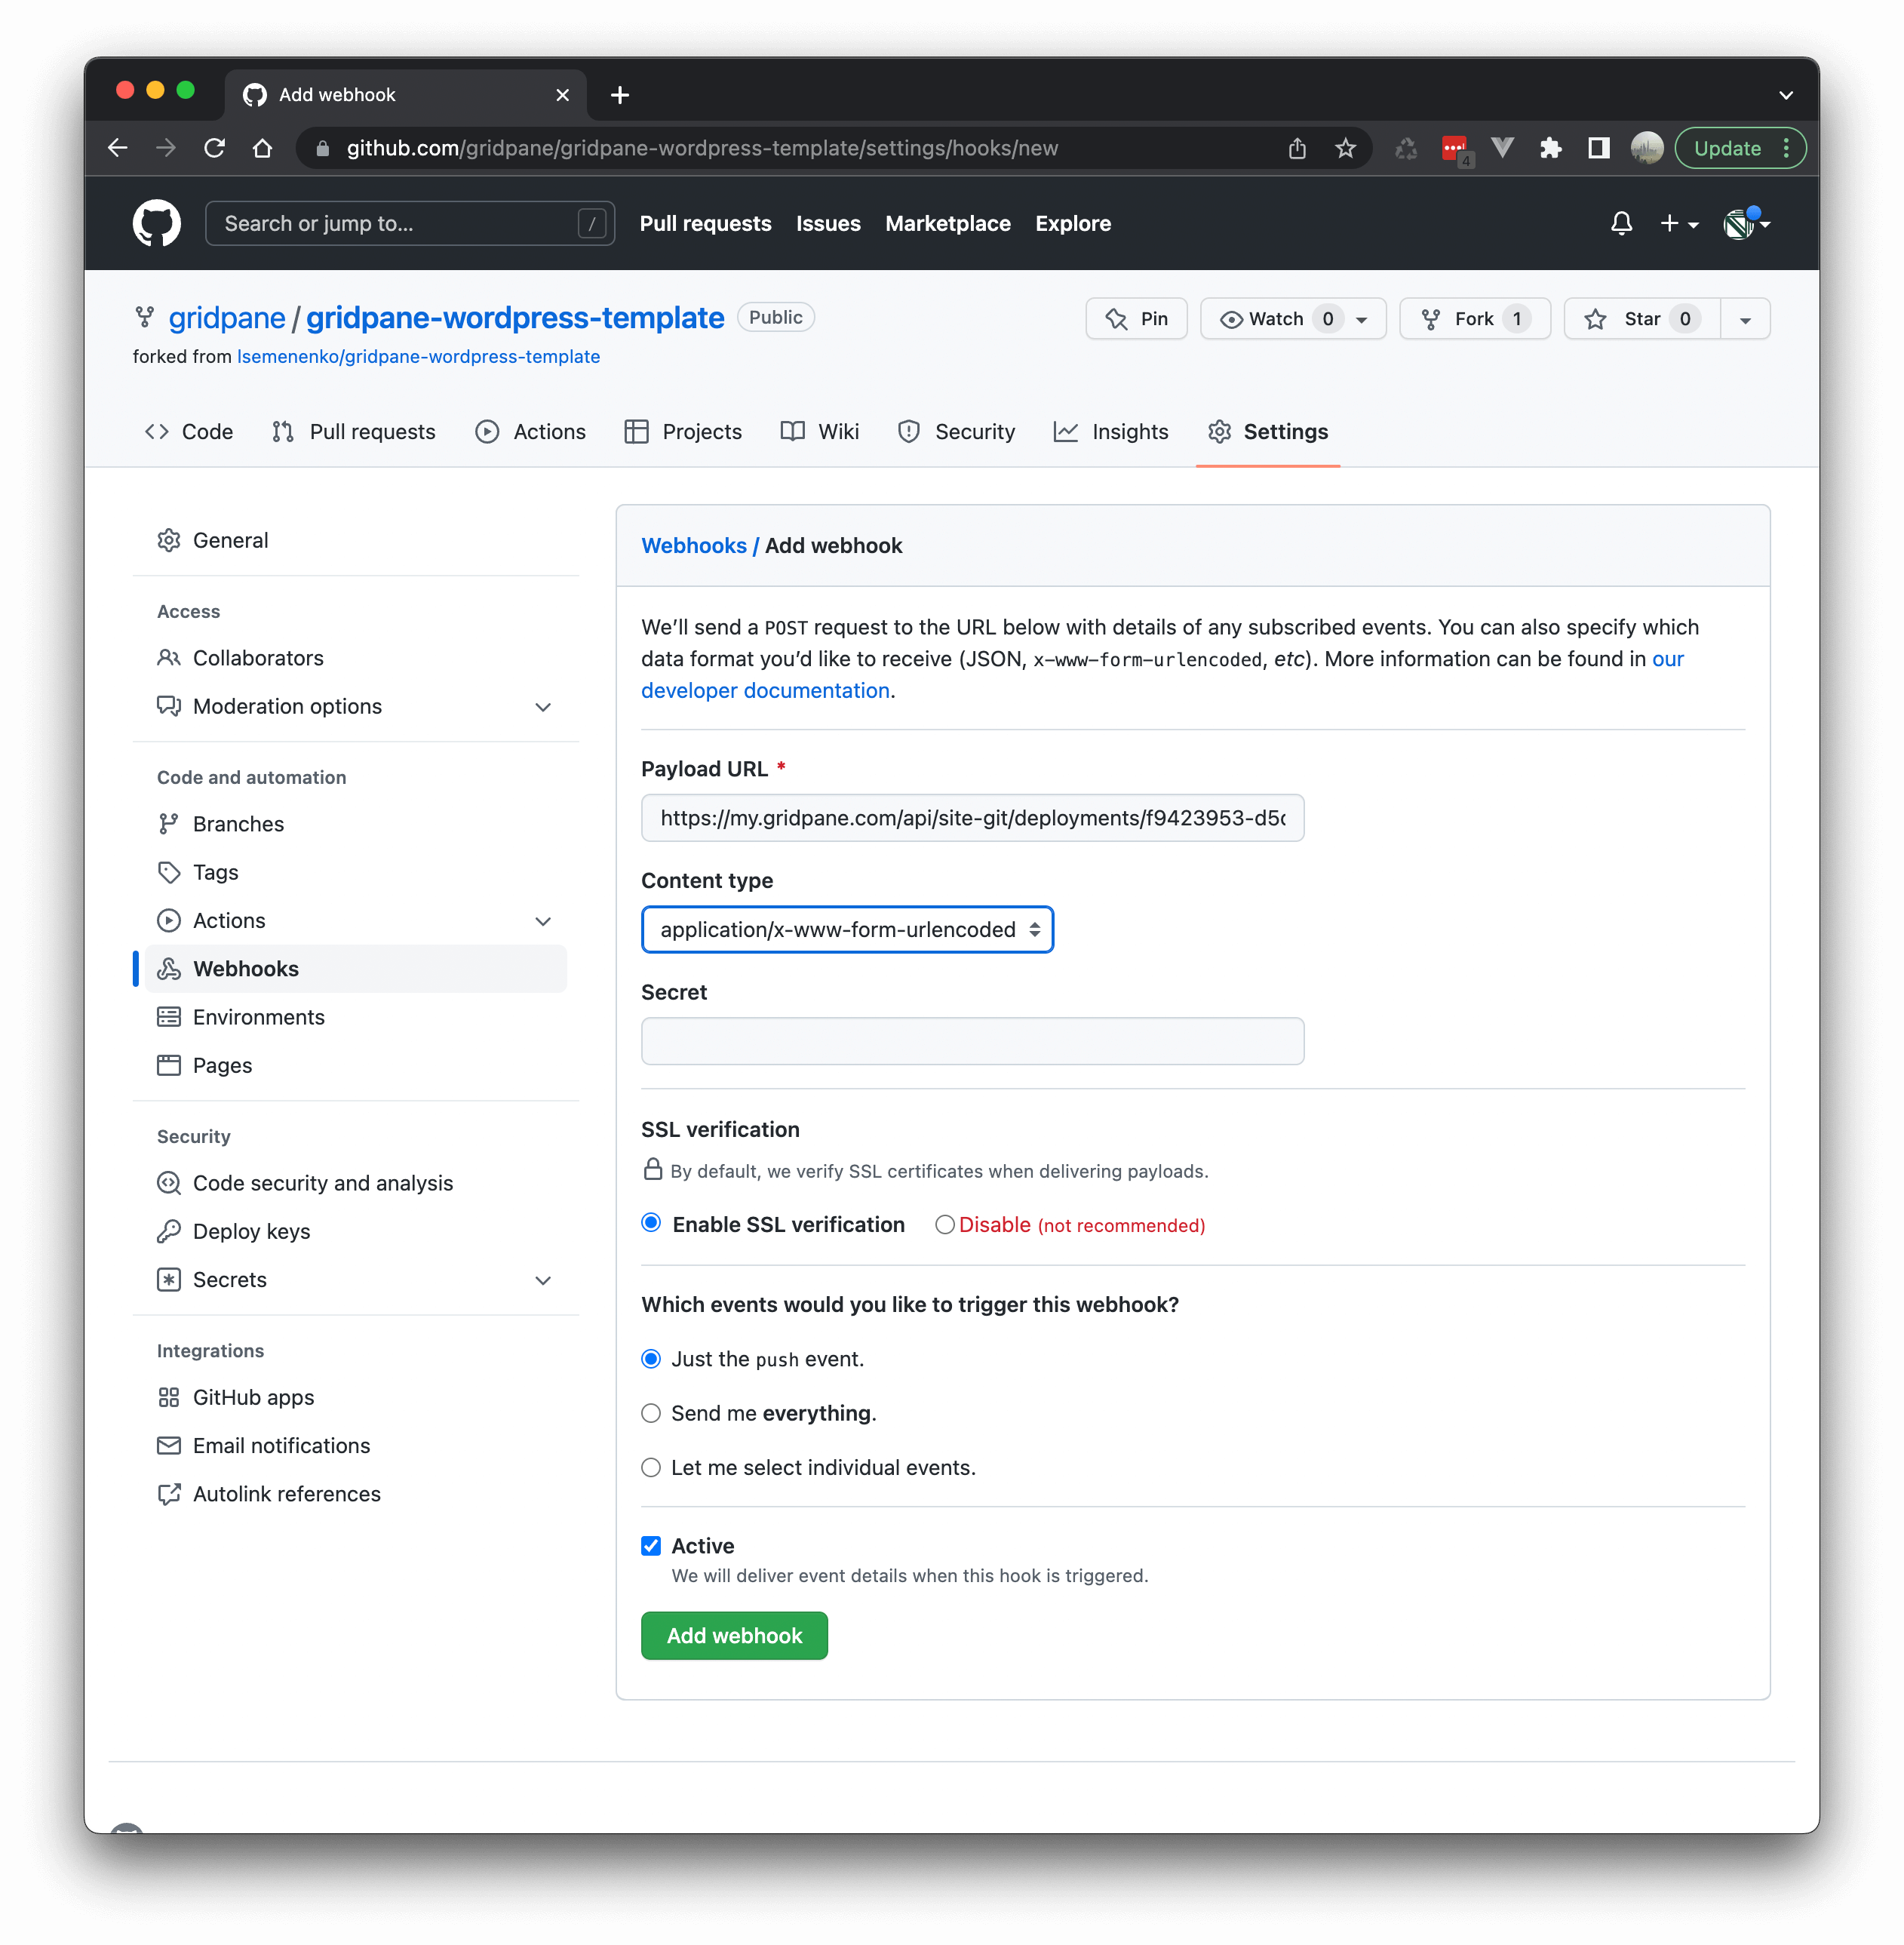
Go to your Repo > Settings > Webhooks and click add webhook:
Add the webhook you copied and click add webhook:
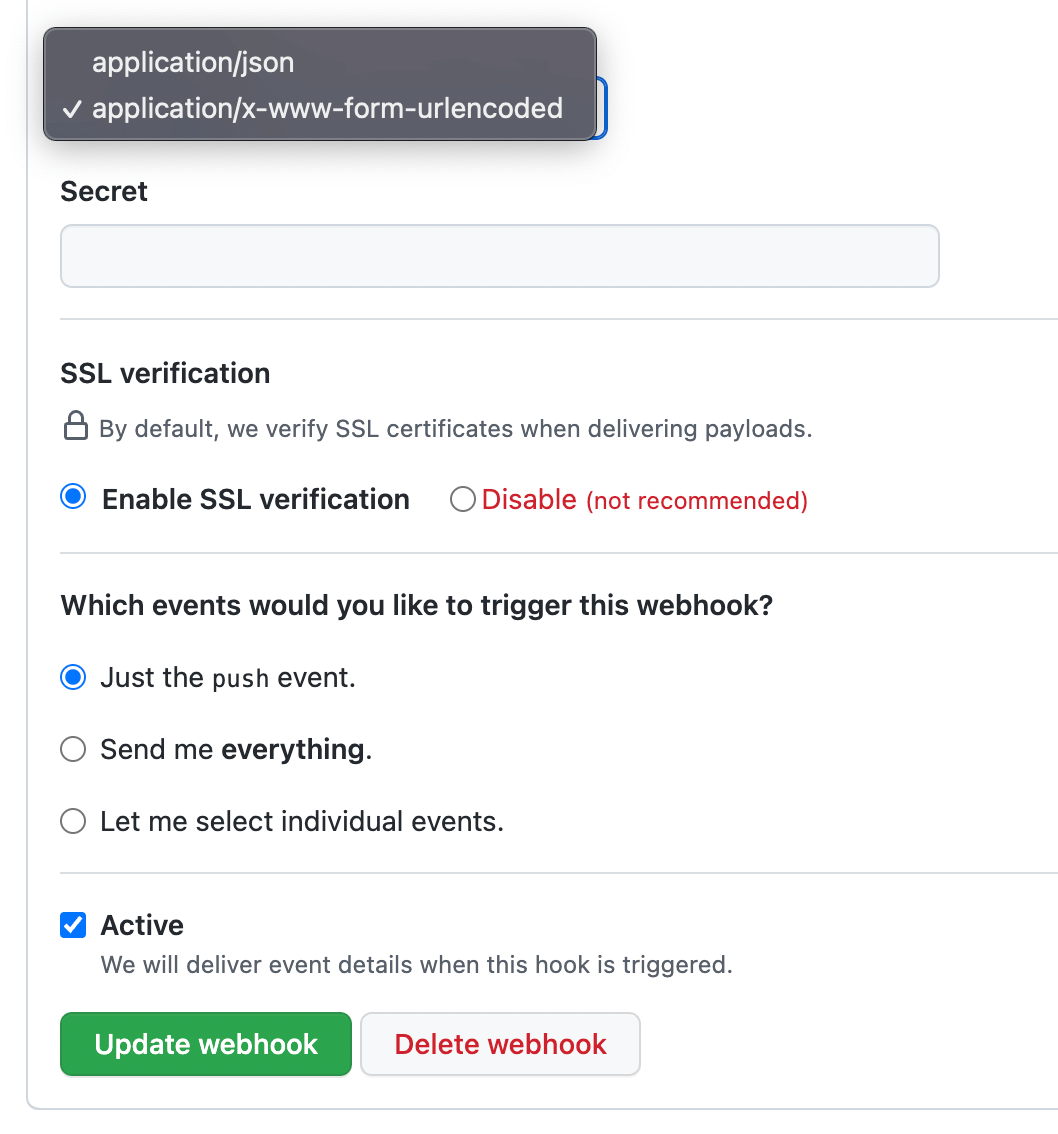
You can have things set to JSON or URL encoded, and all the default settings should be fine.
Once added you may see that the platform attempts to make a call to the webhook and is showing an error. Don’t worry, that is just because we haven’t enabled the deploy webhook at GridPane yet.
Checking Your Deployments
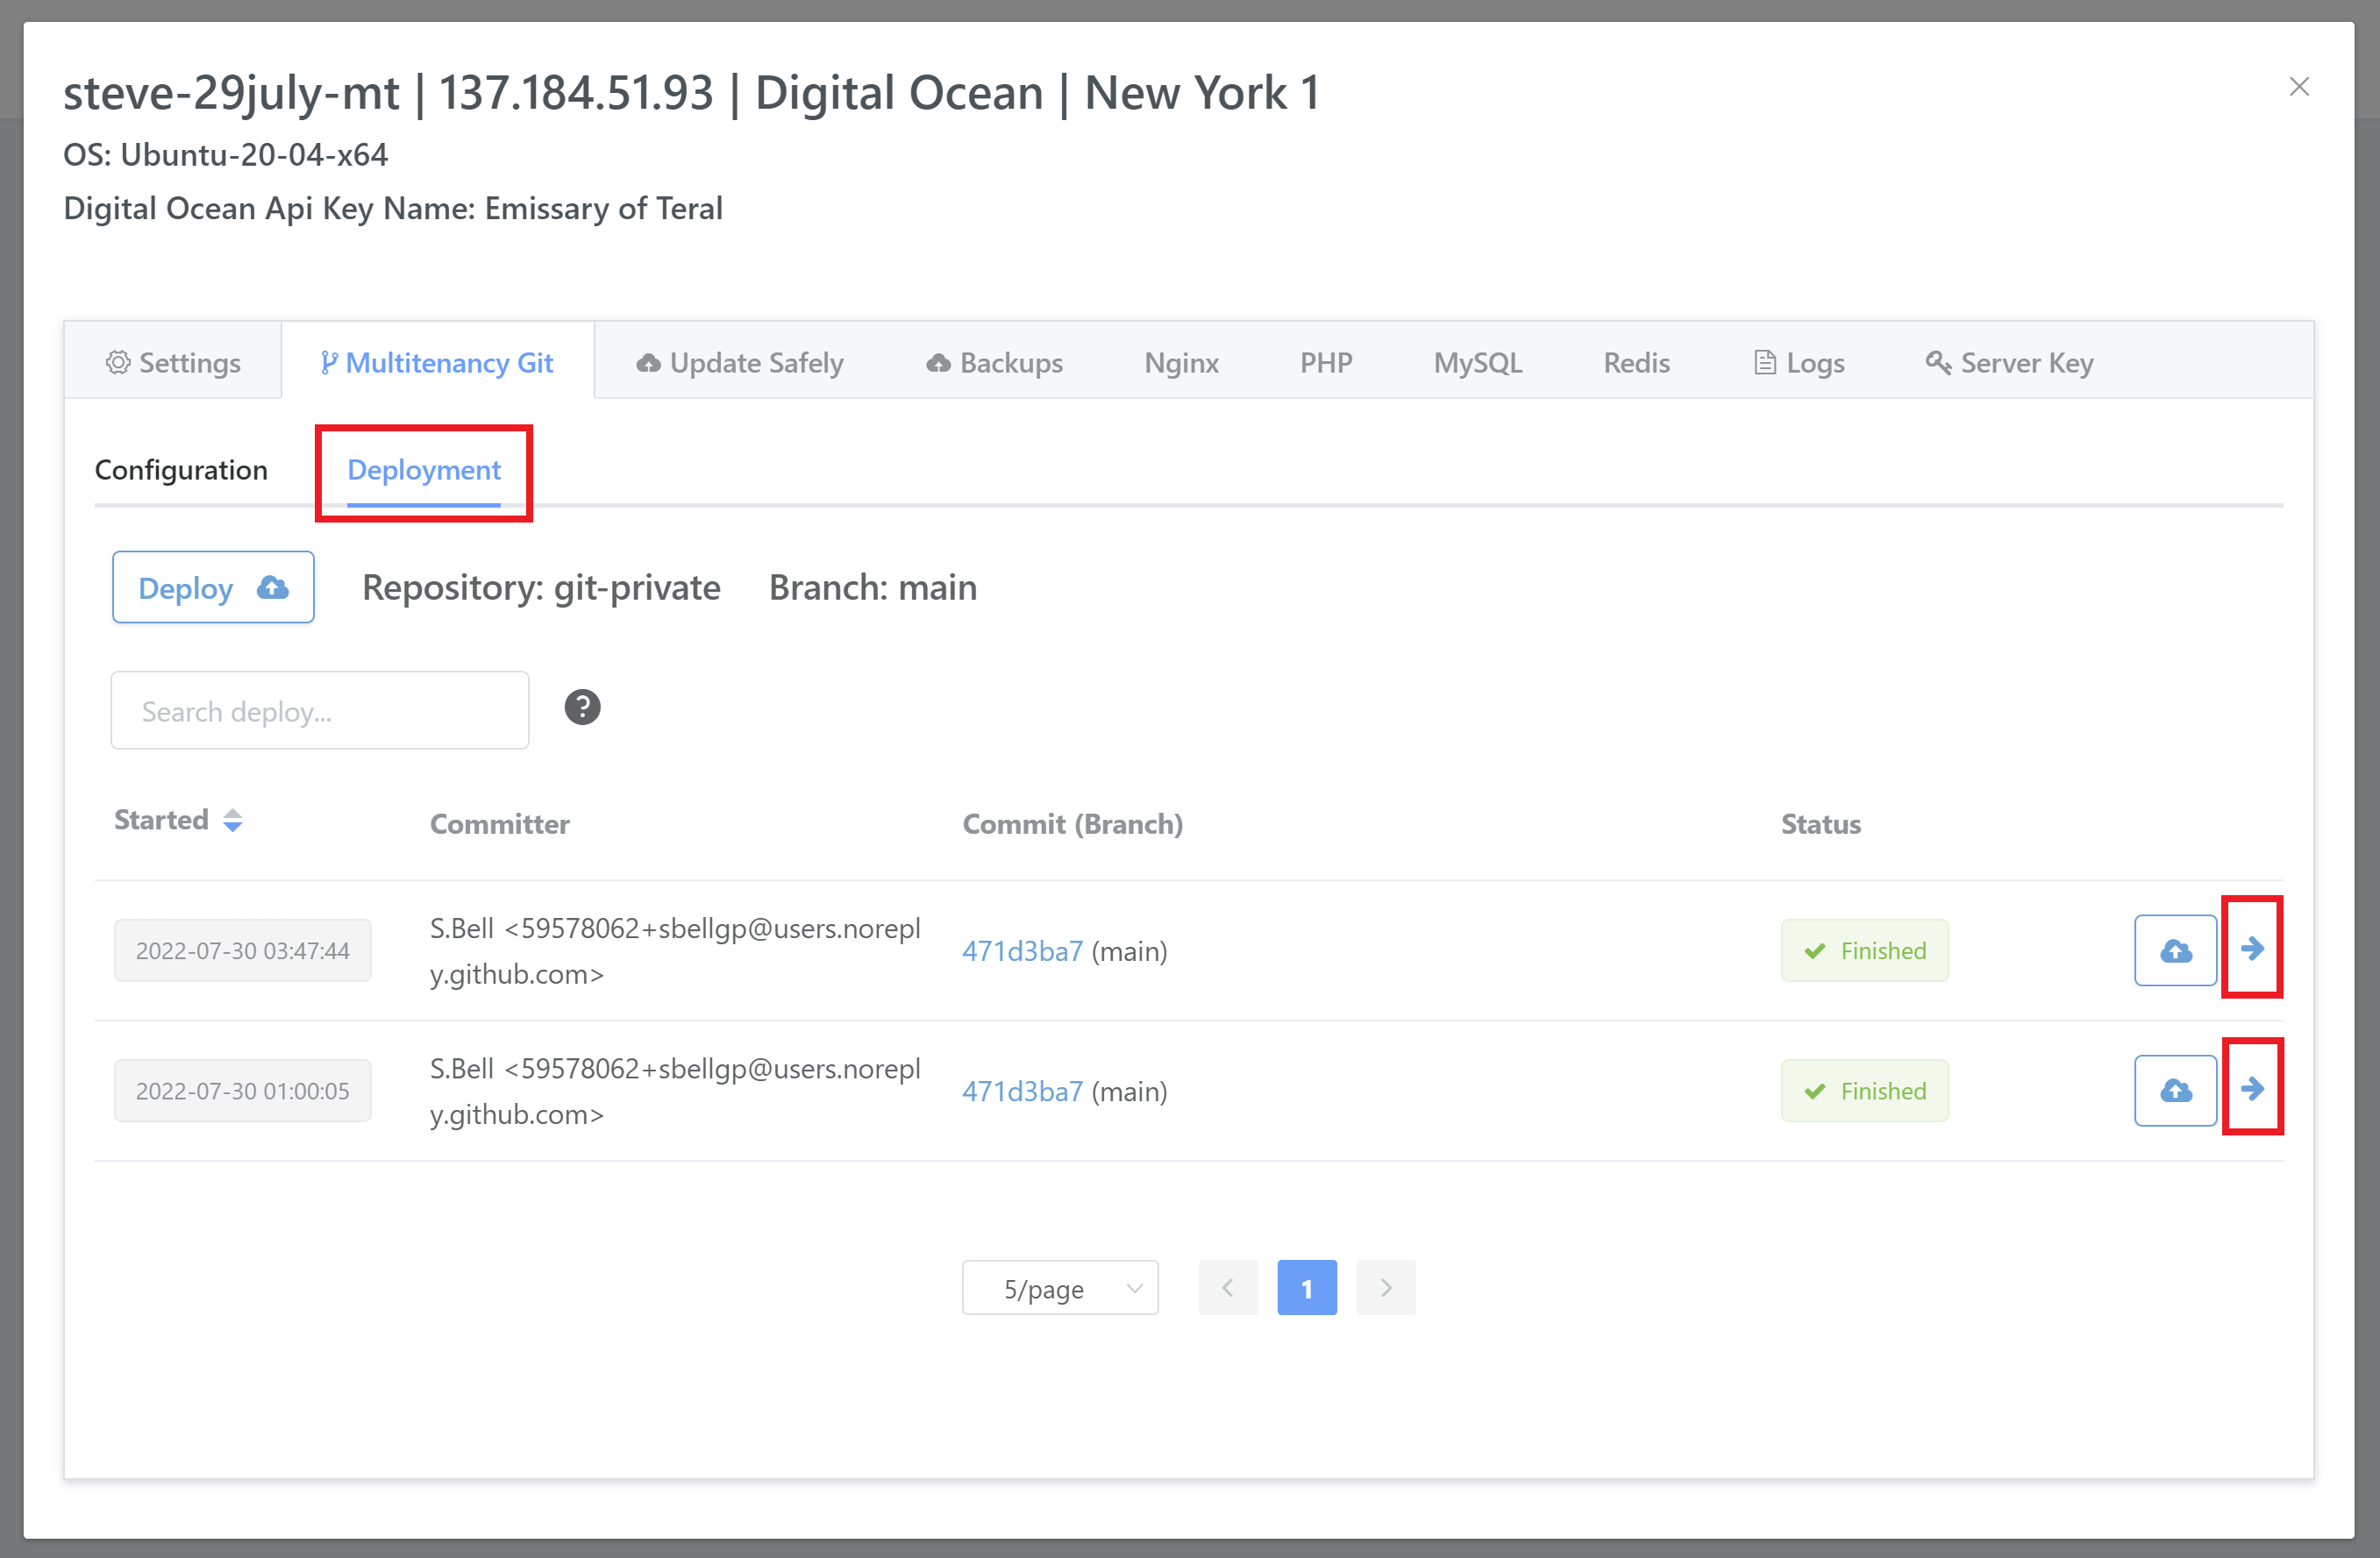
You can check your deployments and also see the previous deployment history inside the Multitenancy Git > Deployment tab.
Here you will see the last deploy with a timestamp, and over on the right-hand side you can also open up the deploy log by clicking on the arrow icon:
The log will then display in its own modal:
Part 5: Multitenancy and GridPane Features
Multitenancy Git and Existing GridPane Features
Our Git integrations work with many of our existing features the same way as regular sites, but there are some significant differences, especially with our staging, cloning, and backup tools. We’ll cover these differences below.
Most of the following also applies to Full Git configured websites.
Multitenancy Git and Staging, Cloneover, and Cloning
When cloning a website into a multitenancy configured server (meaning that the site is automatically configured for Git), or making a staging push, you have 3 choices:
- Push the database and the uploads directory
- Push only the database
- Push only the uploads directory
Our systems won’t copy over your WordPress directories and their files other than the uploads directory.
On staging the correct files will already exist as both live and staging share the same Git codebase. When cloning a site in, your Git codebase should already contain everything the site requires.
These same rules apply when cloning from one multitenancy server to another.
Cloning from a Multitenancy Server to Regular Server
You can also clone your multitenancy websites over to your regular servers. Cloning will omit .git and .gpconfig directories and the website clone will then proceed like a regular clone.
Multitenancy Git and V2 Backups
Similar to cloning and staging, restoring backups for multitenancy websites is configured for both the database and the uploads directory. This skips restoring the WordPress codebase, which is always the same for every website on the server.
This differs from regular Full Git configured websites as these can be reverted to regular WordPress sites whenever required, which isn’t possible on a multitenancy server.
When restoring backups, you have the following options:
- Database and Uploads directory
- Database only
- Uploads directory only
Backups are tagged with GPGitServer.
Multitenancy Git, Caching, SendGrid, and GridPane Security Features
Some of our features make use of WordPress plugins. In order for these two function correctly, it’s important that they be included as our systems will check for these plugins to be present for the corresponding functionality to be activated from within your account.
Full details on this can be found in our Git repo configuration article here:
How to Configure Git Repositories for GridPane Hosted Websites: GridPane Plugins and Full Repos
You can also download our base Full that includes all of these plugins here:
https://github.com/GridPane-Dev/gridpane-wordpress-template-all-plugins
Part 6. Developer Plus and Agency Plan Support
Developer Plus vs Agency
The main difference between our multitenancy on these two plans is the level of support included.
Developer Plus
On Developer Plus, the feature is provided as is, and our support team is not available for assistance in your setup. Configuring and maintaining your Git repo, and working with pre-deployment and post-deployment is your responsibility. Our team is only available to investigate potential bugs when the situation is clearly not the result of user misconfiguration.
Agency
On Agency, we will do our best to assist with anything you need when setting up your Git repos. This includes helping with pre and post-deploy scripts, general troubleshooting, and essentially any assistance that you require within reasonable limits.

