Creating a Firewall Rule
Creating Cloudflare firewall rules is quick and easy. Inside your Cloudflare account choose your website and then click through to the Security > WAF page. Here click the Create a Firewall Rule button.
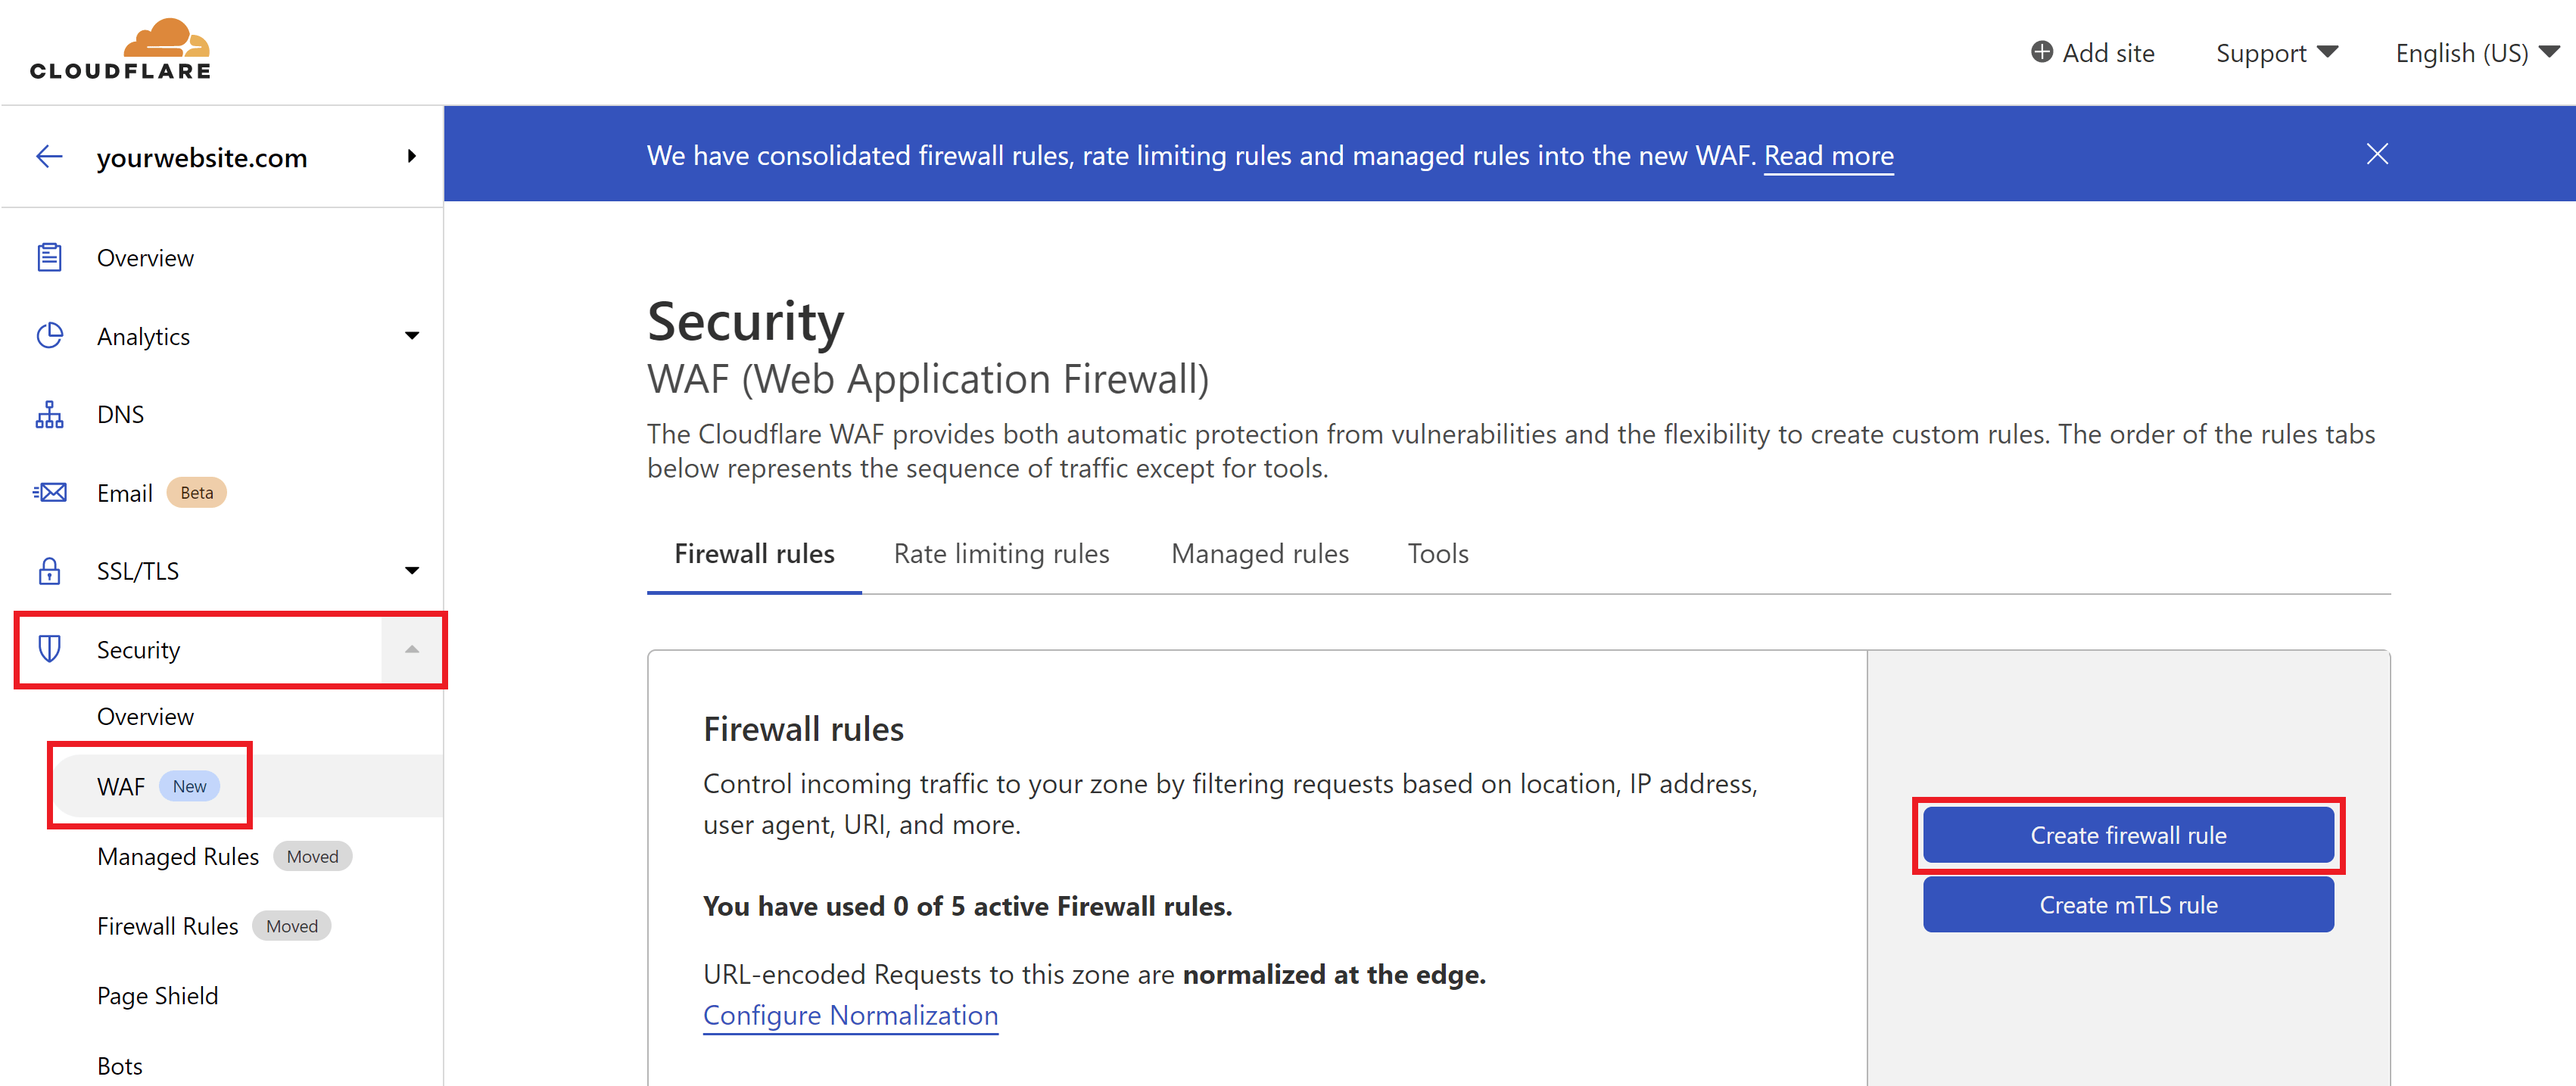
At the time of writing, Cloudflare have recently moved some of their security settings around as you can see in the above screenshot.
Rule Consolidation
One of the great things about Cloudflare’s rules is just how much you can do with one rule. Many of the sections below can be consolidated into one singular rule, leaving you with free additional rules for the future if you need them.
Part 1. Country or Continent Blocking
We’ll start off with country/continent blocking as it can be used creatively in the following sections as well.
If your website isn’t serving a global audience, then country/continent blocking can be a handy tool to block a ton of malicious traffic without needing to worry about blocking legitimate visitors who are your website’s target audience. Not expecting any visitors from outside of your own country? You can block them (though do note that our/your hosting support team may also be blocked if/when you need assistance).
Step 1. Create a Cloudflare Firewall Rule
Navigate to the Security > WAF page, and click the Create Firewall Rule button.
Step 2. Configure Your Firewall Rule Expression
First, give your rule an easy to identify name.
If you want to only allow specific countries, set the following:
- Field: Country or Continent
- Operator: “Is in”
- Value: Choose your countries/continents
If you’re only allowing traffic from one country you can instead choose “equals” as the operator.
If you instead want to block specific countries, set the following:
- Field: Country or Continent
- Operator: “Is not in”
- Value: Choose your countries/continents
Here’s an example of allowing all countries except the US and Canada:

Step 3. Set the Action and Deploy Your Rule
Cloudflare can block all requests that break the rule outright. When ready, click the Deploy button to set your new firewall rule live.
Step 1. Create a Cloudflare Firewall Rule
Navigate to the Security > WAF page, and click the Create Firewall Rule button.
Step 2. Configure Your Firewall Rule Expression
First, give your rule an easy to identify name.
Here we’ll create 3 separate rules for each of the area’s outlined above. First, we’ll simply block direct access to xmlrpc.php with:
- Field: URI Path
- Operator: “contains“
- Value: /xmlrpc.php
Use the OR option on the right-hand side to create two additional rules as follows:
- Field: URI Path
- Operator: “contains“
- Value: (1) /wp-content/ and (2) /wp-includes/
AND
- Field: Referer
- Operator: “does not contain“
- Value: your website URL
It looks as follows:
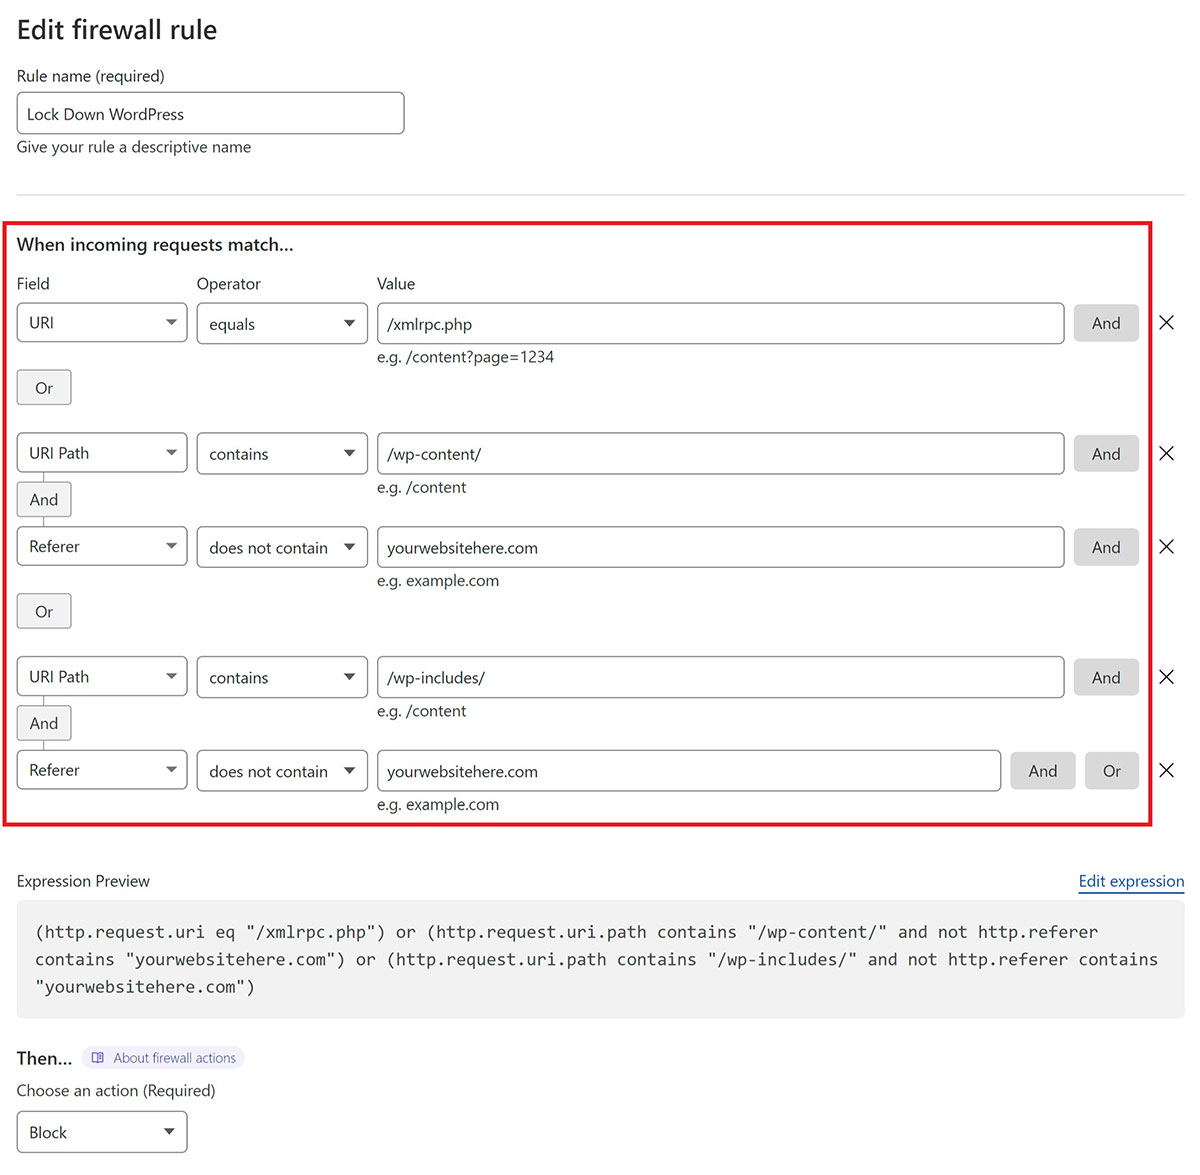
If you’d like to use the same, or use this as a starting point, you can copy the following expression:
(http.request.uri eq "/xmlrpc.php") or (http.request.uri.path contains "/wp-content/" and not http.referer contains "yourwebsitehere.com") or (http.request.uri.path contains "/wp-includes/" and not http.referer contains "yourwebsitehere.com")
Inside your Firewall rule, click “Edit Expression” and paste the above.
From here you can continue editing the firewall rule to your liking.
Step 3. Set the Action and Deploy Your Rule
Cloudflare can block all requests that break the rule outright. When ready, click the Deploy button to set your new firewall rule live.
The following details an option to lock down two area’s vital to accessing your website. Use with caution when working on client websites.
Step 1. Create a Cloudflare Firewall Rule
Navigate to the Security > WAF page, and click the Create Firewall Rule button.
Step 2. Configure Your Firewall Rule Expression
First, give your rule an easy to identify name.
Here’s an example rule:
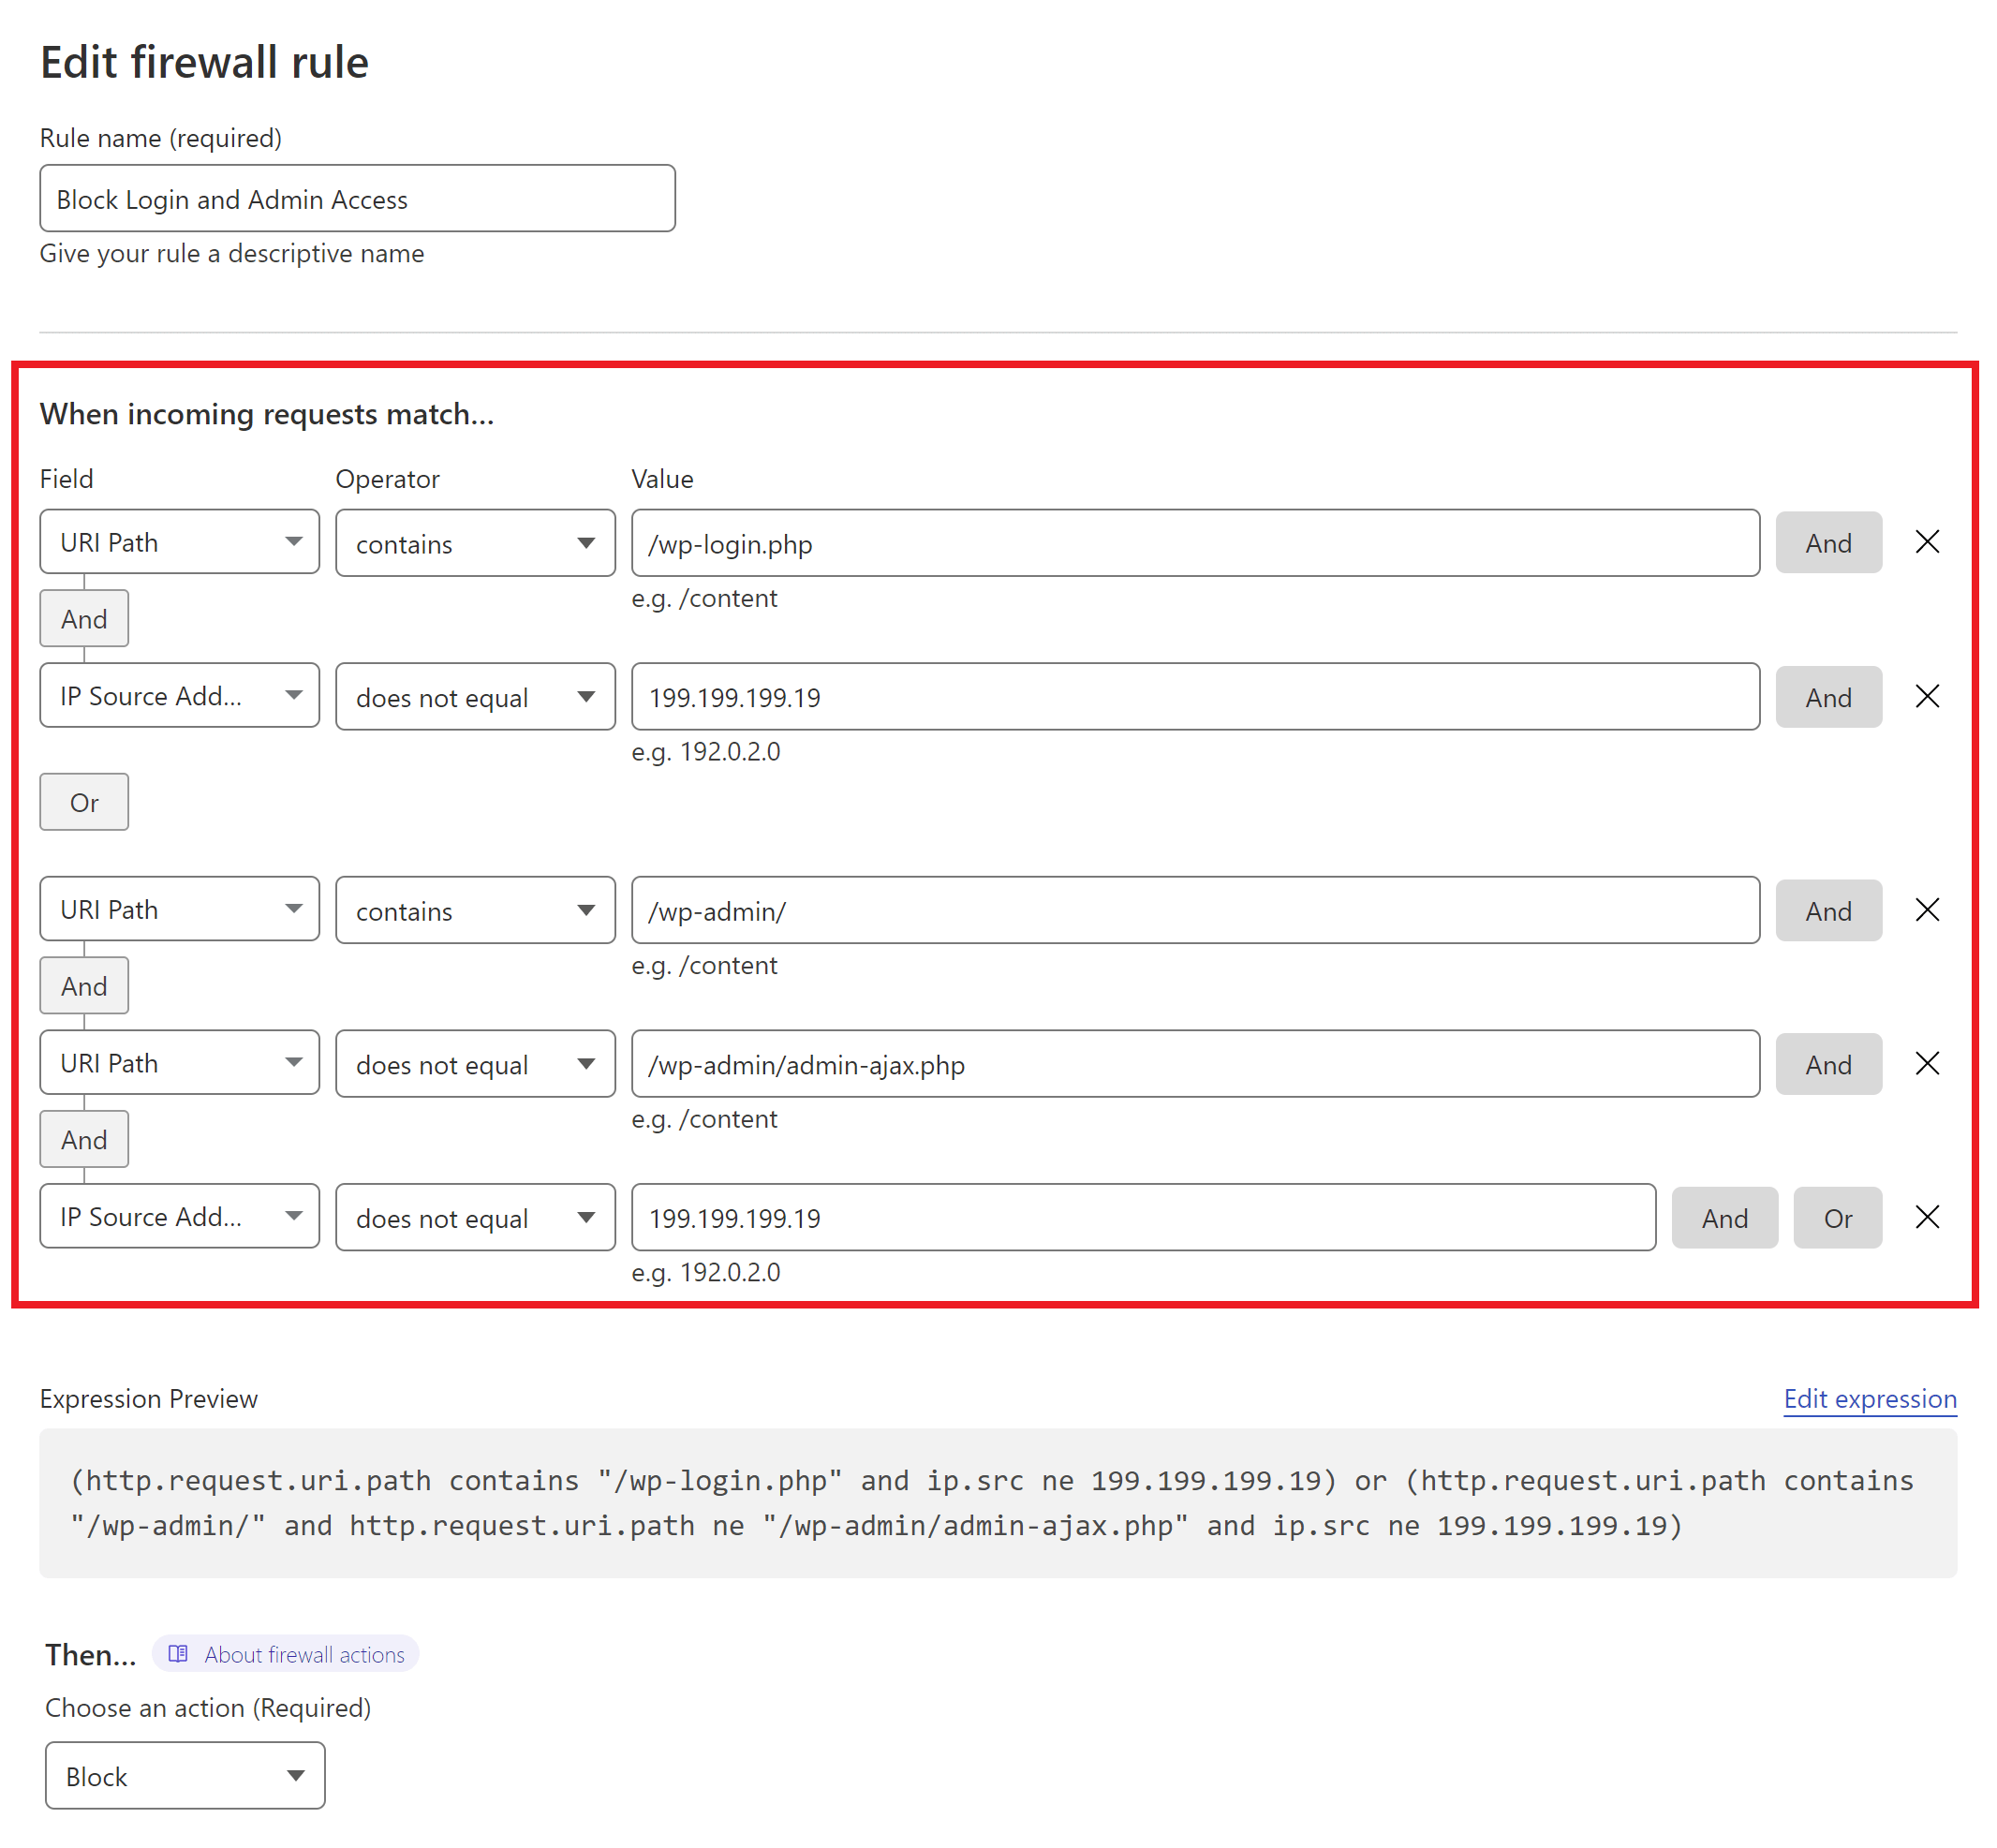
In this example, I’ve locked down the the /wp-login.php page to only be available when accessed via a specific IP address.
The /wp-admin/ area has also been locked down to a single IP address unless it’s specifically the /wp-admin/admin-ajax.php file. This could instead be blocked entirely, and then you could use the WAF “Tools” tab to whitelist your IP address and those of your clients to bypass all firewall rules instead.
To keep things simple for client sites, you could lock these down to their specific country. It’s not perfect, but it can still block a ton of potentially malicious traffic.
If you’d like to use the same rule pictured above as a starting point, you can copy the following expression:
(http.request.uri.path contains "/wp-login.php" and ip.src ne 199.199.199.19) or (http.request.uri.path contains "/wp-admin/" and http.request.uri.path ne "/wp-admin/admin-ajax.php" and ip.src ne 199.199.199.19)
Inside your Firewall rule, click “Edit Expression” and paste the above.
From here you can continue editing the firewall rule to your liking.
Step 3. Set the Action and Deploy Your Rule
Cloudflare can block all requests that break the rule outright. When ready, click the Deploy button.
The following is limited in its application as it’s specific to pages and not to contact forms themselves. However, if you have a regular website where contact forms aren’t on every page, then this is an extremely effective measure.
Step 1. Create a Cloudflare Firewall Rule
Navigate to the Security > WAF page, and click the Create Firewall Rule button.
2. Configure Your Firewall Rule Expressions
First, give your rule an easy to identify name.
Here is what my rule looks like:
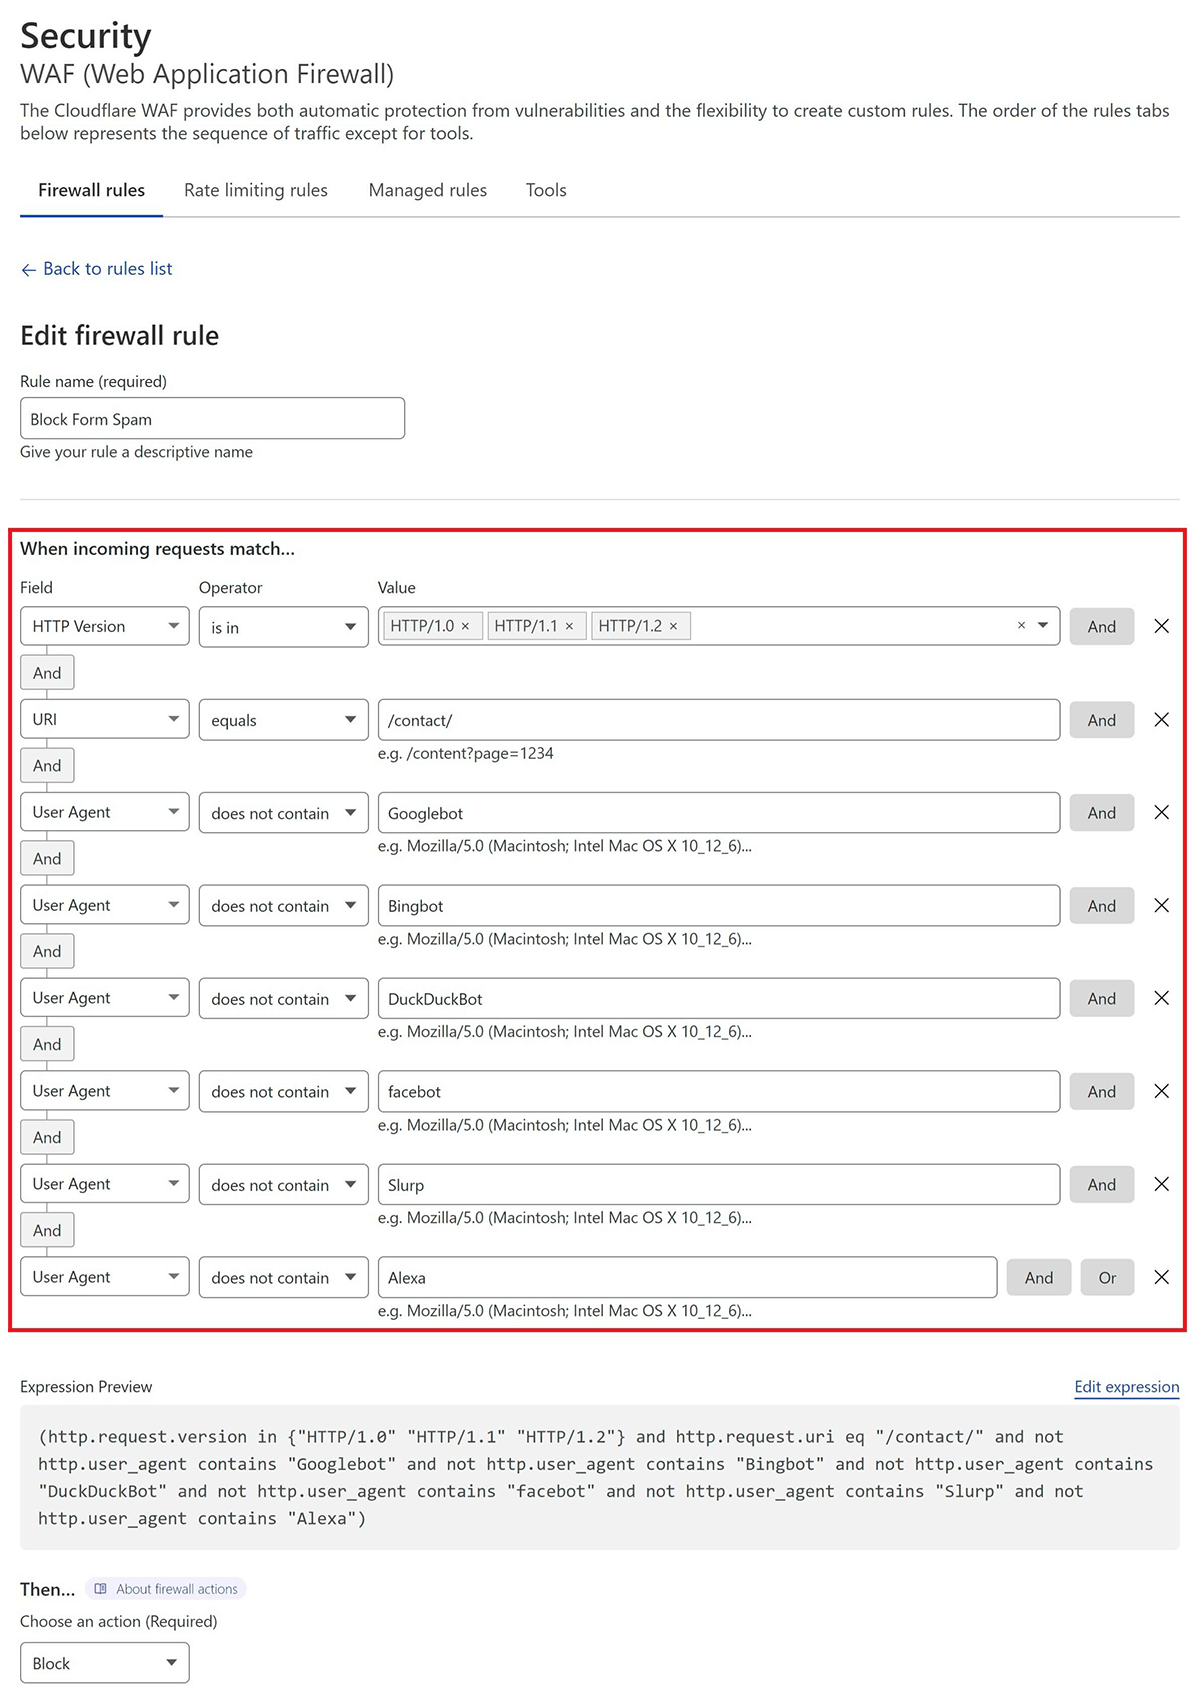
This states that if:
- the URI is /contact/
- and the request is made over HTTP/1.0/1.1/1.2
- and it is NOT either Googlebot, Bingbot, DuckDuckBot, Facebot, Cloudflare, Slurp, or Alexa
- then perform ACTION (see below)
If you’d like to use the same, or use this as a starting point, you can copy the following expression:
(http.request.version in {"HTTP/1.0" "HTTP/1.1" "HTTP/1.2"} and http.request.uri eq "/contact/" and not http.user_agent contains "Googlebot" and not http.user_agent contains "Bingbot" and not http.user_agent contains "DuckDuckBot" and not http.user_agent contains "facebot" and not http.user_agent contains "Slurp" and not http.user_agent contains "Alexa")Next, inside your Firewall rule, click “Edit Expression” and paste the above.

From here you can continue editing the firewall rule to your liking.
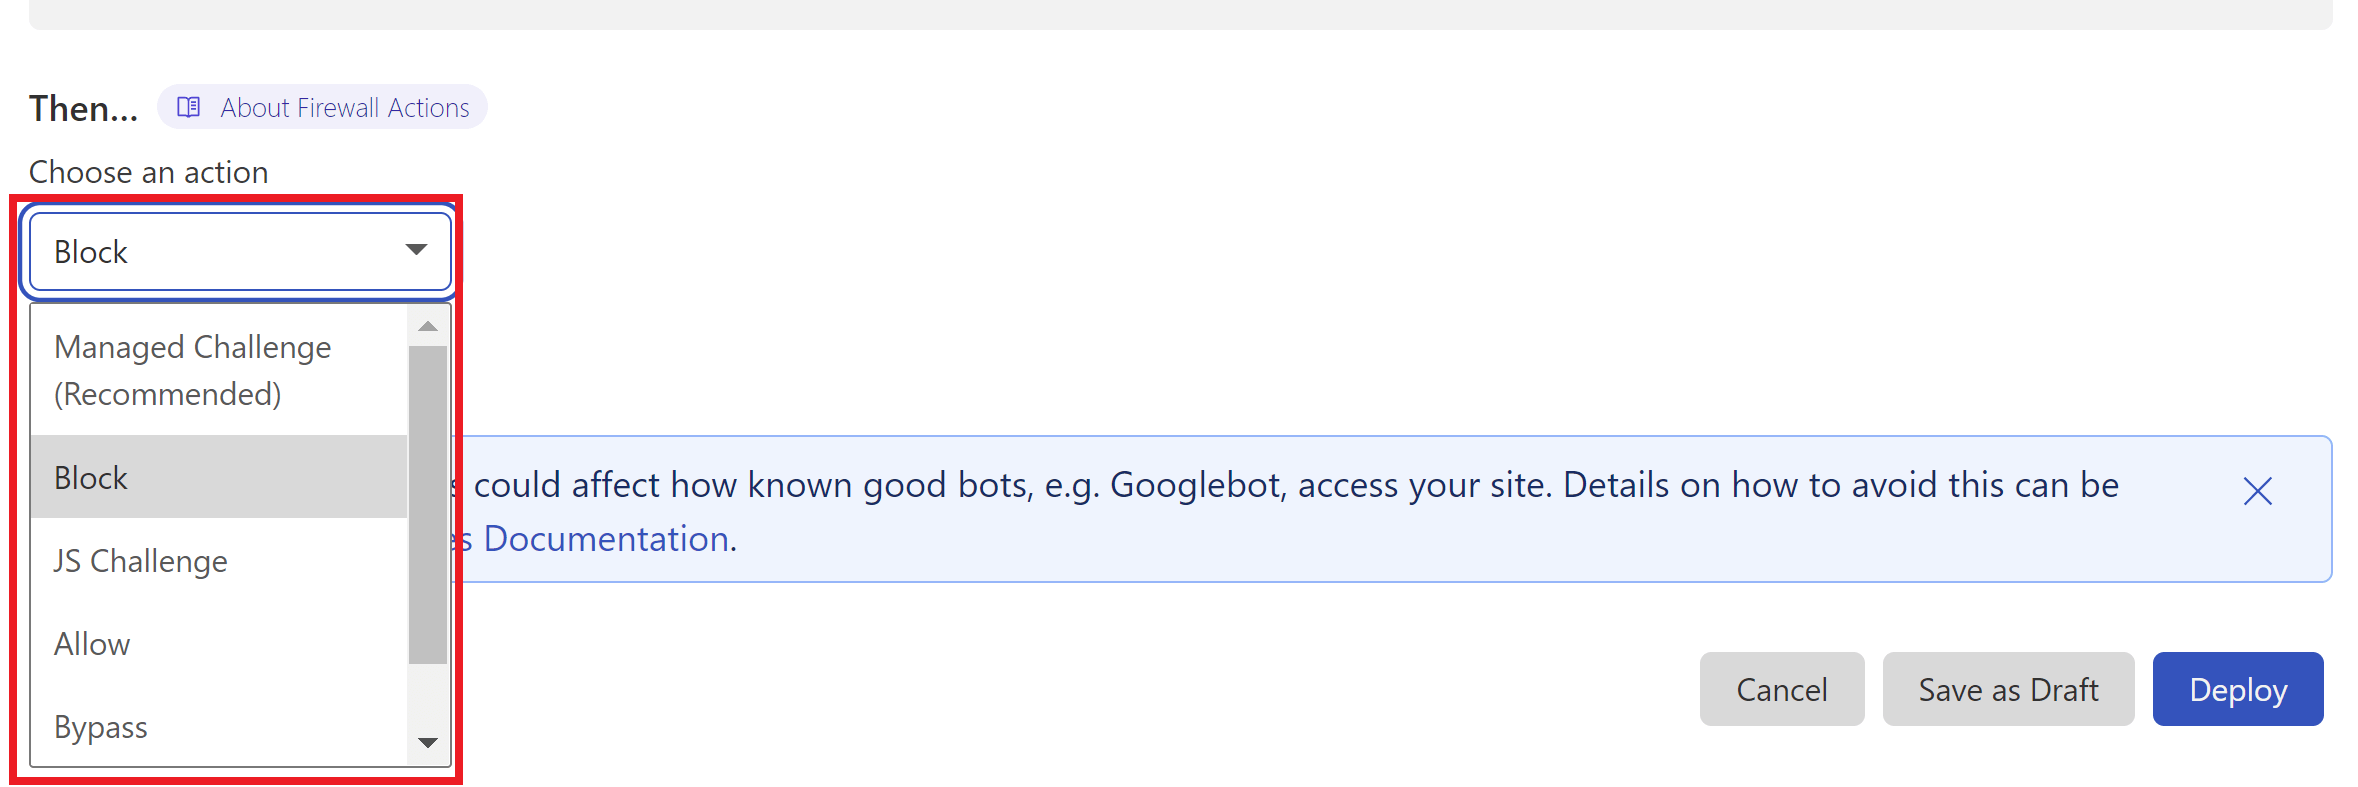
3. Set the Action
I chose to outright block this traffic, but one of the great things about Cloudflare is that you can use their managed challenge or JS challenge to screen this traffic instead. Choose the option that you feel best suits your needs.
4. Deploy Your Rule
When ready, click the Deploy button to set your new firewall rule live.
Here we’re going to restrict wp-comments-post.php to weed out bot traffic.
Denying bot traffic access to the wp-comments-post.php file can be done at the DNS level with a Cloudflare JS challenge.
Unlike contact form spam, which can be a little more complex to deal with, blocking this traffic for comments is a simple matter. Automated spam submissions can’t process JS and thus fail Cloudflare’s JS challenge, which then blocks this traffic at the DNS layer before the request can even reach your server.
Step 1. Create a Cloudflare Firewall Rule
Navigate to the Security > WAF page, and click the Create Firewall Rule button.
Step 2. Configure Your Firewall Rule Expressions
First, give your rule a name that’s easy to identify.
Here is what the rule looks like:
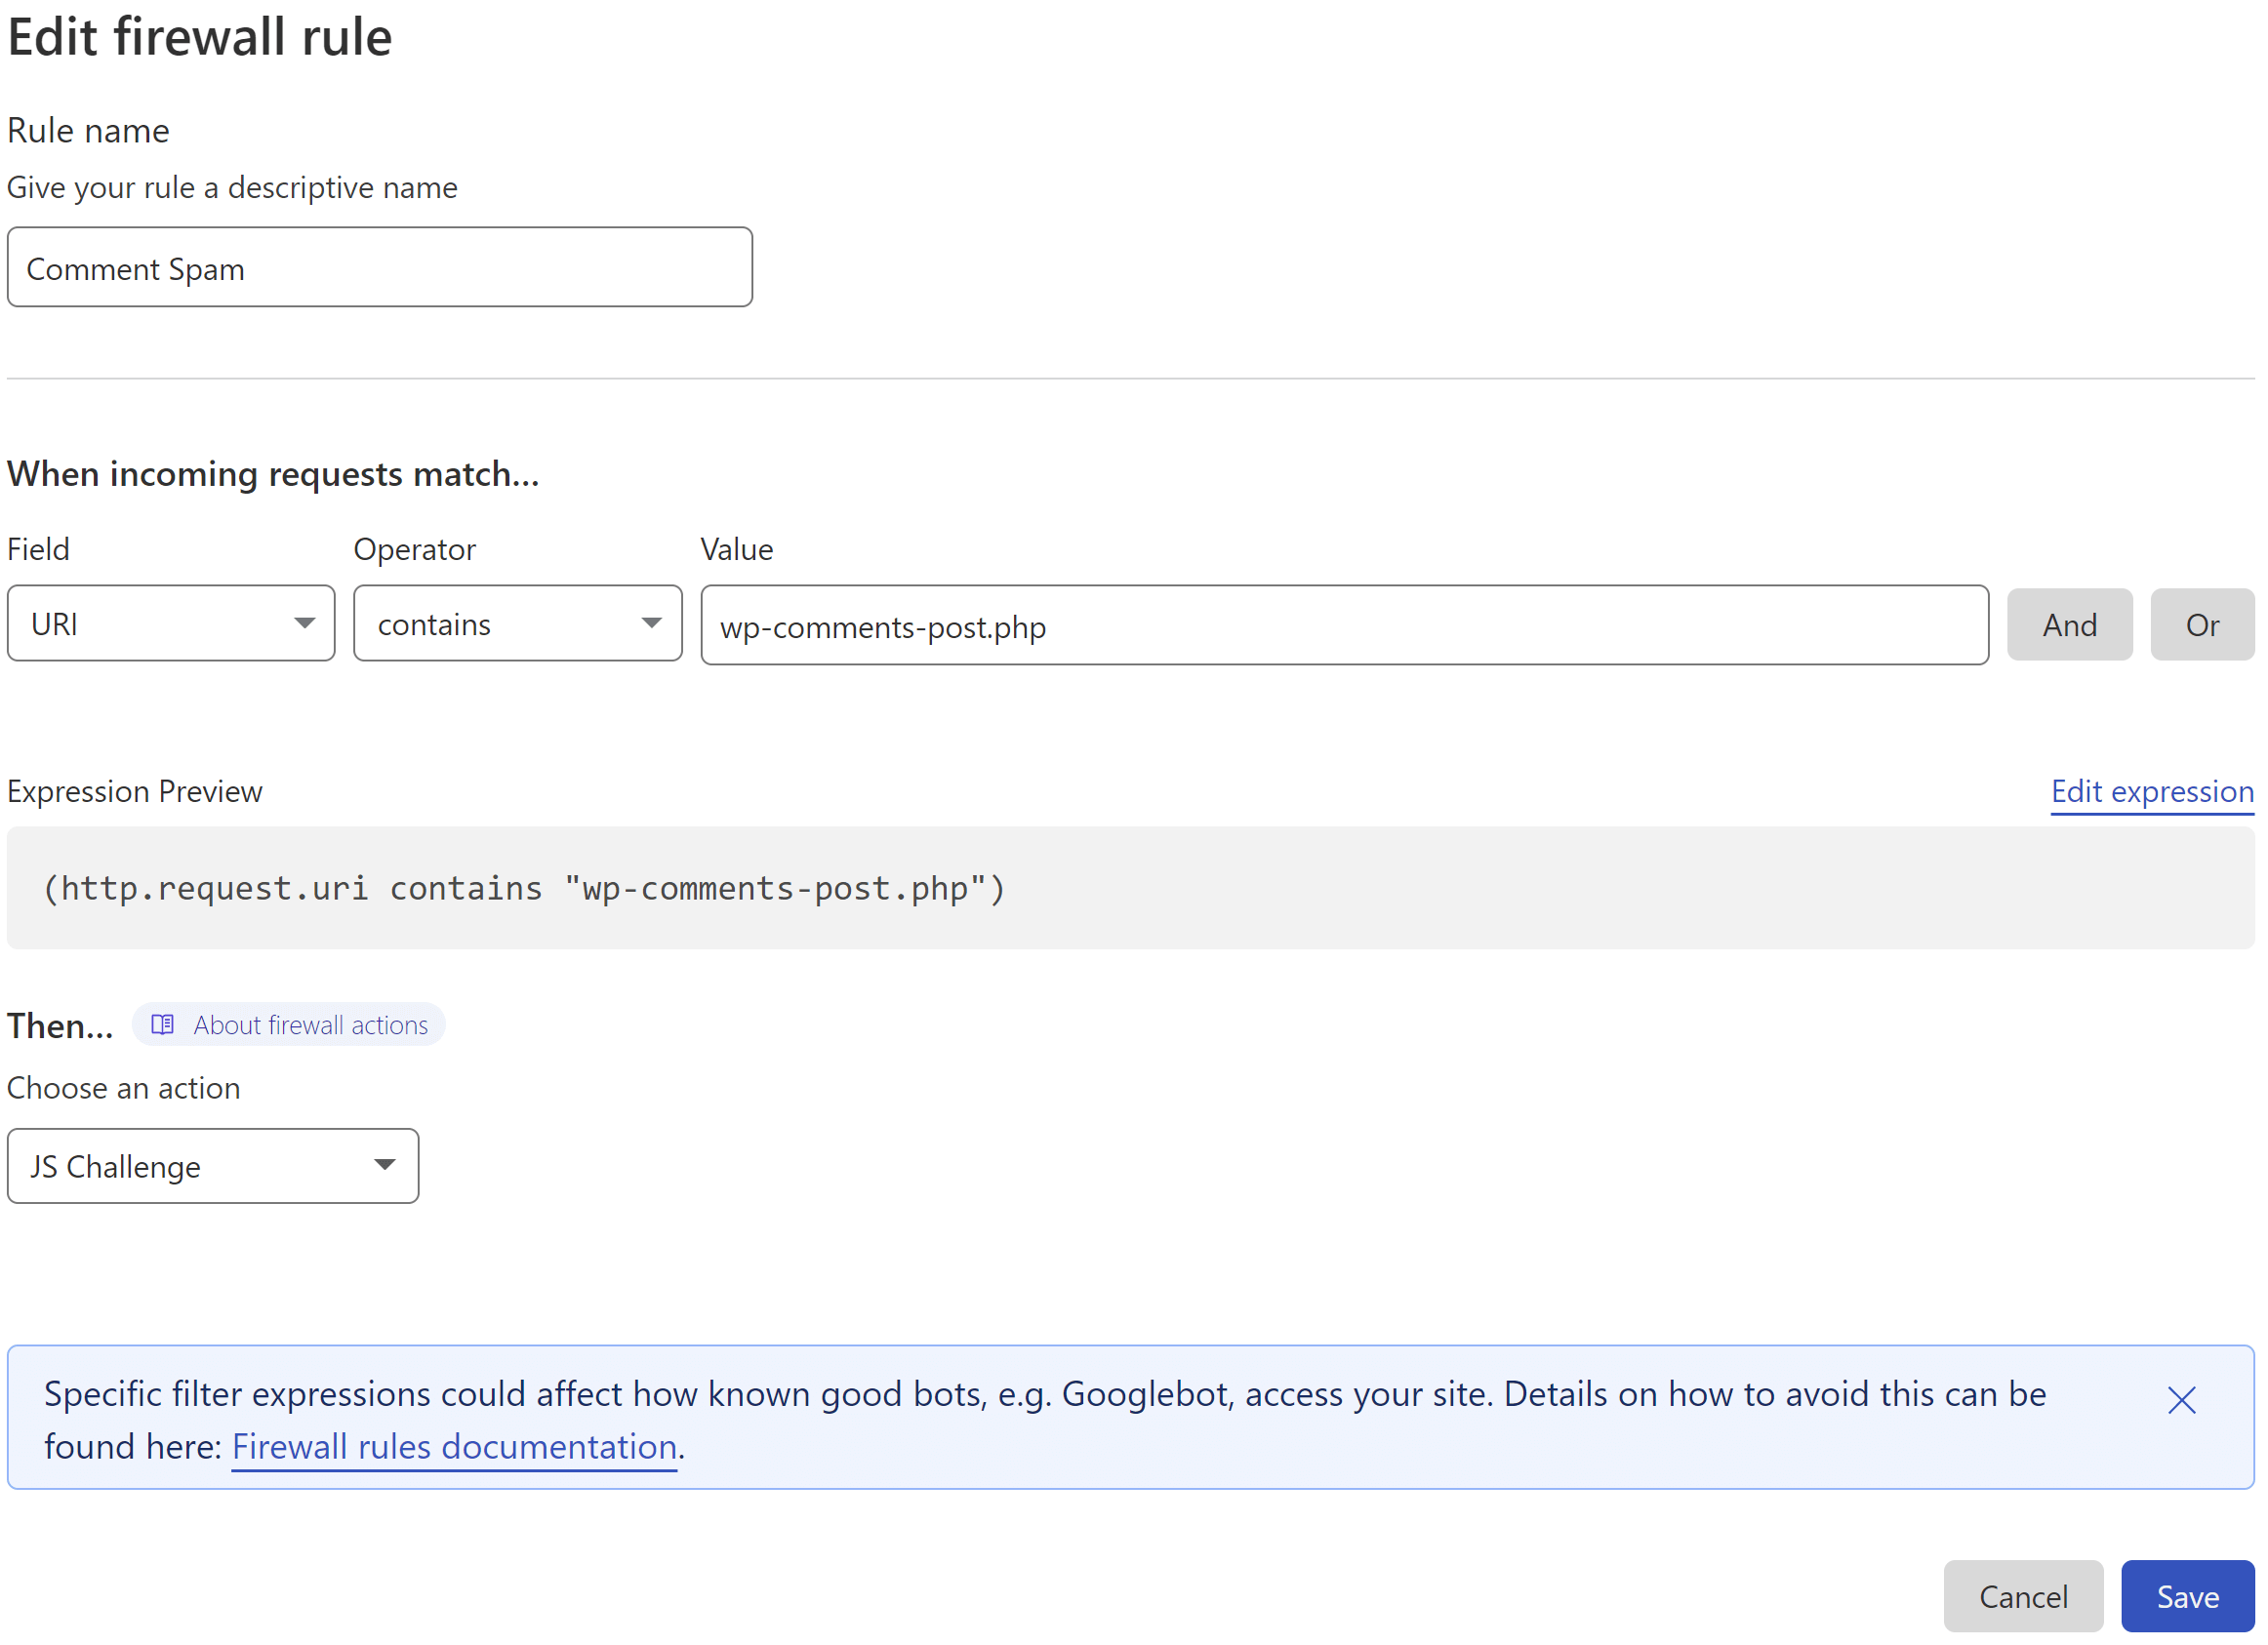
This states that if:
- the URI contains /wp-comments-post.php
- then perform ACTION (see below)
Step 3. Set the Action
Cloudflare offers two methods that could be utilized here. One is their “Managed Challenge” and the other is their JS challenge. As the JS challenge only takes place after a visitor has browsed the page and submitted their comment, the very brief Cloudflare challenge page that pops up doesn’t interfere with the user’s actions beforehand.
Step 4. Deploy Your Rule
When ready, click the Deploy button to set your new firewall rule live.
The following can be used as an alternative to the above two rules. It blocks submissions that aren’t made directly from your website, and thus blocks the automatic posting by spam bots.
Step 1. Create a Cloudflare Firewall Rule
Navigate to the Security > WAF page, and click the Create Firewall Rule button.
Step 2. Configure Your Firewall Rule Expression
First, give your rule an easy to identify name.
Here’s what the rule looks like:

This states that if:
- The URI contains either /wp-admin/admin-ajax.php or /wp-comments-post.php
- and the request method is POST
- and the referrer does not contain your website URL
- then perform ACTION (block in this case)
(http.request.uri contains "/wp-admin/admin-ajax.php" and http.request.method eq "POST" and not http.referer contains "yourwebsitehere.com") or (http.request.uri contains "/wp-comments-post.php" and http.request.method eq "POST" and not http.referer contains "yourwebsitehere.com")
Next, inside your Firewall rule, click “Edit Expression” and paste the above.
Step 3. Set the Action and Deploy Your Rule
Cloudflare can block all requests that break the rule outright.
When ready, click the Deploy button.
4. Block Bad Bots
Cloudflare allows you to block bots based on their user agent. Like country blocking, it’s quick and easy to setup.
7G Users: The 7G WAF contains a long list of bad bots that it blocks at the server level. If you’re already using 7G then you may want to give this one a miss and save your Cloudflare rules. You can also create your own 7G rule to block additional bots if ever needed.
Step 1. Create a Cloudflare Firewall Rule
Navigate to the Security > WAF page, and click the Create Firewall Rule button.
Step 2. Configure Your Firewall Rule Expression
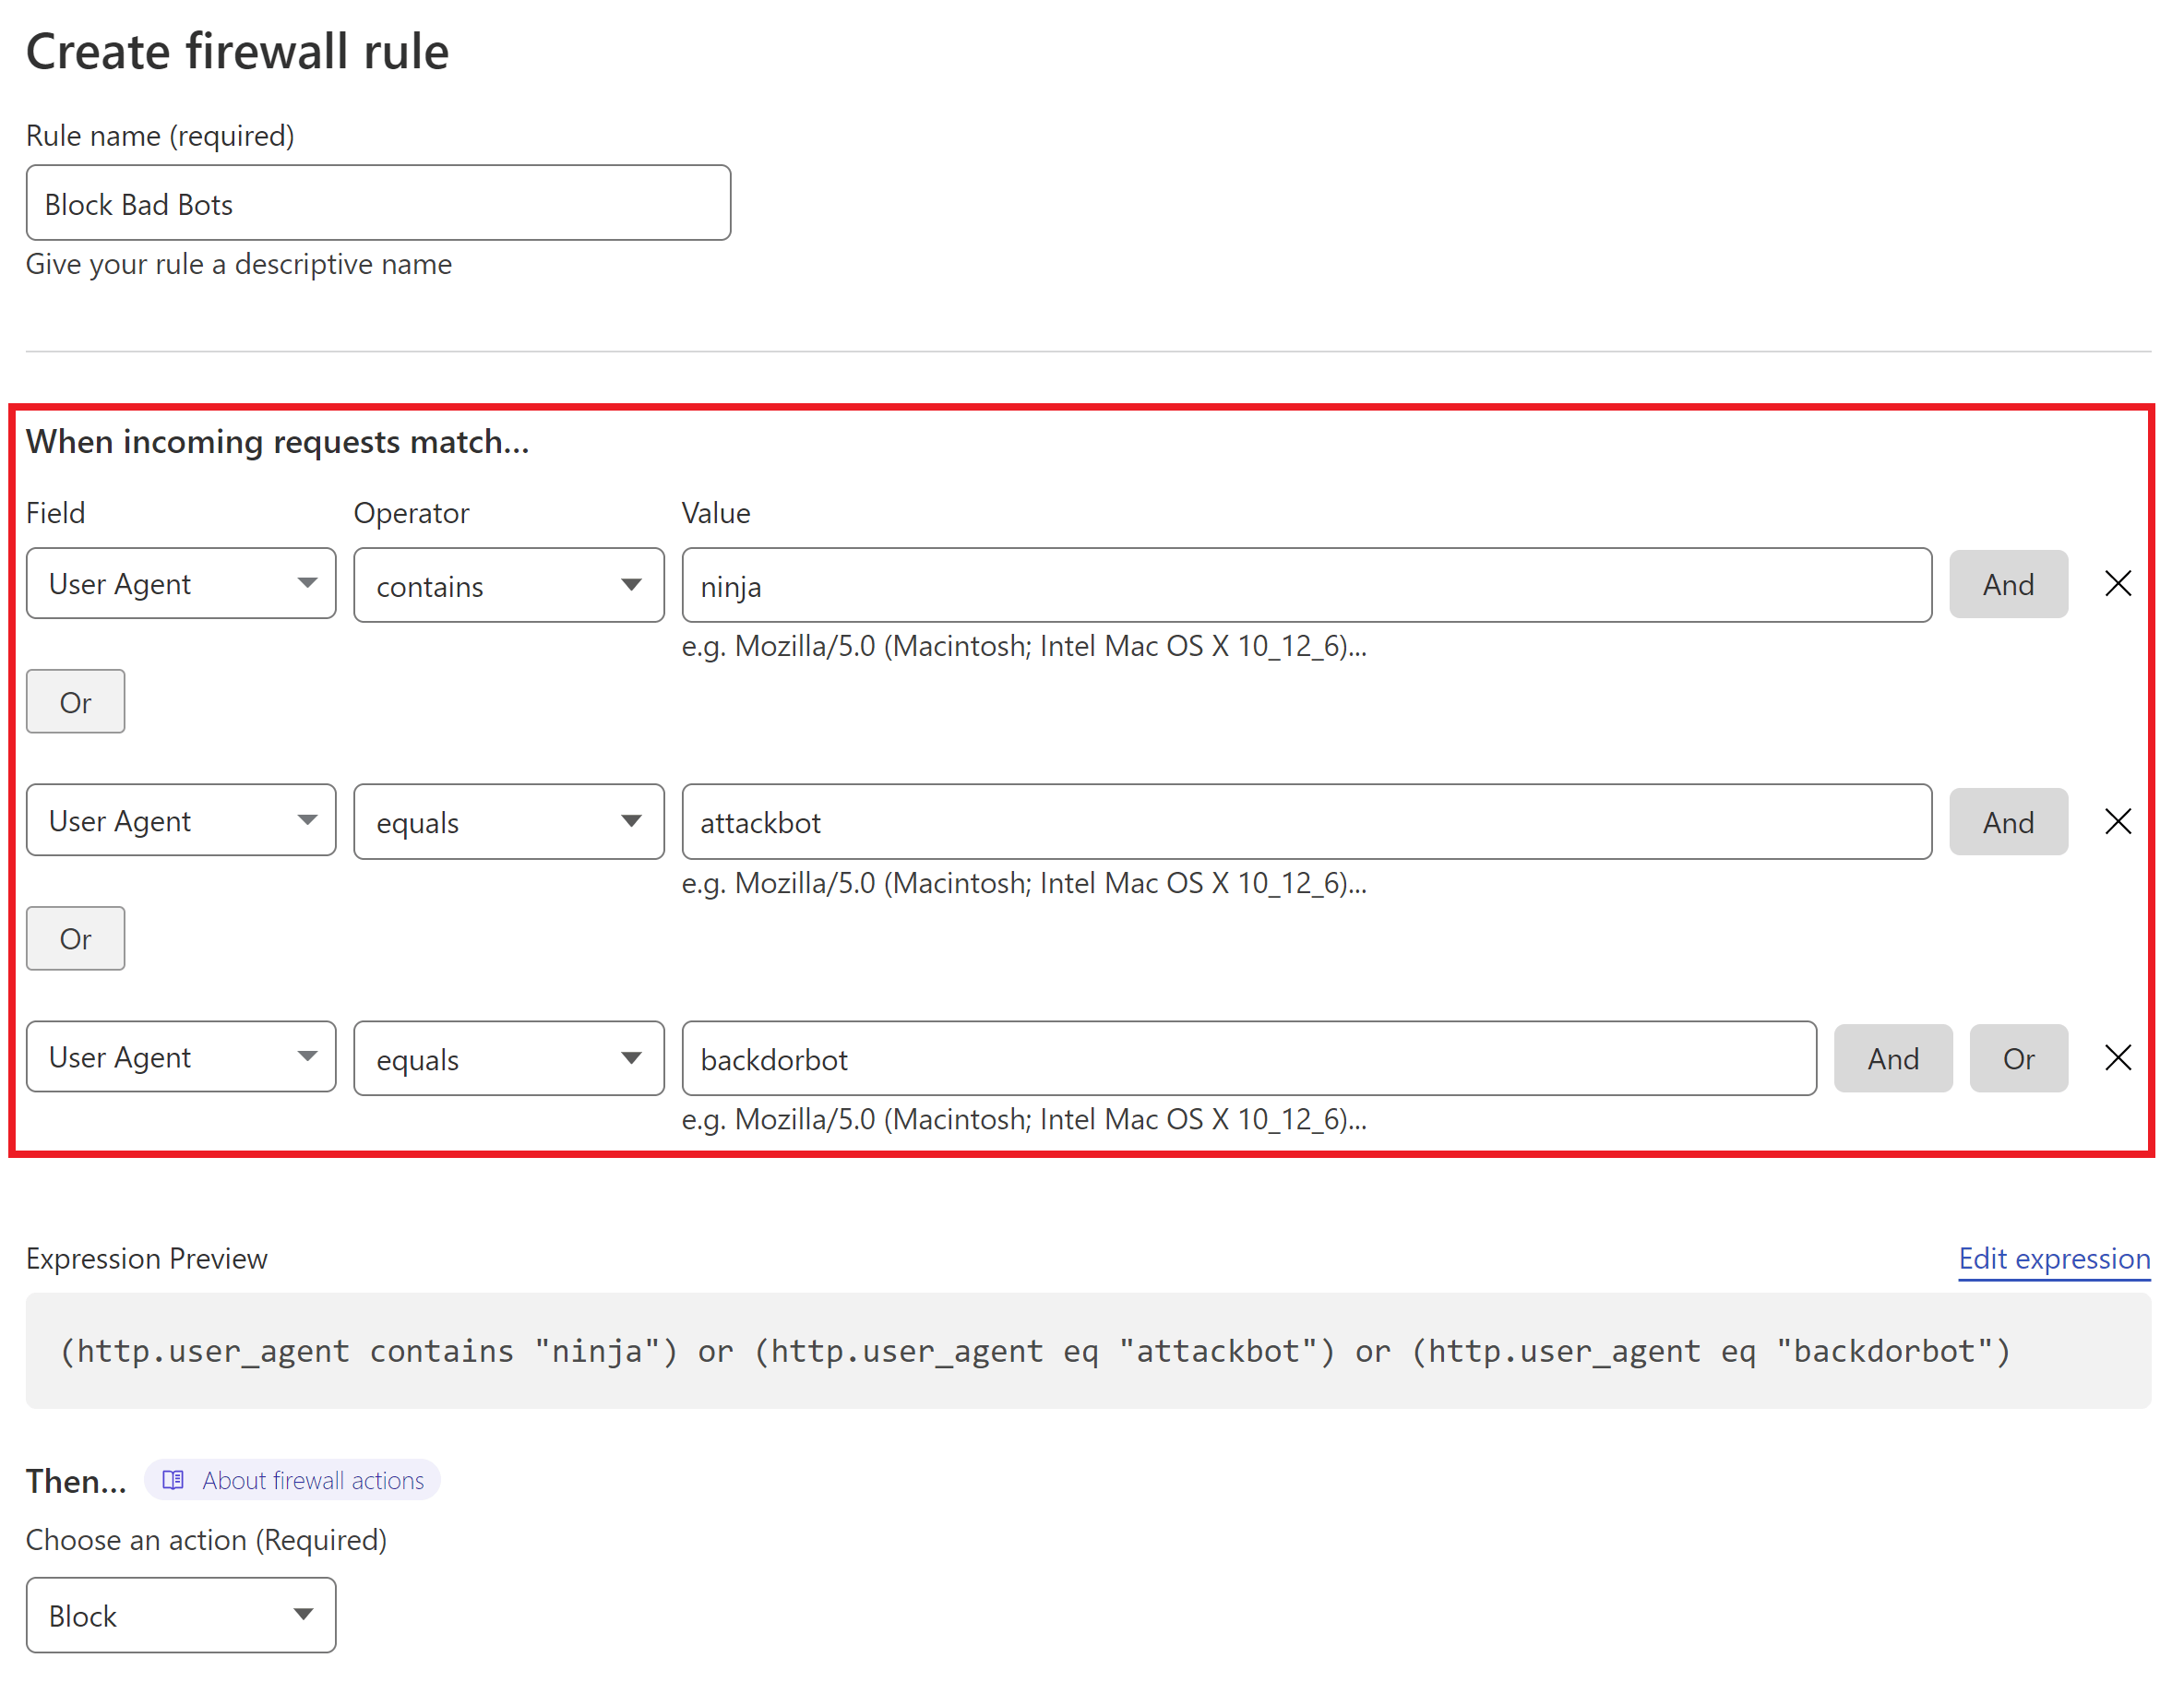
First, give your rule an easy to identify name.
Next, set the following:
- Field: User Agent
- Operator: “Equals” or “Contains“
- Value: Add the name of the bad user agent
Add additional bots with the “OR” option on the right hand side.
Here’s an example of blocking multiple bots (and while these are bad bots, it’s only an example of how the rule can be used, not a comprehensive recommendation):
Step 3. Set the Action and Deploy Your Rule
Cloudflare can block all requests that break the rule outright.
When ready, click the Deploy button.
Epic! Great read. Thank you so much for this high valuable post Steve!
:: Question 1: Regarding Part 1. Country or Continent Blocking
When I would restrict access to all but the Netherlands as an example, would scripts that send/receive data outside of the Netherlands still work? I suppose they do since they do not have to do anything with an IP?
:: Question 2: Regarding Part 2. Locking Down WordPress
Inside Gridpane under hardening, there are also is XMLRPC block option. Is that the same? Why would one set it up in Cloudflare then? Because it is closer to the source? IF so, I suppose it will be unnecessary to set the hardening in GP too?
Hey Alexander, no worries!
Re Q1, I would expect what you’ve described would work fine, but I would still definitely test this to be sure.
Re Q2, this is doing the same thing as the GridPane XML-RPC hardening measure, just at the DNS layer, so these requests never even reach the server. I personally do still use and recommend using of all the GridPane server-level measures as well though, including this, as if you ever do need to deactivate the Cloudflare proxy for any reason you have that security already in place. There’s no downside to having this active at both Cloudflare and GridPane.
Hope this helps!
Hi Steve, thanks for the helpful article.
I have a little question about locking down the wp-login/wp-admin of my website. I tried to use a specific query string as you did in the example, but the rule is not working. Do I have to set something other than the WAF rule for making it work?
Hey Richard, no worries. I just checked this one and I actually confirmed the same thing. I may need to remove it from the article, but I’ll try sort a workaround and I’ll let you know!
Apologies it took so long to update you Richard. I used this on a bunch of my sites for a long time, but it’s likely I always used SSO, and I haven’t found a workaround. I’ve removed it from the example.
Thank You
Hi,
Will blocking wp-login.php block Googlebot and hurt a site’s SEO?
Thanks.
Hey David, it will block Googlebot on /wp-login.php unless you specifically whitelist it (which you can do if it makes you feel more comfortable), but it shouldn’t hurt your SEO as it can still crawl the rest of the site. Just like /wp-admin, there’s really no reason for Google to be crawling your login page, and ideally, you don’t want it indexed.
Thanks for sharing such informative content.
Hello
This is a good post. However, can I please ask. I don’t see this covering protecting the plugins directory. I hope you might update the following expression to protect the plugins directory also
(http.request.uri eq “/xmlrpc.php”) or (http.request.uri.path contains “/wp-content/” and not http.referer contains “yourwebsitehere.com”) or (http.request.uri.path contains “/wp-includes/” and not http.referer contains “yourwebsitehere.com”)
Hi Matthew, glad the post was helpful. The plugins directory is already protected by this expression as it’s located inside of wp-content: /wp-content/plugins.
Thank you for idea
Thank you for this wonderful post!
Got Typo….
STEP 2. CONFIGURE YOUR FIREWALL RULE EXPRESSION
First, give your rule an easy to identify name.
Here we’ll create 3 separate rules for each of the area’s outlined above. First, we’ll simply block direct access to xmlrpc.php with:
Field: URI Path <<— SHOURLD BE JUST "URI"
Thanks for the heads up. For this rule either will actually work, but on looking over this again I’d go with “contains”. I’ll update the screenshot soon.
Hi, I have a WooCommerce site and the “locking down” rule is blocking multiple xml access attempts. Should I worry about it? Is there any exception for WooCommerce?
Hi André, you’ll need to thoroughly test that everything is working as expected and adjust if necessary. Without knowing more about the site and the specific requests, I can’t provide much guidance, but if it’s requests to xmlrpc then these are likely brute force attacks.
This is an AWESOME writeup! Thank you so much for sharing to the community.
IMO, blocking bad traffic before it even arrives to your website is PRICELESS!!!
I was left with 3 questions though, and I’m really hoping that you have a rule that might seamlessly work…
1) What about all of those User Enumeration (?author) Scans?
(http.request.full_uri contains “?author”)
2) How about blocking the debug.log?
(http.request.uri.path contains “/debug.log”)
3) Is it realistic and/or safe to combine all of these into a single rule?
Hey, sorry for the late reply. I hadn’t thought about the first 2 during the write up since GridPane have measures to take care of those, but sure, or you could lock down the debug.log to a specific IP. For #3, you could add them as a single rule, but it’s easier to manage when added as multiple, and then you can also turn specific parts off if needed, and not the entire ruleset.
Regarding rule 2.1 Mass Lockdown, does this rule also prevent verified bots from crawling your site, eventually affecting SEO?
Hi Cath, this rule locks down areas of your website that no bot should be trying to crawl. It won’t affect bot traffic accessing the public parts of your site. More info on blocking bots is available in part 3.
Hi Steve,
I tried your rule for wp-admin and wp-login.php protection. I use multiple IPs for access to those areas so I listed them all with OR. I got something like this: “(http.request.uri.path contains “/wp-admin/” and not http.request.uri.path contains “/wp-admin/admin-ajax.php” and not http.request.uri.path contains “/wp-admin/theme-editor.php” and ip.src ne 222.22.222.22) or (ip.src ne 33.33.333.33)” etc. I created the same rule for wp-login.php.
However, no matter which of those rule I deploy, the entire site becomes unavailable (restricted by Cloudflare) for visitors from different IPs.
Hi Dave, probably best posting this one in the community forum along with a screenshot of your setup.
Sometimes, it blocks IPs that you include under WAF’s custom rules. To prevent that from happening, whitelist the same IPs under WAF’s Tools tab.
Hi, Wonderful Post.
Am wondering Should I use IPv4 address instead of IPv6 address that google shows and Changes everyday in Cloudflare as ip.src to unblock my IP address so that I can access my Admin area and other pages?
In short should I use IPv4 address to unblock my specific pages?
Thanks.
Sorry for the delay Johny. Honestly, it probably needs testing. If you have a static IPv4 but still get blocked with Cloudflare, you would want to then try whitelisting your current IPv6 address to see if that then allows access.
Yeah, I was running into that issue myself and ended up using IPv6
Has anyone else seen issues with either WAF rules or the “Zone Lockdown” rules applying altogether? I did the wp-admin (and similar) lockdown based on source IP address and couldn’t get it to apply so I contacted support. They recommended using Zone Lockdown under the Tools menu. so I created lockdown rules as described for http://www.sitename.com/wp-admin , https://www.sitename.com/wp-admin , etc.. These are even not applying so I’m wondering if there’s something just off with my overall configuration here. Support hasn’t gotten back to me yet.
Hi Geoff, I’ve not heard of anyone experiencing issues and this has been published for a long time at this point. Please post your WAF setup in the community forum for troubleshooting advice. This is beyond our scope of support and not something that our support team provides assistance for.
Hi Steve,
Mine is an e-commerce site serving costomers majorly in my own country and very few outside.
I have already enabled 7g firewall and fail2ban with wp fail2ban plugin.
Can you please help me with following things
1) Do i still need to use cloudflare? What additional benefit will it serve?
2) Stopping malicious traffic with 7g firewall on my server against blocking it at DNS level using cloudflare? Which will give me better server performance and low latency?
Hi Jango,
Every site is different, and it’s especially important to be cautious with WooCommerce (you don’t want to accidently block any external services connected to your site if you’re using any), but here’s what I would probably do.
I would still use Cloudflare – if you can block threats at the DNS layer then this means less work for your server, and the rules outlined in this post that will help lock your site down further than it would otherwise be without them. In theory, using Cloudflare should also result in lower latency as parts of the site will be served closer to the end user, but this isn’t always the case if the server is actually located in that region. Cloudflare also just makes it easy to fend off DDoS and DoS attacks and even block entire countries where visitors clearly have no legitimate business.
Hope this helps!
Step 2. Configure Your Firewall Rule Expression:
IP Source Address-
How to find this IP address and how to go about it?
I didn’t know I could go ballistic on Cloudflare WAF rules as stated above. Wow!
I noticed the Harden WP #2 step (used domain instead of IP block) is blocking people getting .png .webp files sometimes.
How would you harden wordpress but prevent issues like this from occurring?
Thank you, that was very helpful.
What would you recommend for setting in the WAF > rate limiting rules?
Thanks so much for these clear & detailed explanations! I was trying to lockdown access to /wp-admin to my home IP as well as my VPN IP for when I’m on the road. I got the lockdown to my home IP working but cannot figure out the VPN IP part of it, either as part of the home IP rule or by using its own rule for the VPN IP. Perhaps I misunderstand how VPNs work but simply using the VPN IP address does not seem to work. Any thoughts on this?
Hi Arp, sorry for the delayed reply. The VPN IP should really just work like any other IP. When you connect, maybe double check it with an IP checker to confirm what your VPN is stating is true. I’ve used VPNs for various testing like this and whitelisting has always worked without issue, so it’s a bit of weird one. You should be able to add your IPs together in one rule.
I always find myself coming back here to review the rules. Awesome post all around Steve!
Thanks Josh, I appreciate it! Glad it’s been useful 🙂
I have just changed the wp-login page and wp-admin page using a plugin. Working great. However, the comment spam and contact form spam is something I was looking forward to. Thanks for the detailed article!
are you sure about blocking wp-admin? wp-login perhaps, but blocking whole wp-admin It will crash your website, ajax calls and js are called
Hi Kamil, you need to exclude admin ajax as the article mentions. With any firewall you need to thoroughly test the site to ensure that everything works as expected, so you can modify for different sites as needed.