Create and Set Your Backblaze B2 API Credentials

6 min read

Introduction

Backblaze B2 is an inexpensive and reliable cloud storage provider. This article will walk you through to generate a Backblaze API key and add it your GridPane account so that you can use their service for remote website backups.

Table of Contents

Backblaze Pricing

Backblaze offers excellent value for money and offers 10GB of storage free with your account. Depending on your sites, this may be enough to cover your backup storage costs.

Their pricing isn’t just based on storage alone though, and there are fees for downloading and transactions. As with storage though, the cost is incredibly low and there’s a free allowance.

Information

The pricing information below is all correct as of Aug 2023. You can view Backblaze B2 pricing directly on there website here:
Backblaze B2 Cloud Storage Pricing

Storage Costs

Storage costs $0.005/GB/month, and data stored with Backblaze is calculated hourly, with no minimum retention requirement.

Download Costs

Downloads are charged at $0.01/GB when downloading files. The first 1 GB of data downloaded each day is free.

Transaction Costs

These costs are associated with API usage. For example, sending backup data via API.

The costs are incredibly cheap:

  1. Class A Transactions: Free
  2. Class B Transactions: First 2500 per day are free, then $0.004 per 10,000
  3. Class C Transactions: First 2500 per day are free, then $0.004 per 1,000

It’s possible that you may hit your free tier ceiling, though this is very rare. Caps can be configured inside your Backblaze account settings under Caps & Alerts.

Step 1. Sign up for a Backblaze account

Head over to https://www.backblaze.com/cloud-storage and sign up for an account.

You’ll be asked for your name and email address and then to verify your email address after clicking sign up.

Your first 10GB of storage is free (which is awesome), and after that, you’ll need to add a payment method. We recommend you do this immediately to ensure that the transition over 10GB is seamless when the time comes.

Step 2. Create an App Key

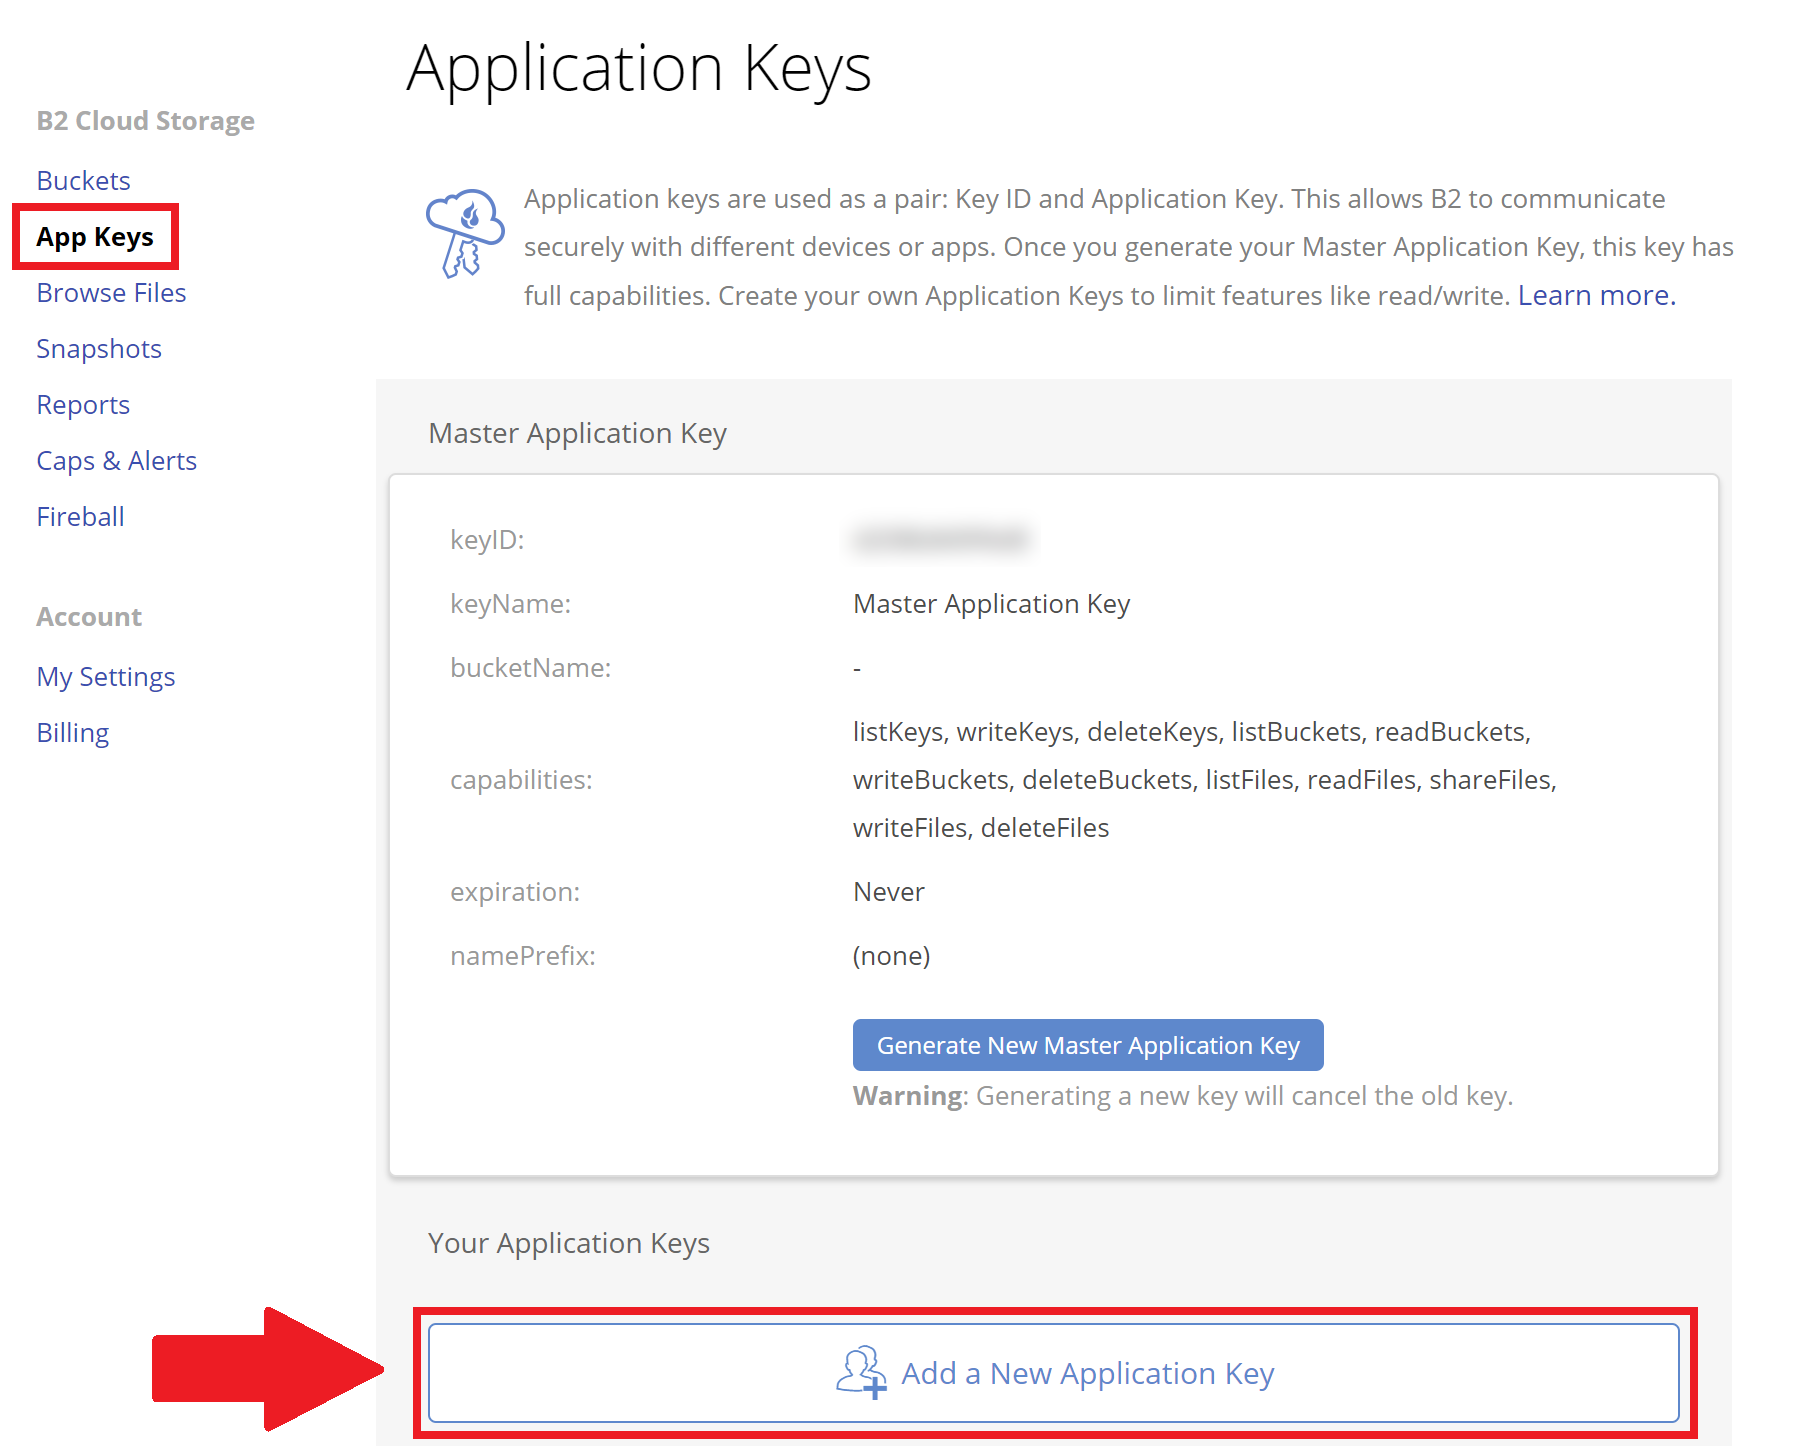
In the menu on the left-hand side, click through to the App Keys page, and then click the Add a New Application Key button (you can ignore the master key):

The modal, as pictured below, will open. Here you need to give your key a name and select the Read and Write check box:

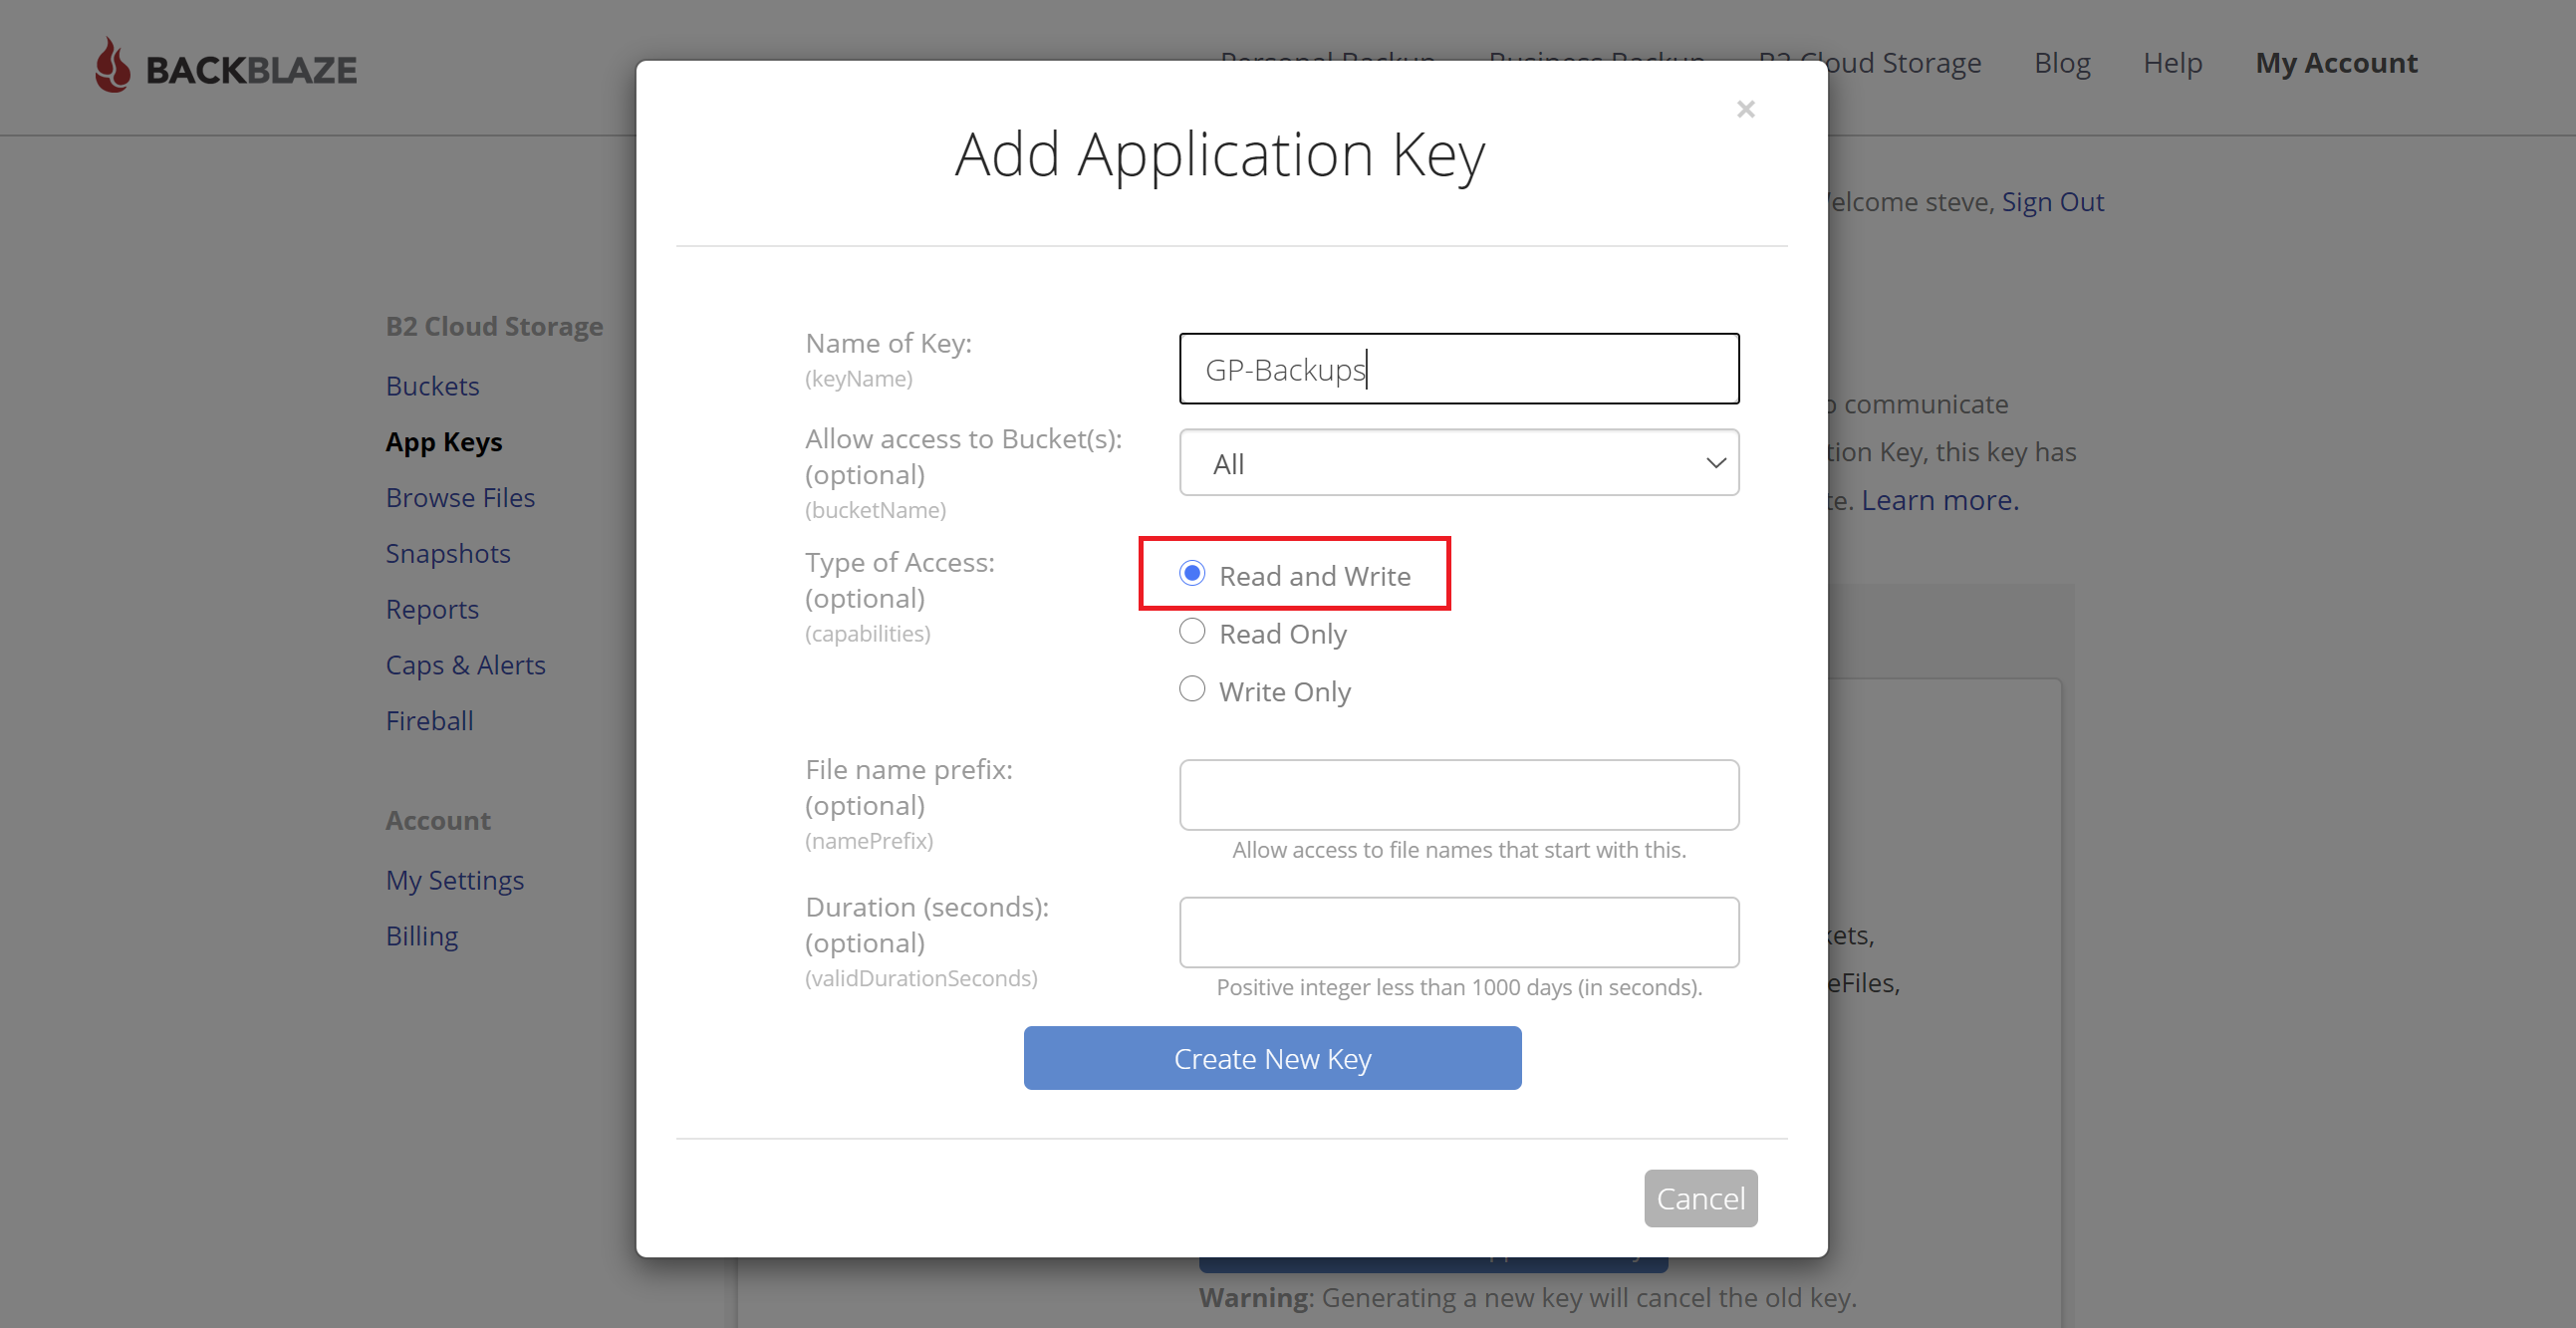
Next, click the “Create New Key” button.

Step 3. Copy your API credentials

Your API credentials will appear on the page. These will only be shown one time so be sure to copy them before leaving the page.

We need to the:

  • KeyID
  • applicationKey

Step 4. Add your Backblaze API credentials to GridPane

Back in your GridPane account, click through to your settings page:

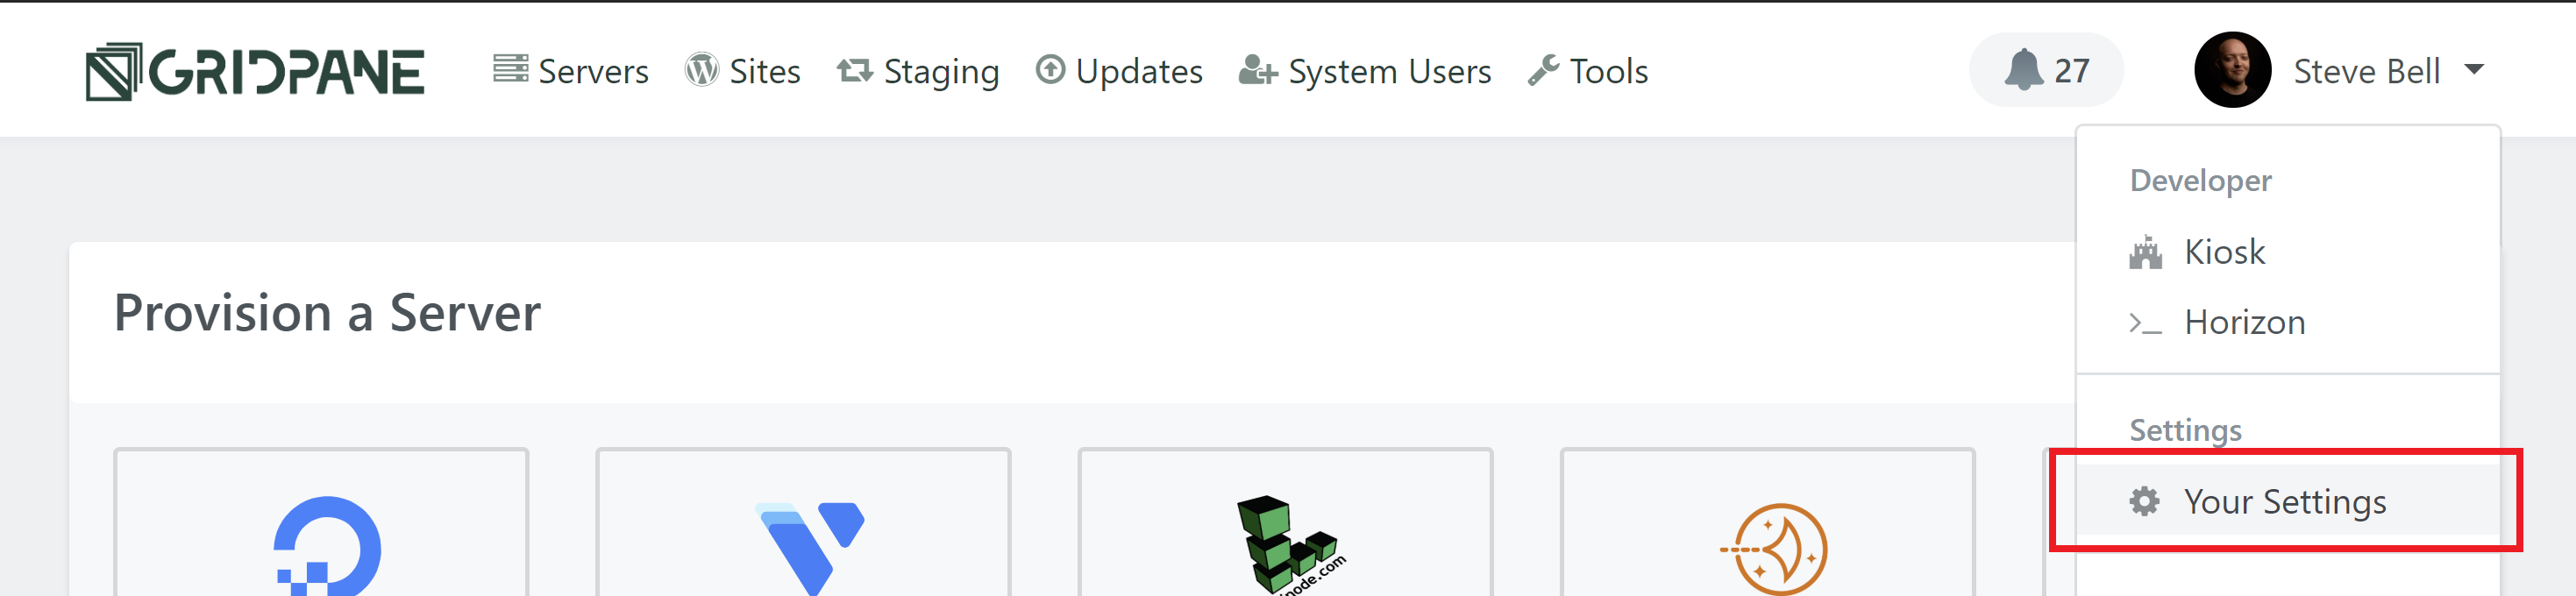
Here, click through to the Integrations page, click Backup Providers, and enter your API details in the Backblaze tab:

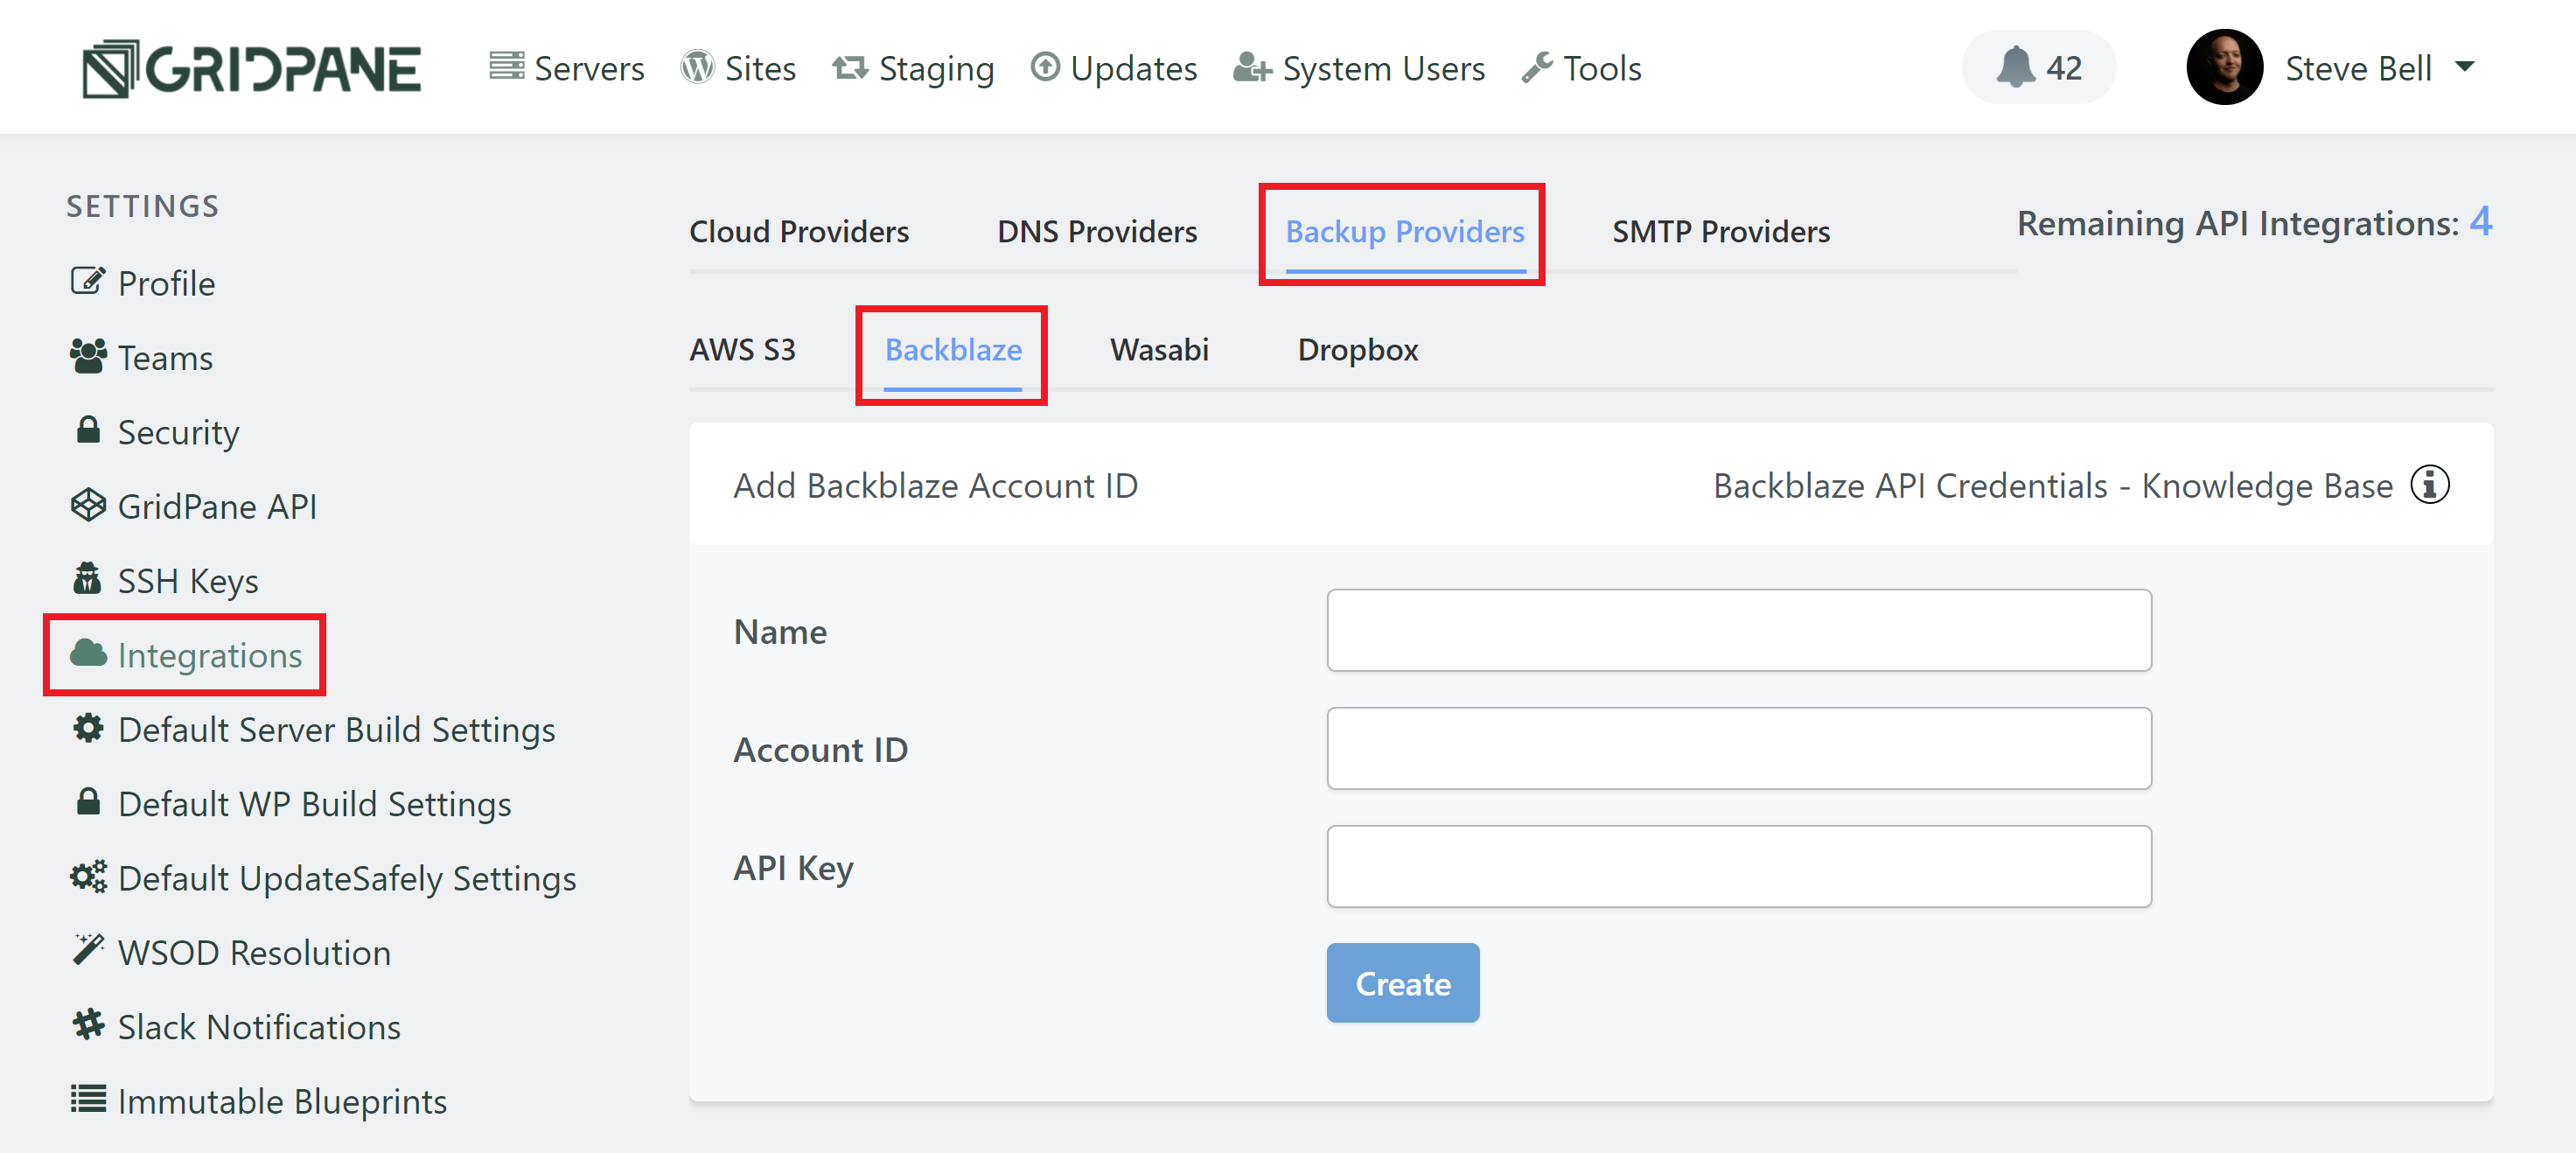
  1. Give your key a name.
  2. Your KeyID = Account ID
  3. Your applicationKey = API Key
  4. Click the Create button.

You’re all set! To learn how to configure remote backups for your websites, check out the following article for a full walk-through:

Remote Website Backups

Optional, But Not Recommended: Creating Individual Server Buckets without Globally Writeable Permissions

By default, our API uses globally writeable permissions. If you don’t want to give GridPane this level of access, the following can be done instead, but please read the two notices below before you proceed.

This is only necessary if this is something you specifically want to do. Otherwise, you can follow steps 1-4 above and leave this to GridPane to create.

Important: Please Read Before Your Proceed

While this approach is possible, it is not recommended. Locking keys to individual servers means that any backups you take will not be accessible from any other servers that you have now or in the future, and they therefore may not be accessible when you need them.

Alternative Option: If you already use Backblaze in other areas of your business, but do not want to grant global API key access to GridPane for this reason, a better alternative is to simply create a second, separate Backblaze account.

Important: Cloning Notice

When cloning your websites from one server to another you will still have the option to clone/configure your remote B2 backups. However, this will fail because the API key can only access the bucket on the original server.

Background: How Buckets Work

Each server has its own unique bucket. This is so that multiple servers don’t have write access to the same bucket, which wouldn’t be ideal in terms of security.

The individual server buckets follow this naming format:

gridpane-backups-${UUID}

Step 1. Copy the UUID

The ${UUID} can be found on your server with the following command:

cat /root/gridcreds/gridpane.uuid

The output will look similar to this:

root@nginx:~# cat /root/gridcreds/gridpane.uuid
876ac0ab-690f-4067-bdb6-9b2eec41b989
root@nginx:~#

We remove the last 3 digits for Backblaze B2 (see the info box below for details), and the name for your bucket would be as follows:

gridpane-backups-876ac0ab-690f-4067-bdb6-9b2eec41b

Information

The bucket name for this server would normally be as follows on AWS S3 and Wasabi:

gridpane-backups-876ac0ab-690f-4067-bdb6-9b2eec41b989
However, prior to December 2022, Backblaze had a 50-character limit, and to maintain backwards compatibility, we continue to enforce this limit. Remember, all your servers can restore backups from any site built on any other server.

Step 2. Creating Server Buckets Manually

To create a server bucket manually, log into your Backblaze account and select Buckets from the lefthand menu. From here, click the “Create a Bucket” button:

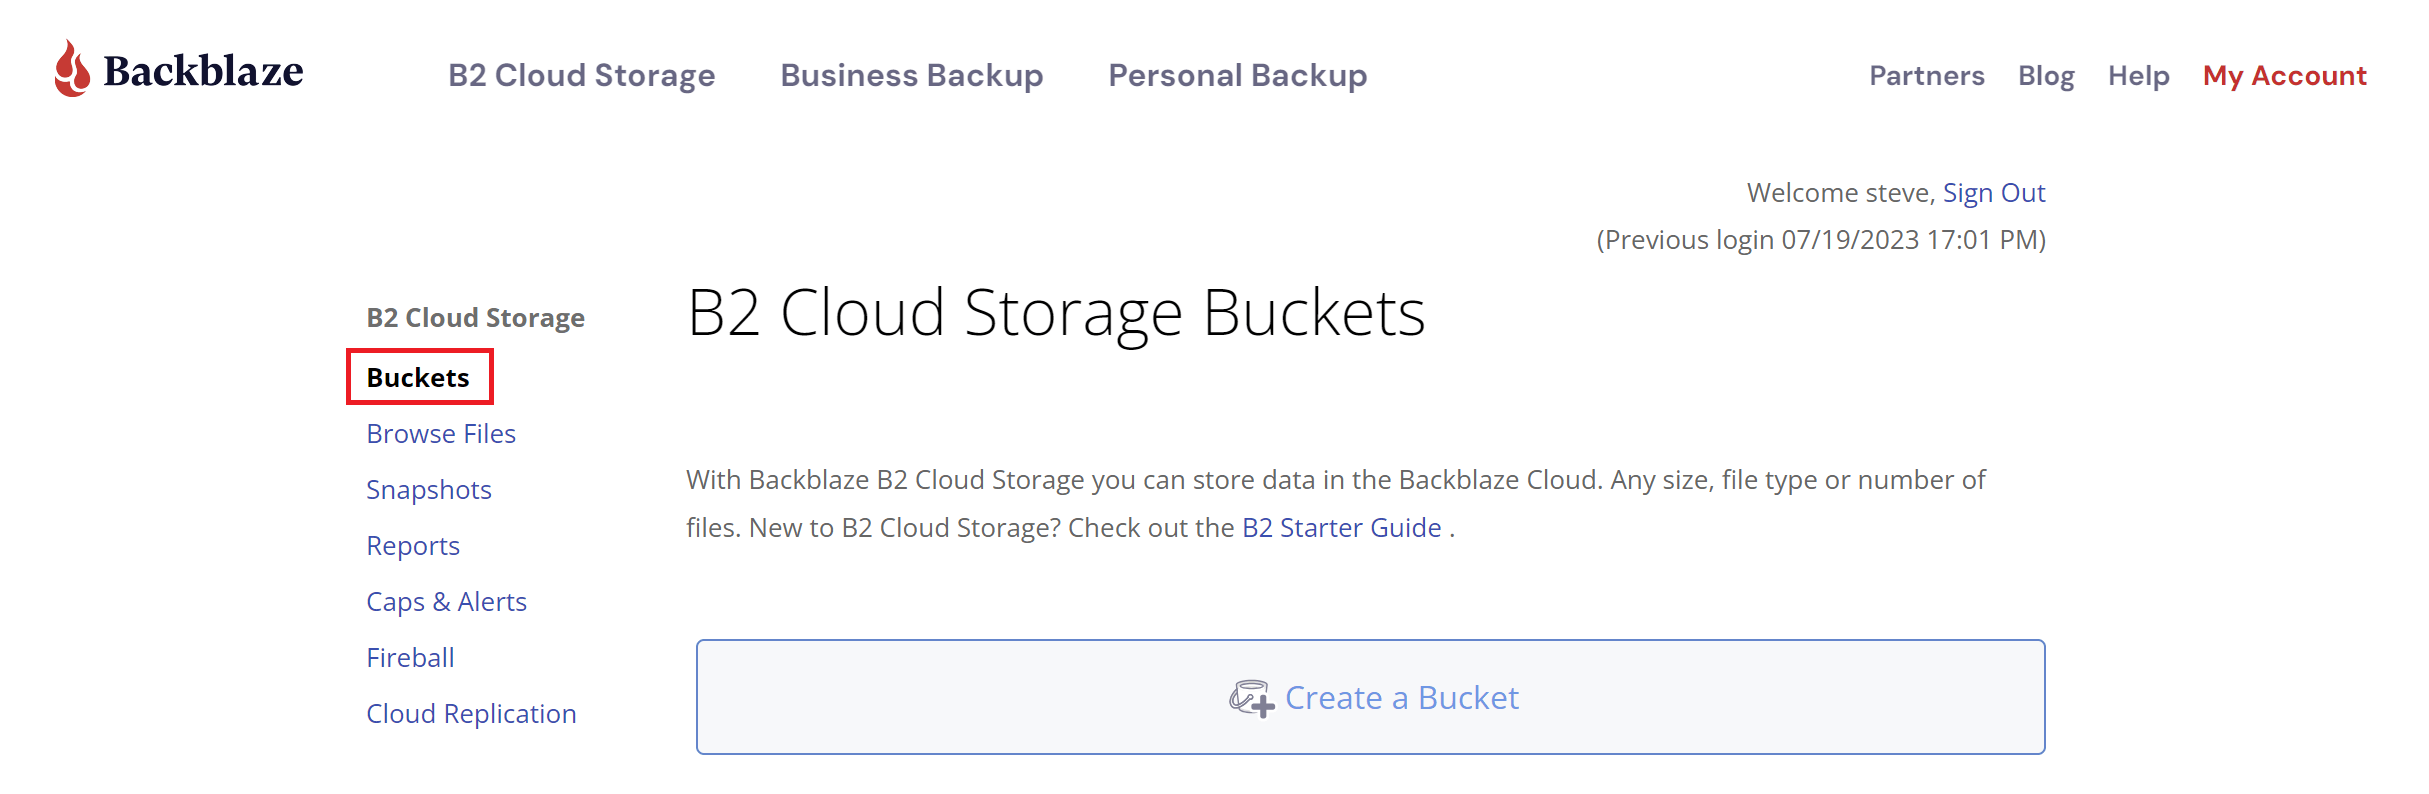
There’s no need for the bucket to be public, so keep it set to the default of private. There’s no need to encrypt, as the data is already encrypted on your server, stored encrypted, and transferred encrypted.

  • Bucket Unique Name: The bucket name you’d use is as stated above – remove the last 3 digits from the UUID. In our example, it would be as follows:
    gridpane-backups-876ac0ab-690f-4067-bdb6-9b2eec41b
  • Default Encryption: Disable
  • Object Lock: Disable

Step 3. Create and Apply Your API Key

Next, select “Application Keys” from the left hand menu, and then select the “Add a New Application Key” button to create a new API key.

From here:

  • Give your key a name
  • Select the bucket you just created from the “Allow access to buckets” dropdown
  • Select “Read and Write” access
  • Make sure you check the “Allow listing all bucket names including bucket creation dates (required for S3 List Buckets API)” option

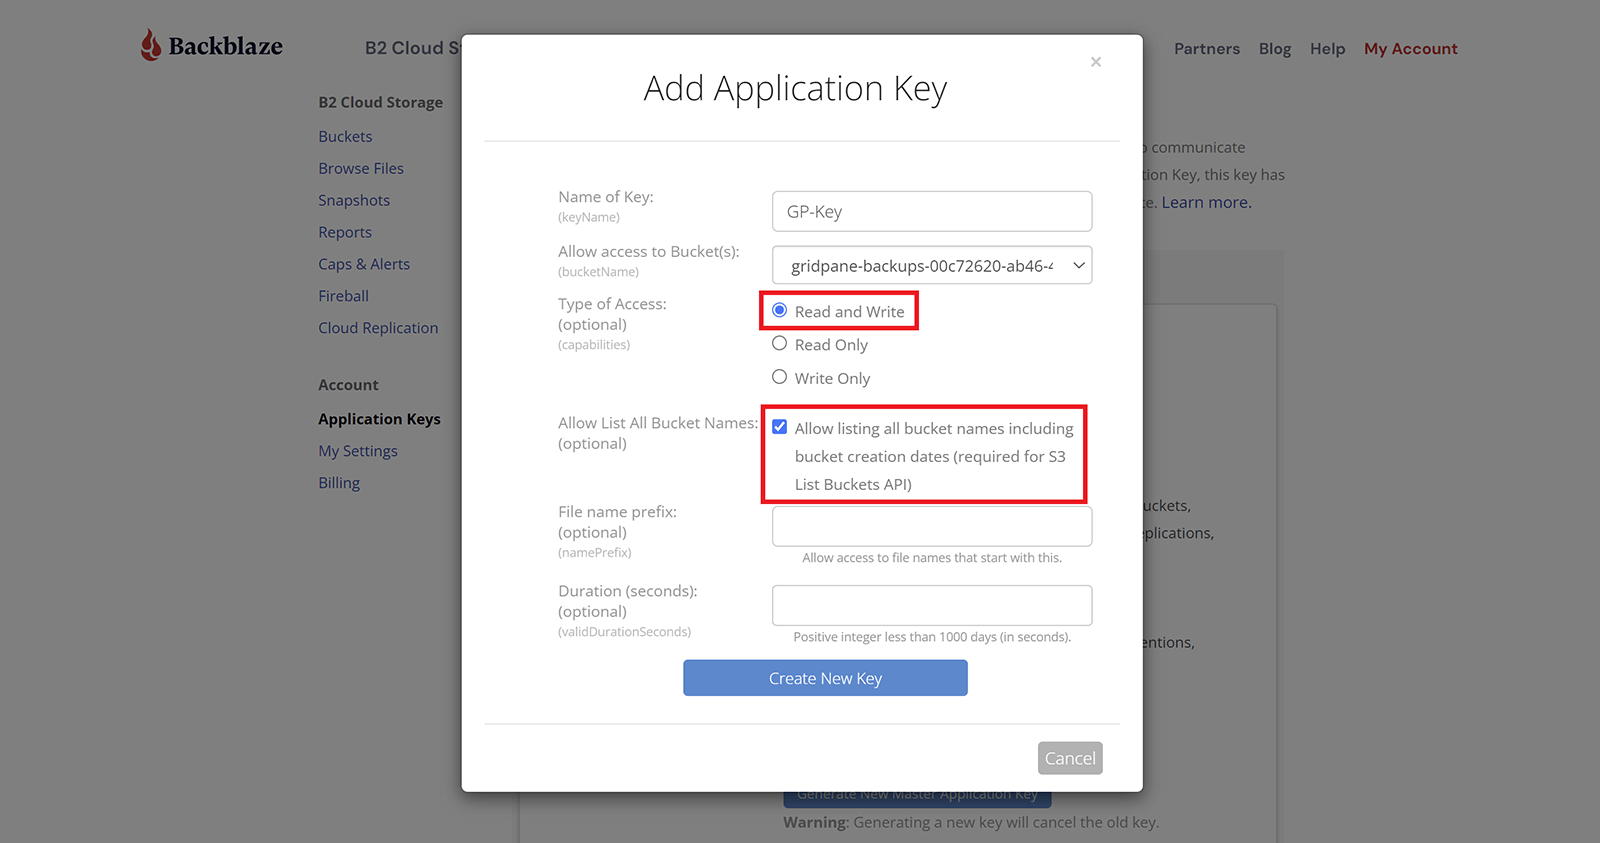
Click the “Create New Key” button.

Step 4. Add Your API Key to GridPane

See this section.

Further Reading

For further information about how backup systems work, the available options for configuring them, and for setting up remote backups (available on V2), please see the articles listed below.

Strategy

Recommended Backup Strategy

V2 Backup Documentation