How to Create a Content Security Policy (CSP Header)

10 min read

Table of Contents

  1. Introduction
  2. CSPs and GridPane
  3. A CSP is More Than Just a Box to Check
  4. Creating Your Content Security Policy Config
    GridPane’s Default Content Security Policy
  5. Formatting
  6. Creating/Customizing Your Own Content Security Policies
  7. Testing a Content Security Policy
  8. Add Your Customizations to Your Server
  9. Further Reading

Introduction

A Content Security Policy (CSP) is a set of instructions for browsers to follow when loading up your website, delivered as part of your website’s HTTP Response Header.

This is a widely supported security standard that can help you prevent injection-based attacks by fine-tuning what resources a browser is allowed to load on your website.

It specifies exactly where the browser is allowed to load resources from, and it’s an effective way of blocking anything malicious loading from elsewhere should instructions to do so somehow make their way into your website.

A browser simply does what it’s told, and has no idea whether a script is malicious in nature or not. When creating a CSP, you can customize exactly where things like JS, CSS, fonts, or pretty much anything at all, are and aren’t allowed to load from.

CSPs and GridPane

GridPane includes several security headers for every website on the platform. These prevent cross-site (XSS) scripting and clickjacking in order to keep your website secure.

For clickjacking protection, we use the catch-all X-Frame-Options header. This header is an all-or-nothing header, Google killed it when they made Chrome ignore its granular configuration:
https://developer.mozilla.org/en-US/docs/Web/HTTP/Headers/X-Frame-Options

It is now considered a legacy header and has been superseded by the Content Security Policy Header (CSP). The Content Security Policy header provides for fine granular control over the security policy not just for iFrames, but all content types.
https://content-security-policy.com/
https://developer.mozilla.org/en-US/docs/Web/HTTP/Headers/Content-Security-Policy

GridPane does come with a GP-CLI command to easily enable a partially configured CSP header, but we do not enable this header by default. It requires affirmative action from a user to enable it.

Why a CSP Isn’t Active by Default

So the question is why? Why are we implementing the outdated legacy header to stop Clickjacking protection, instead of defaulting to enable the CSP header, which provides for granular clickjacking protection and so much more?

This is primarily for 3 reasons: –

  1. X-Frame-Options is a catch-all to ensure iframe clickjacking protection on site builds. Enabling it by default is highly unlikely to cripple any sites.
  2. CSP headers have no one size fits all configuration, these need to be customized on a website by website basis to actually provide any real security
  3. If we did implement one by default, it would have to be wide open to avoid crippling sites and swamping our support team 24/7, therefore, it wouldn’t provide any real security at all. Even worse, it may give our users a false sense of security, and that goes against everything we’re about as a company.

A CSP header will dictate where you can load fonts and analytics from, it will affect map and video embeds, code embeds, and a whole lot more. We can’t create a CSP that takes into account everyone’s specific requirements. 

We want you to use this header, but for it to be effective and actually increase your security, it must be configured individually for each of your sites depending on their needs.

A CSP is More Than Just a Box to Check

You can check your security headers “grade” on websites such as https://securityheaders.com/.

It’s important to note that this isn’t the same thing as something like a GTMetrix score (which is inconsequential), this has a real impact on your website’s security and should be taken seriously.

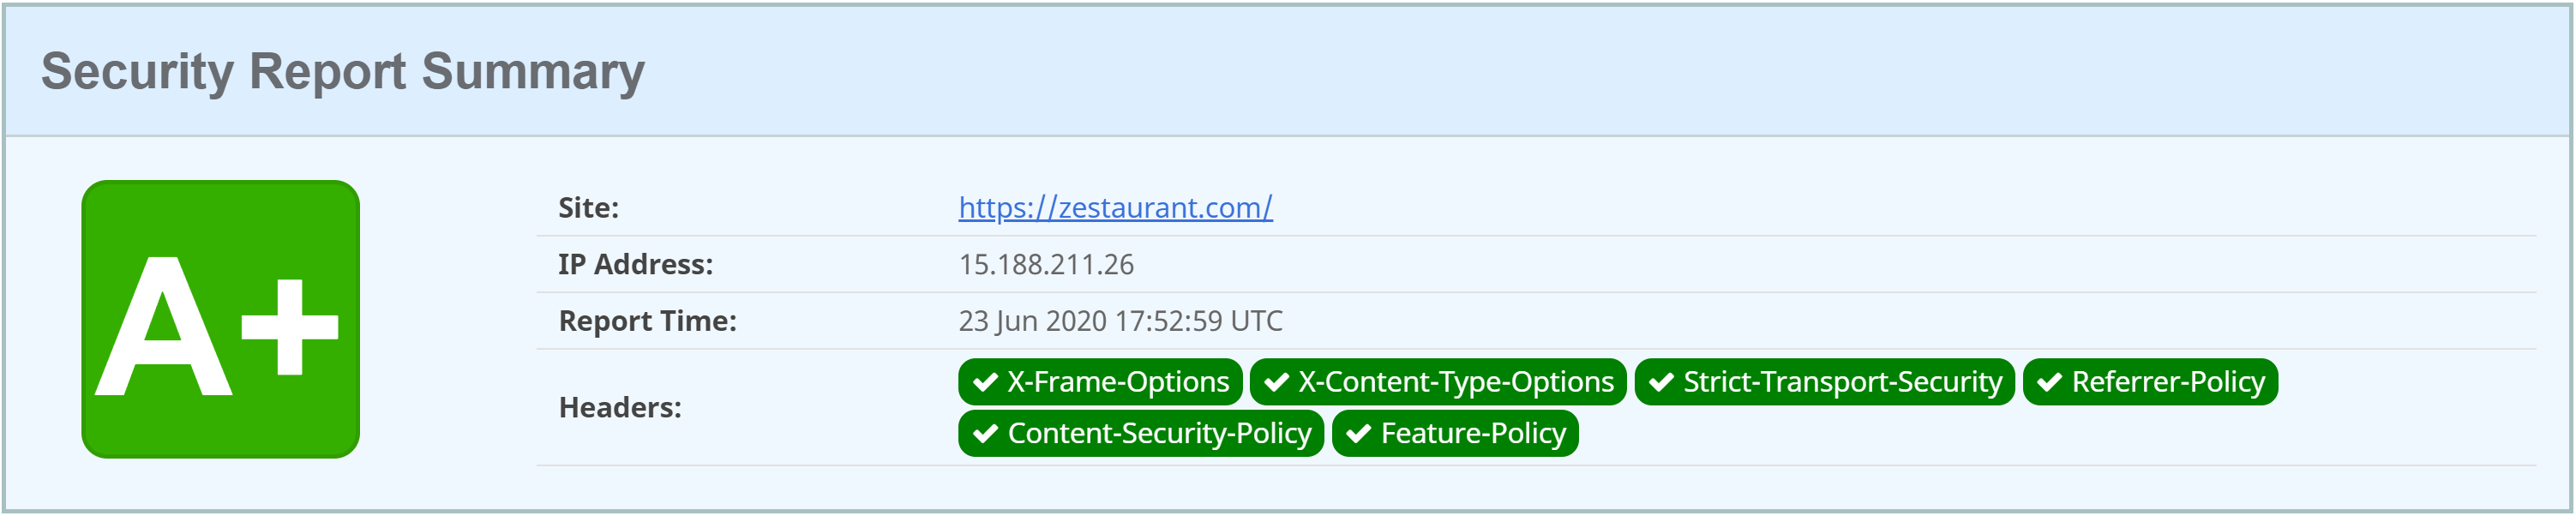
You can set up a CSP that provides zero security whatsoever and still get an A+ grade rating. It’s comically easy. Here’s an example:

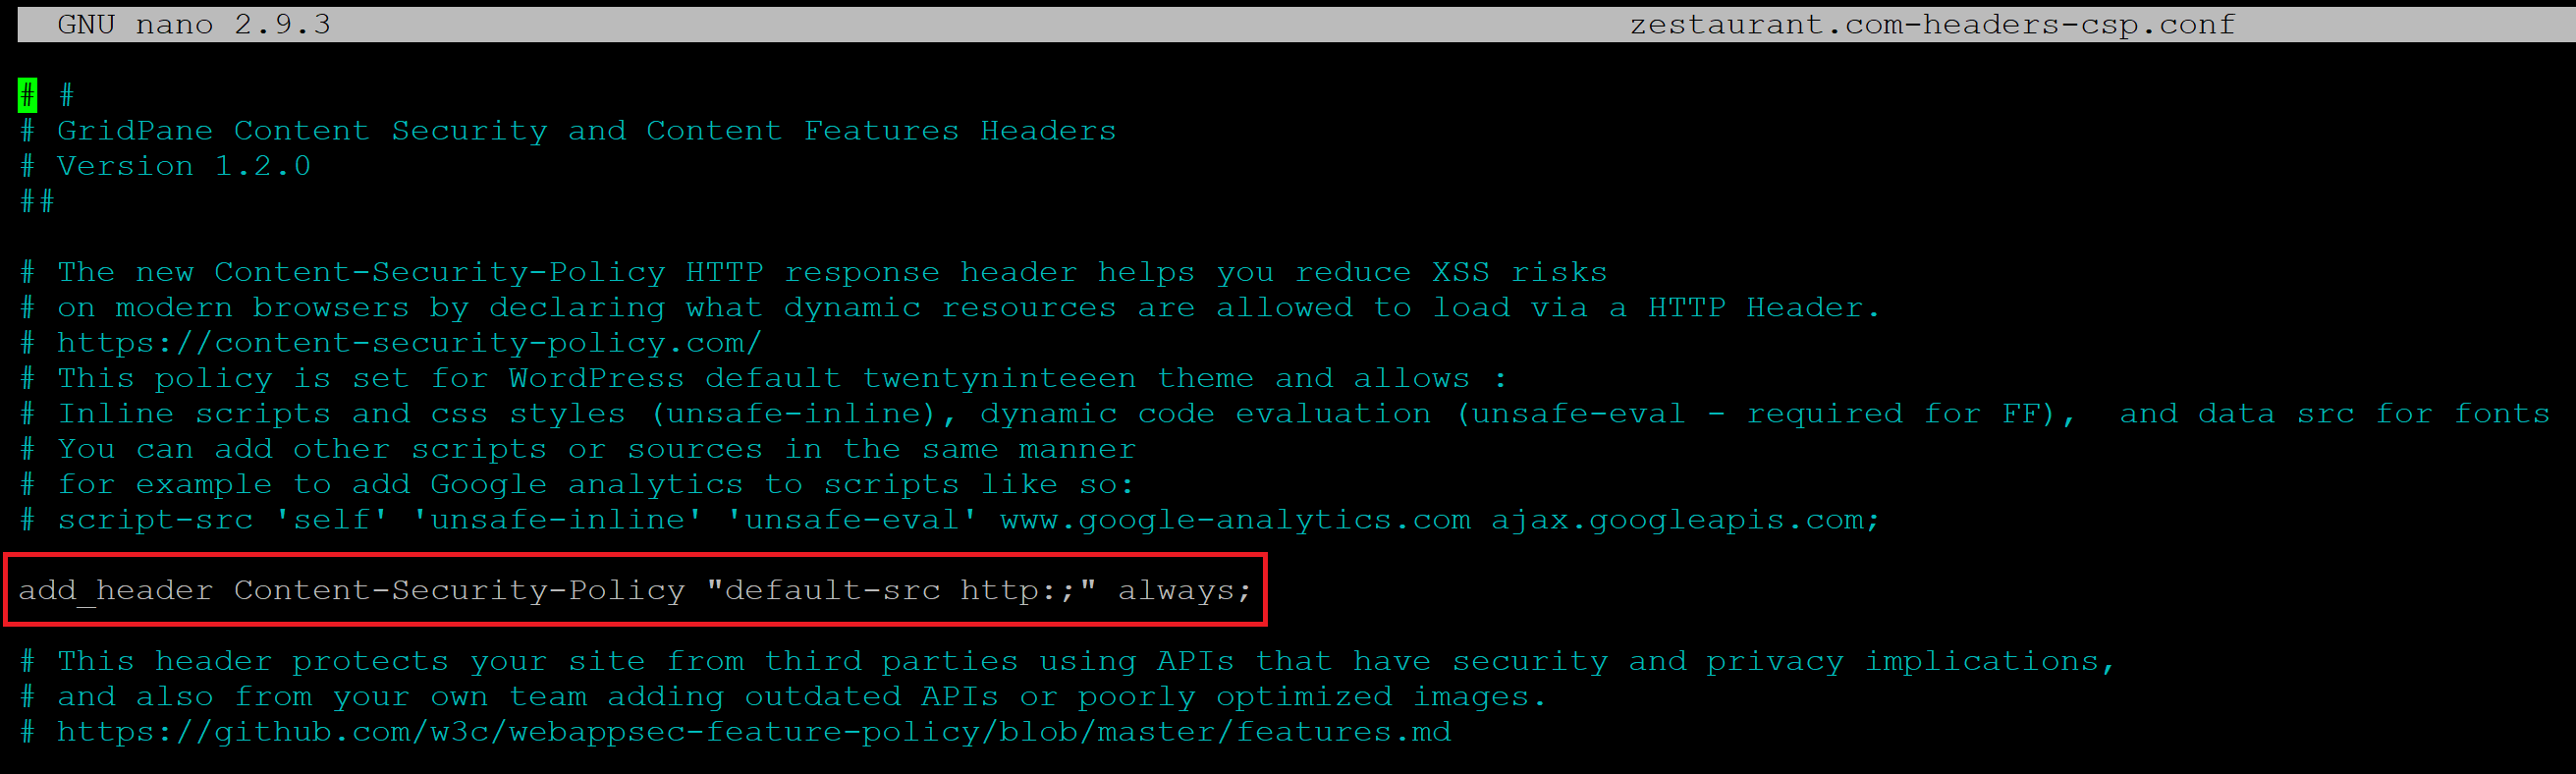
The default-src http: I’ve added here allows any type of resource from any source, to be loaded by the browser over HTTP. It’s the exact opposite of secure. Here’s that same websites security header grade:

Please do not do this. If you’re going to take the time to set up a CSP, do it the right way and create a real one that enhances your website’s security. Our default CSP can easily be customized, and this article will walk you through how to do this.

Creating Your Content Security Policy Config

We have our very handy GP-CLI to assist in the creation of your CSP configuration file. For this, you’ll need to SSH into your server. Please see the following articles to get started:

Important

We strongly recommend that you thoroughly test your CSP on a staging site before enabling it on your live production website.

Once connected to your server, you can run the following command to activate our default CSP (switch out site.url for your website’s URL):

gp site site.url -csp-header-on

You can also deactivate it again any time with:

gp site site.url -csp-header-off

GridPane’s Default Content Security Policy

The above commands will create and activate a CSP for your website.

The file it creates is located in /var/www/site.url/nginx/site.url-headers-csp.conf 

The default CSP configuration is as follows: –

add_header Content-Security-Policy "default-src 'self'; script-src 'self' 'unsafe-inline' 'unsafe-eval'; connect-src 'self'; img-src 'self'; style-src 'self' 'unsafe-inline'; font-src 'self' data:;" always;

What it all means

default-src 'self';
This defines the loading policy for all resources where the resource type dedicated directive is not defined (it’s the fallback). “Self” refers to your website’s domain.

script-src 'self' 'unsafe-inline' 'unsafe-eval'; 
Only scripts hosted on your website itself are allowed to be loaded, and this also allows the use of inline source elements and dynamic code evaluation such as JavaScript eval().

connect-src 'self'; 
This guards the browser mechanisms that can fetch HTTP Requests and only allows for requests to be made from your website.

img-src 'self'; 
Only images hosted on your website are allowed.

style-src 'self' 'unsafe-inline'; 
Only CSS hosted on your website itself is allowed to be loaded, and this includes the use of inline CSS.

font-src 'self' data:; 
Allows fonts to be loaded from any URI.

always; 
Always ensures that Nginx sends the header regardless of the response code.

Feature-Policy / Permissions-Policy Bonus

Information

The "Feature-Policy" is being replaced with the "Permissions-Policy". More below.

This command also creates a Feature Policy. This header protects your site from third parties using APIs that have security and privacy implications, and also from your own team adding outdated APIs or poorly optimized images. Learn more here:

https://github.com/w3c/webappsec-feature-policy/blob/master/features.md

https://developer.mozilla.org/en-US/docs/Web/HTTP/Headers/Feature-Policy

Permissions-Policy

As stated above, the Feature Policy is being replaced with the Permissions Policy. There’s not a lot of info online regarding the correct formatting, even on Mozilla, at the time of writing. 

Below is a starter example you can use:

add_header Permissions-Policy "camera=(), fullscreen=(self), geolocation=(), magnetometer=(), microphone=(), midi=(), payment=(), sync-xhr=(), usb=(), speaker-selection=()";

And you can learn more about generating your own Permissions-Policy here:

https://www.permissionspolicy.com/

Formatting

Your CSP on GridPane is added using the “add_header” Nginx directive. Here’s how the formatting looks:

add_header name "directive1 value; directive2 value; directive3 value;" [always];

Only one directive is needed to create a CSP. A directive can only be used once – any additional attempts to use the same directive will not work. For example:

add_header Content-Security-Policy "default-src 'self'; default-src https://website.com;" always;

The second default-src https://website.com;  will be ignored. The correct way to format this is as follows:

add_header Content-Security-Policy "default-src 'self' https://website.com;" always;

Creating/Customizing Your Own Content Security Policies

We recommend you read up on the header and its configuration using the following resources, in addition to this article.

https://content-security-policy.com/
https://developer.mozilla.org/en-US/docs/Web/HTTP/Headers/Content-Security-Policy

The following are some example CSP’s that you can use as a starting point to customize your own.

The Basics

There are a few values that need an explanation: –

'self' This matches the current origin i.e. your domain name (but not subdomains).

'unsafe-inline' This allows the use of inline JS and CSS.

'unsafe-eval' This allows the use of mechanisms like eval().

'none' This prevents the browser from loading this type of resource.

Each of the above requires the quotes.

Setting the default

The default-src value is the first thing we need to look at. Typically 'self' is enough for most websites. As explained earlier, this defines the loading policy for all resources where the resource type dedicated directive is not defined and refers to your website’s address.

You can also use your websites domain name, for example: 

add_header Content-Security-Policy "default-src  https://website.com;" always;

And use a wildcard to include subdomains with:

add_header Content-Security-Policy "default-src  https://*.website.com;" always;

Example 1: Allowing Google Fonts

Let’s modify the default CSP to be a little stricter and close down the font-src directive to only load fonts from our website and Google fonts. We need to change the value from 'self' data: to 'self' fonts.gstatic.com. We also need to ensure that we can load the stylesheet by adding fonts.googleapis.com to the style-src directive. 

Our edited CSP looks as follows:

add_header Content-Security-Policy "default-src 'self'; script-src 'self' 'unsafe-inline' 'unsafe-eval'; connect-src 'self'; img-src 'self'; style-src 'self' 'unsafe-inline' fonts.googleapis.com; font-src 'self' fonts.gstatic.com;" always;

Example 2: Allowing Google Fonts and YouTube video embeds

We can further expand our CSP to allow video embeds from YouTube by adding it to our style-src and the child-src. This will allow JS and iframes specifically from youtube.com to load correctly on your website. The code has been highlighted in bold below:

add_header Content-Security-Policy "default-src 'self'; script-src 'self' 'unsafe-inline' 'unsafe-eval' https://www.youtube.com/; child-src https://www.youtube.com/; connect-src 'self'; img-src 'self'; style-src 'self' 'unsafe-inline' fonts.googleapis.com; font-src 'self' fonts.gstatic.com;" always;

Check out the further reading section at the bottom of this article for more great resources and examples.

Testing a Content Security Policy

Before you set your CSP live on your website, you may wish to test it to confirm it won’t accidentally cause any problems. You may also wish to do this on a staging site and leave your production website alone for the time being until you’re sure your CSP is ready to go.

Once you’ve created your policy, instead of adding it with Content-Security-Policy, you can add it with Content-Security-Policy-Report-Only. Using this, your browser report on your CSP, but does not enforce it.
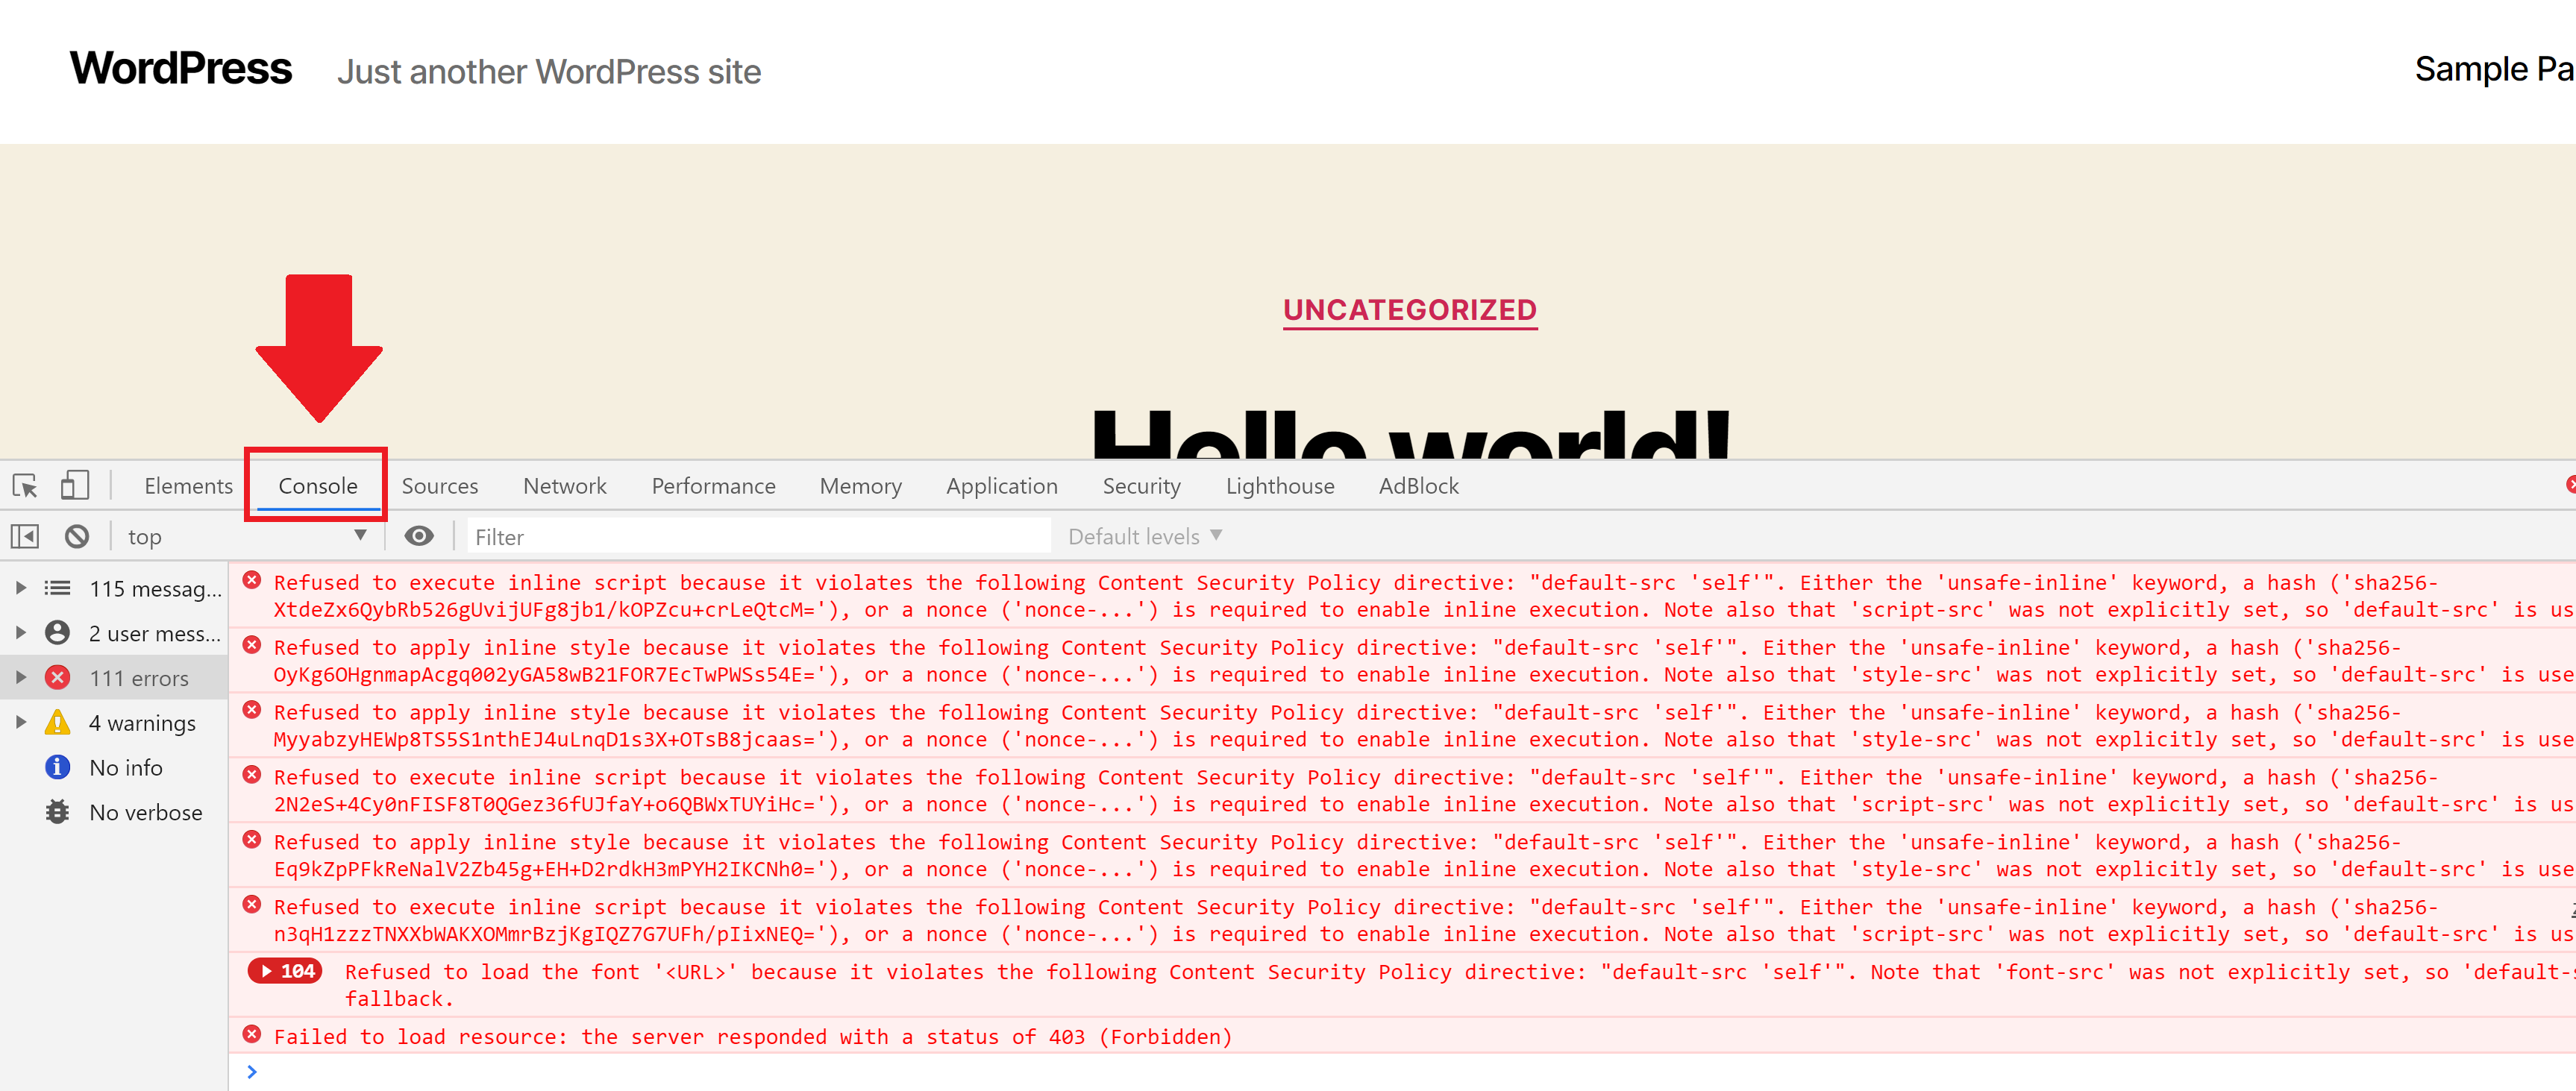
Checking for errors

To check for errors, head on over to your website. Open your browser’s developer tools and navigate to the Console tab. Errors will look like the following, and detail the cause so you can modify your CSP accordingly and retest:

Add Your Customizations to Your Server

Step 1. Open your CSP config

SSH into your server and run the following command (switching out “site.url” for your websites domain name) to open up your CSP config:

nano /var/www/site.url/nginx/site.url-headers-csp.conf

Step 2. Paste your custom CSP

Paste your custom header into your file, replacing the line highlighted in the image below:
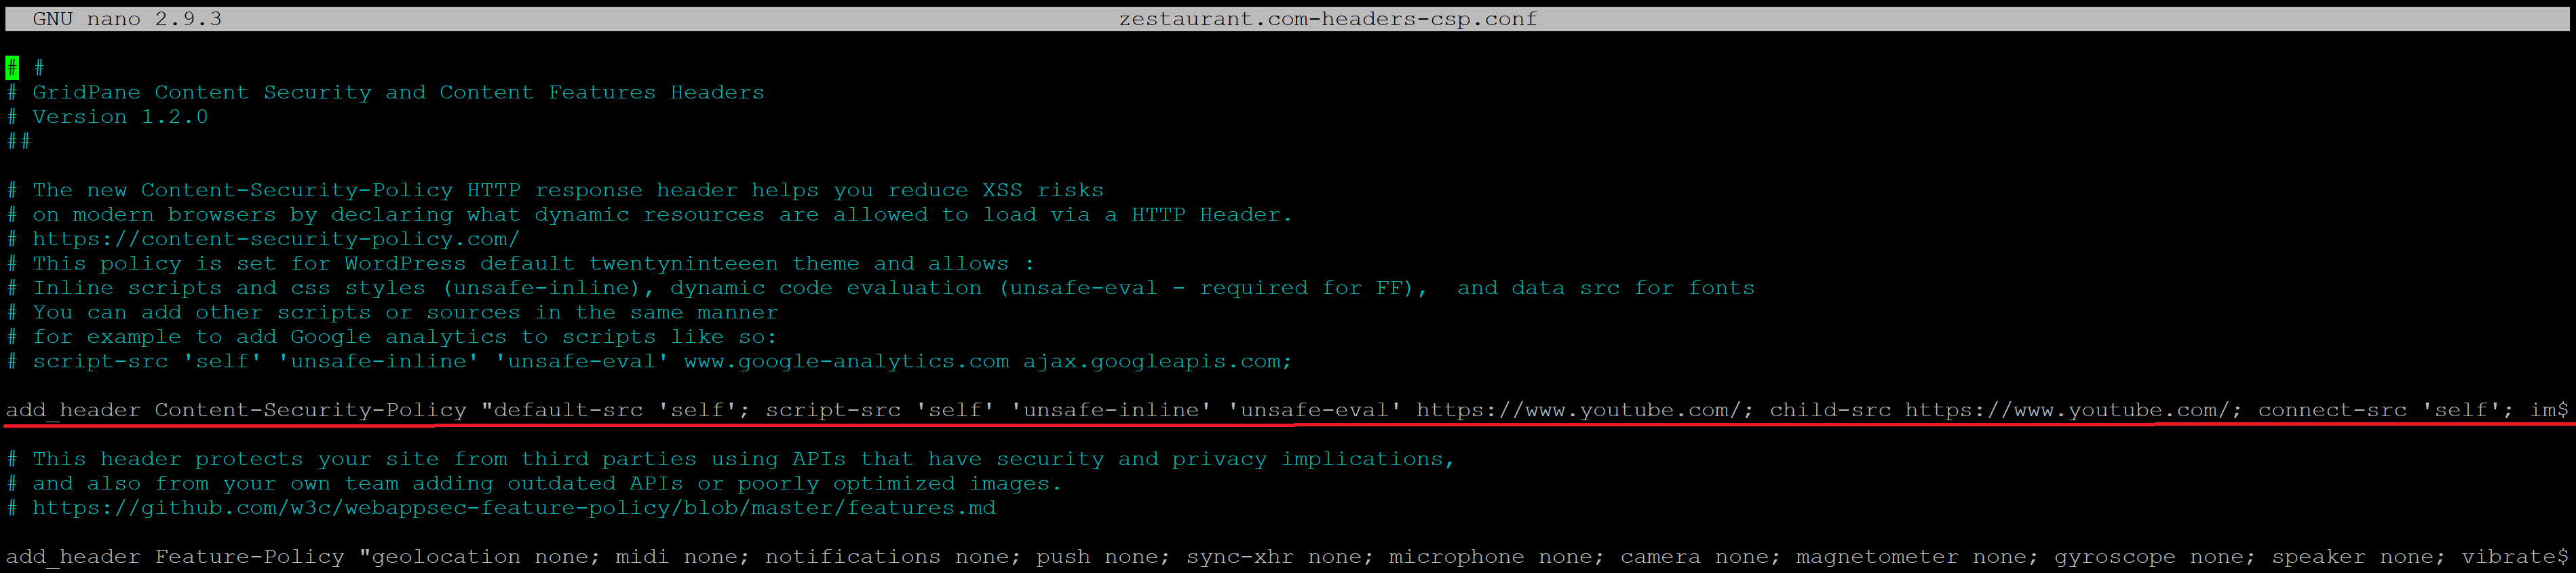
It begins with add_header Content-Security-Policy. Delete the whole line, and paste your own in. Confirm it’s all correct.

If you’re testing your CSP, instead of using Content-Security-Policy, replace this with Content-Security-Policy-Report-Only. For example: 

add_header Content-Security-Policy-Report-Only "default-src 'self'; script-src 'self' 'unsafe-inline' 'unsafe-eval'; connect-src 'self'; img-src 'self'; style-src 'self' 'unsafe-inline' fonts.googleapis.com; font-src 'self' fonts.gstatic.com;" always;

Ctrl+O and then press enter to save the file. Then Ctrl+X to exit nano.

Step 3. Check and reload Nginx

We now need to test our Nginx syntax with:

nginx -t

If there are no errors present, reload Nginx with the following command:

gp ngx reload

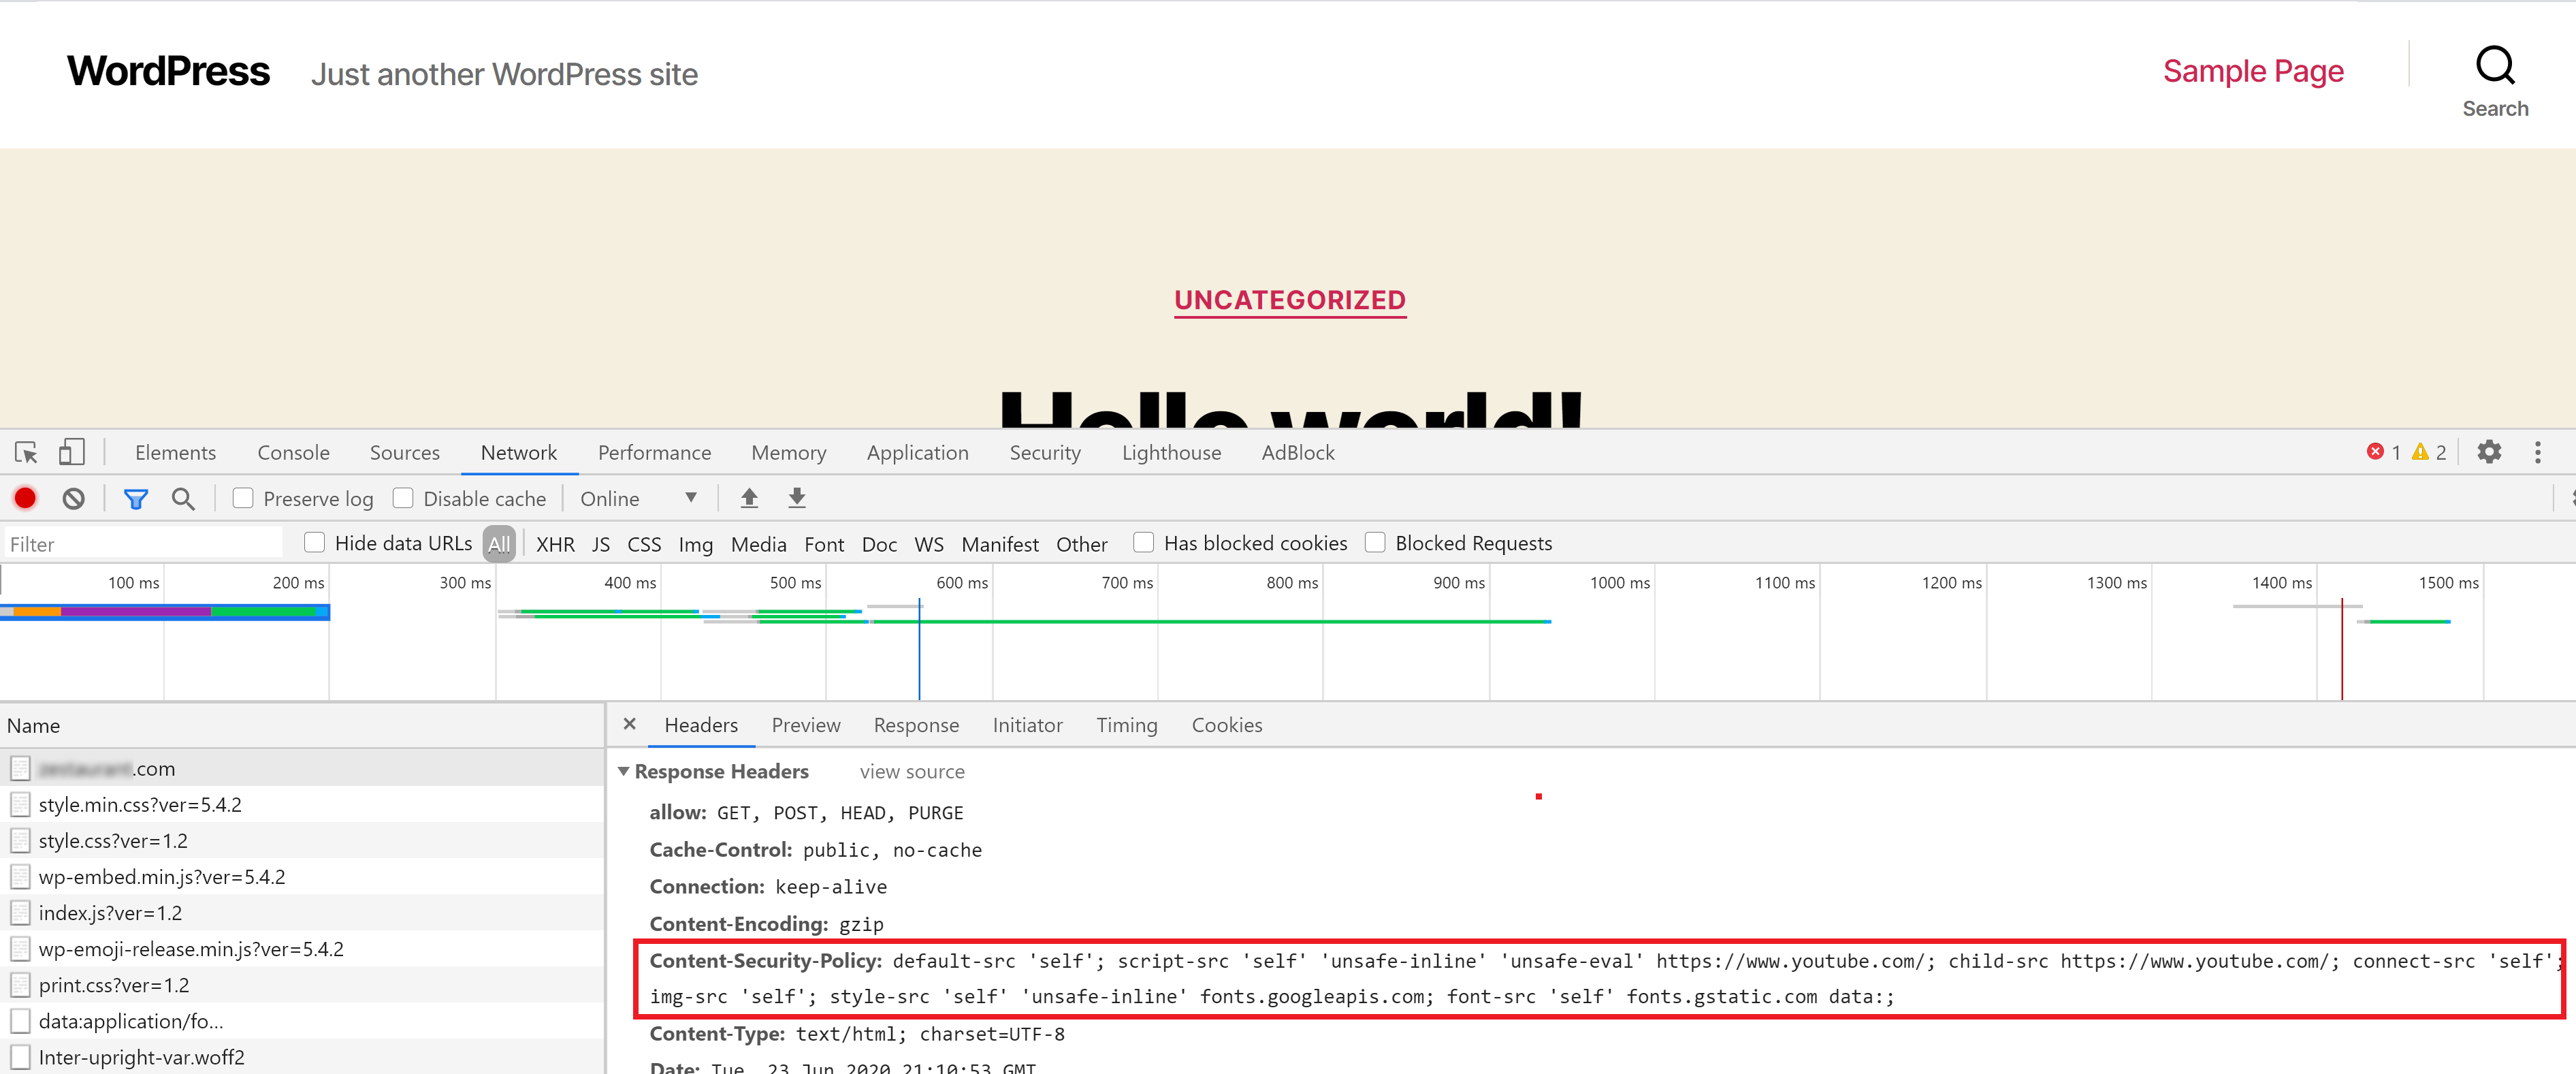
Step 4. Check your CSP on your website

First, open up your website in an incognito window. Next, right-click and choose “Inspect“, select the “Network” tab, and then reload the page. The result will look similar to the image below.

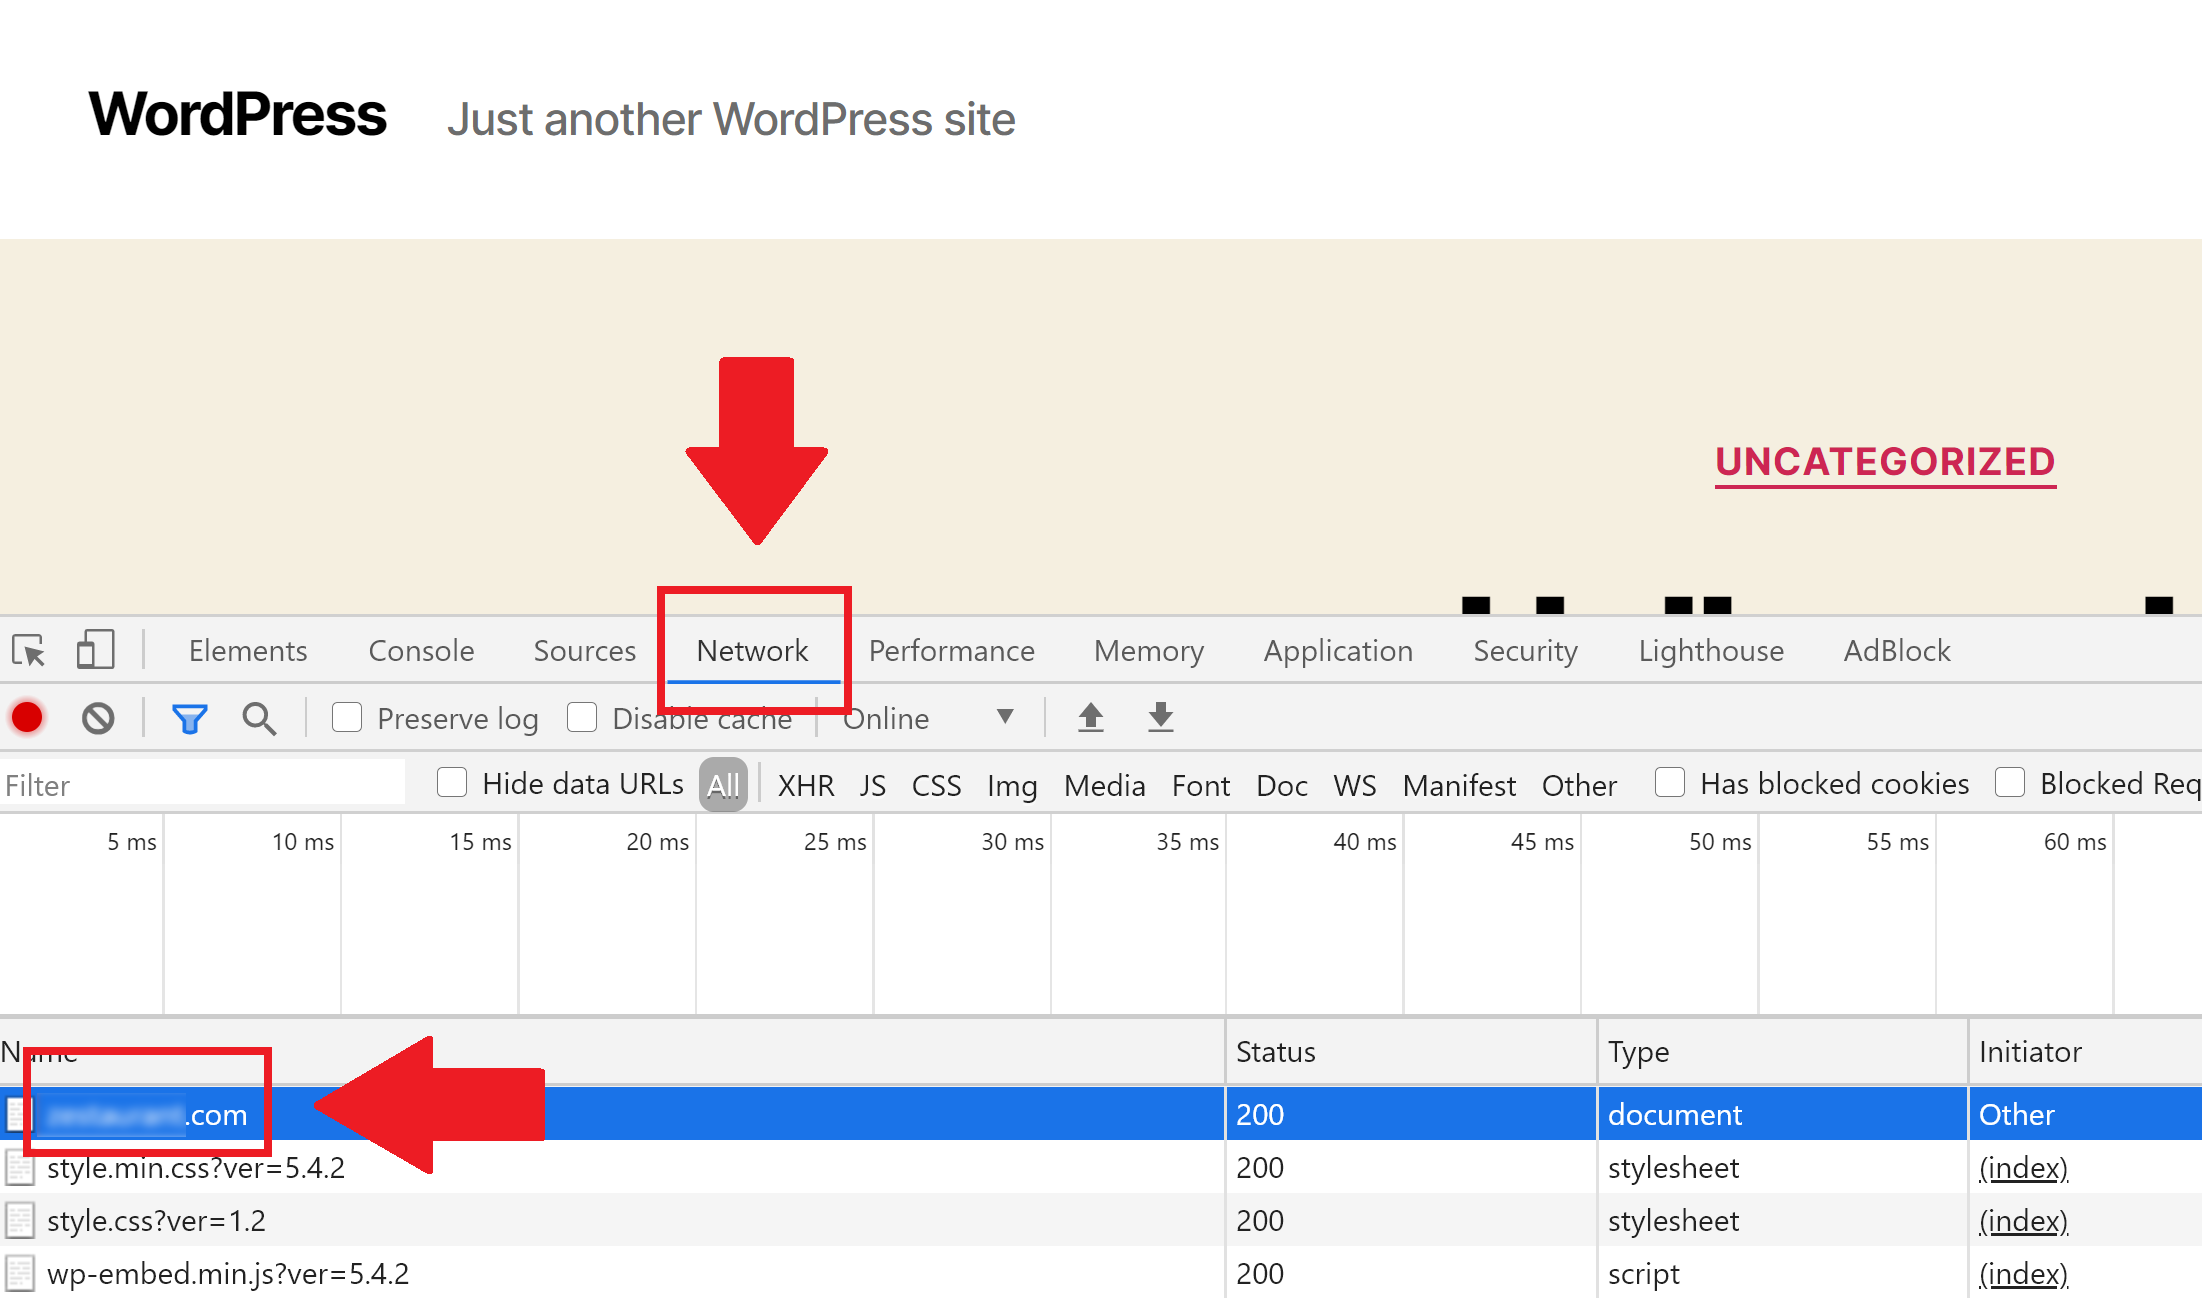
Click on your URL on the left-hand side to open up the box on the right, then down until you see the “Response Headers” section. Here you will be able to see your Content-Security-Policy as outlined in the image below:

Further Reading

All about Content Security Policies:
https://content-security-policy.com/

Setting your CSP up for Google Tag Manager:
https://developers.google.com/tag-manager/web/csp

Further thoughts from Google on creating a CSP:
https://developers.google.com/web/fundamentals/security/csp

Mozilla’s CSP guidance:
https://developer.mozilla.org/en-US/docs/Web/HTTP/Headers/Content-Security-Policy