Table of Contents
- Introduction
- Part 1. General Troubleshooting
1. First Step: Manually Clear Fortress Cache
2. Check the Fortress Error Logs
3. Check the Fortress Audit & CLI Logs - Part 2. Specific Troubleshooting
1. Fortress Failed to Install
2. Fortress is Showing an Error Page
3. 500 Error When Entering 2FA Authentication
4. Password No Longer Works After Deactivating Fortress
5. Manage WP Auto-Login
6. Fortress Configuration Errors
7. You Cannot Save Your Work After 30 Minutes
Introduction
This article details how to begin troubleshooting should you ever encounter an issue with Fortress. In part 1 we include the basics, and then move on to specific scenarios in part 2.
Troubleshooting will require you to connect to your server. If this is the first time connecting to a server via SSH, please see the following guides to get started:
Step 1. Generate your SSH Key
Step 2. Add your SSH Key to GridPane (also see Add default SSH Keys)
Step 3. Connect to your server by SSH as Root user (we like and use Termius)
Fortress Developer Documentation
For all other settings that are not covered, the official Developer Documentation for Fortress can be found here:
Official Fortress Developer Documentation
Part 1. General Troubleshooting
First Step: Manually Clear Fortress Cache
To begin your troubleshooting, you can manually clear Fortress cache on a per-site basis. To clear the Fortress cache, you can use the following WP-CLI command (replace site.url with your website URL):
gpfort site.url -cli shared config:test --reload-on-success
Check the Fortress Error Logs
Fortress includes its own logging, and each of your websites has its own error and audit logs. These are contained here inside the /audit and /error directories:
/var/www/site.url/fortress/var/log/
You can view the error logs inside the /error directory with:
ls -l /var/www/site.url/fortress/var/log/error
From here, you can choose the most recent error log – it will be named with the date at the beginning, for example: 24-04-2023.error.log.
To view the entire log, run the following WP-CLI command (replace site.url with your website URL):
cat /var/www/site.url/fortress/var/log/error/24-04-2023.error.log
Alternatively, you can view just the last 100 lines of the log, you can use the following command:
tail -100 cat /var/www/site.url/fortress/var/log/error/24-04-2023.error.log
You can adjust “100” to be more or less, depending on your requirements.
You can learn more in the official Fortress documentation here.
Searching for Log Identifiers
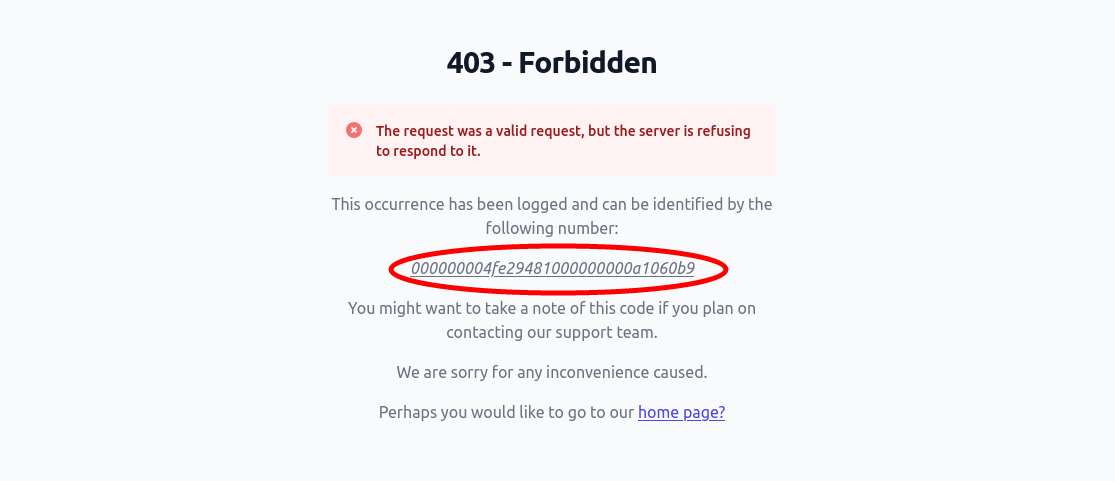
If you’ve been shown an error page with an identifying number (example below), you can use grep to locate these log entries. Here, we’re searching for the phrase and displaying the line before the error number, and 10 lines after for some additional stack trace info.
Here’s an example:
cat /var/www/site.url/fortress/var/log/error/24-04-2023.error.log | grep -B 1 -A 10 {error number}cat /var/www/site.url/fortress/var/log/error/24-04-2023.error.log | grep -B 1 -A 10 0000000037d945ab000000004a848bb8
The output will be similar to this:
[02-Feb-2023 15:18:36 UTC] snicco_fortress.http.ERROR Can't show TOTP force-setup page to user [1] because TOTP setup is already completed.
Context: ['identifier' => '0000000037d945ab000000004a848bb8', 'user_id' => 1, 'request_target' => '/snicco-fortress/auth/totp/manage/force-setup', 'request_method' => 'GET']
Snicco\Component\Psr7ErrorHandler\HttpException "Can't show TOTP force-setup page to user [1] because TOTP setup is already completed." in /var/www/html/wp-content/plugins/snicco-fortress/src/Auth/TOTP/Infrastructure/Http/Controller/TOTPCredentialsController.php:105
Stack trace:
...
Check the Fortress Audit & CLI Logs
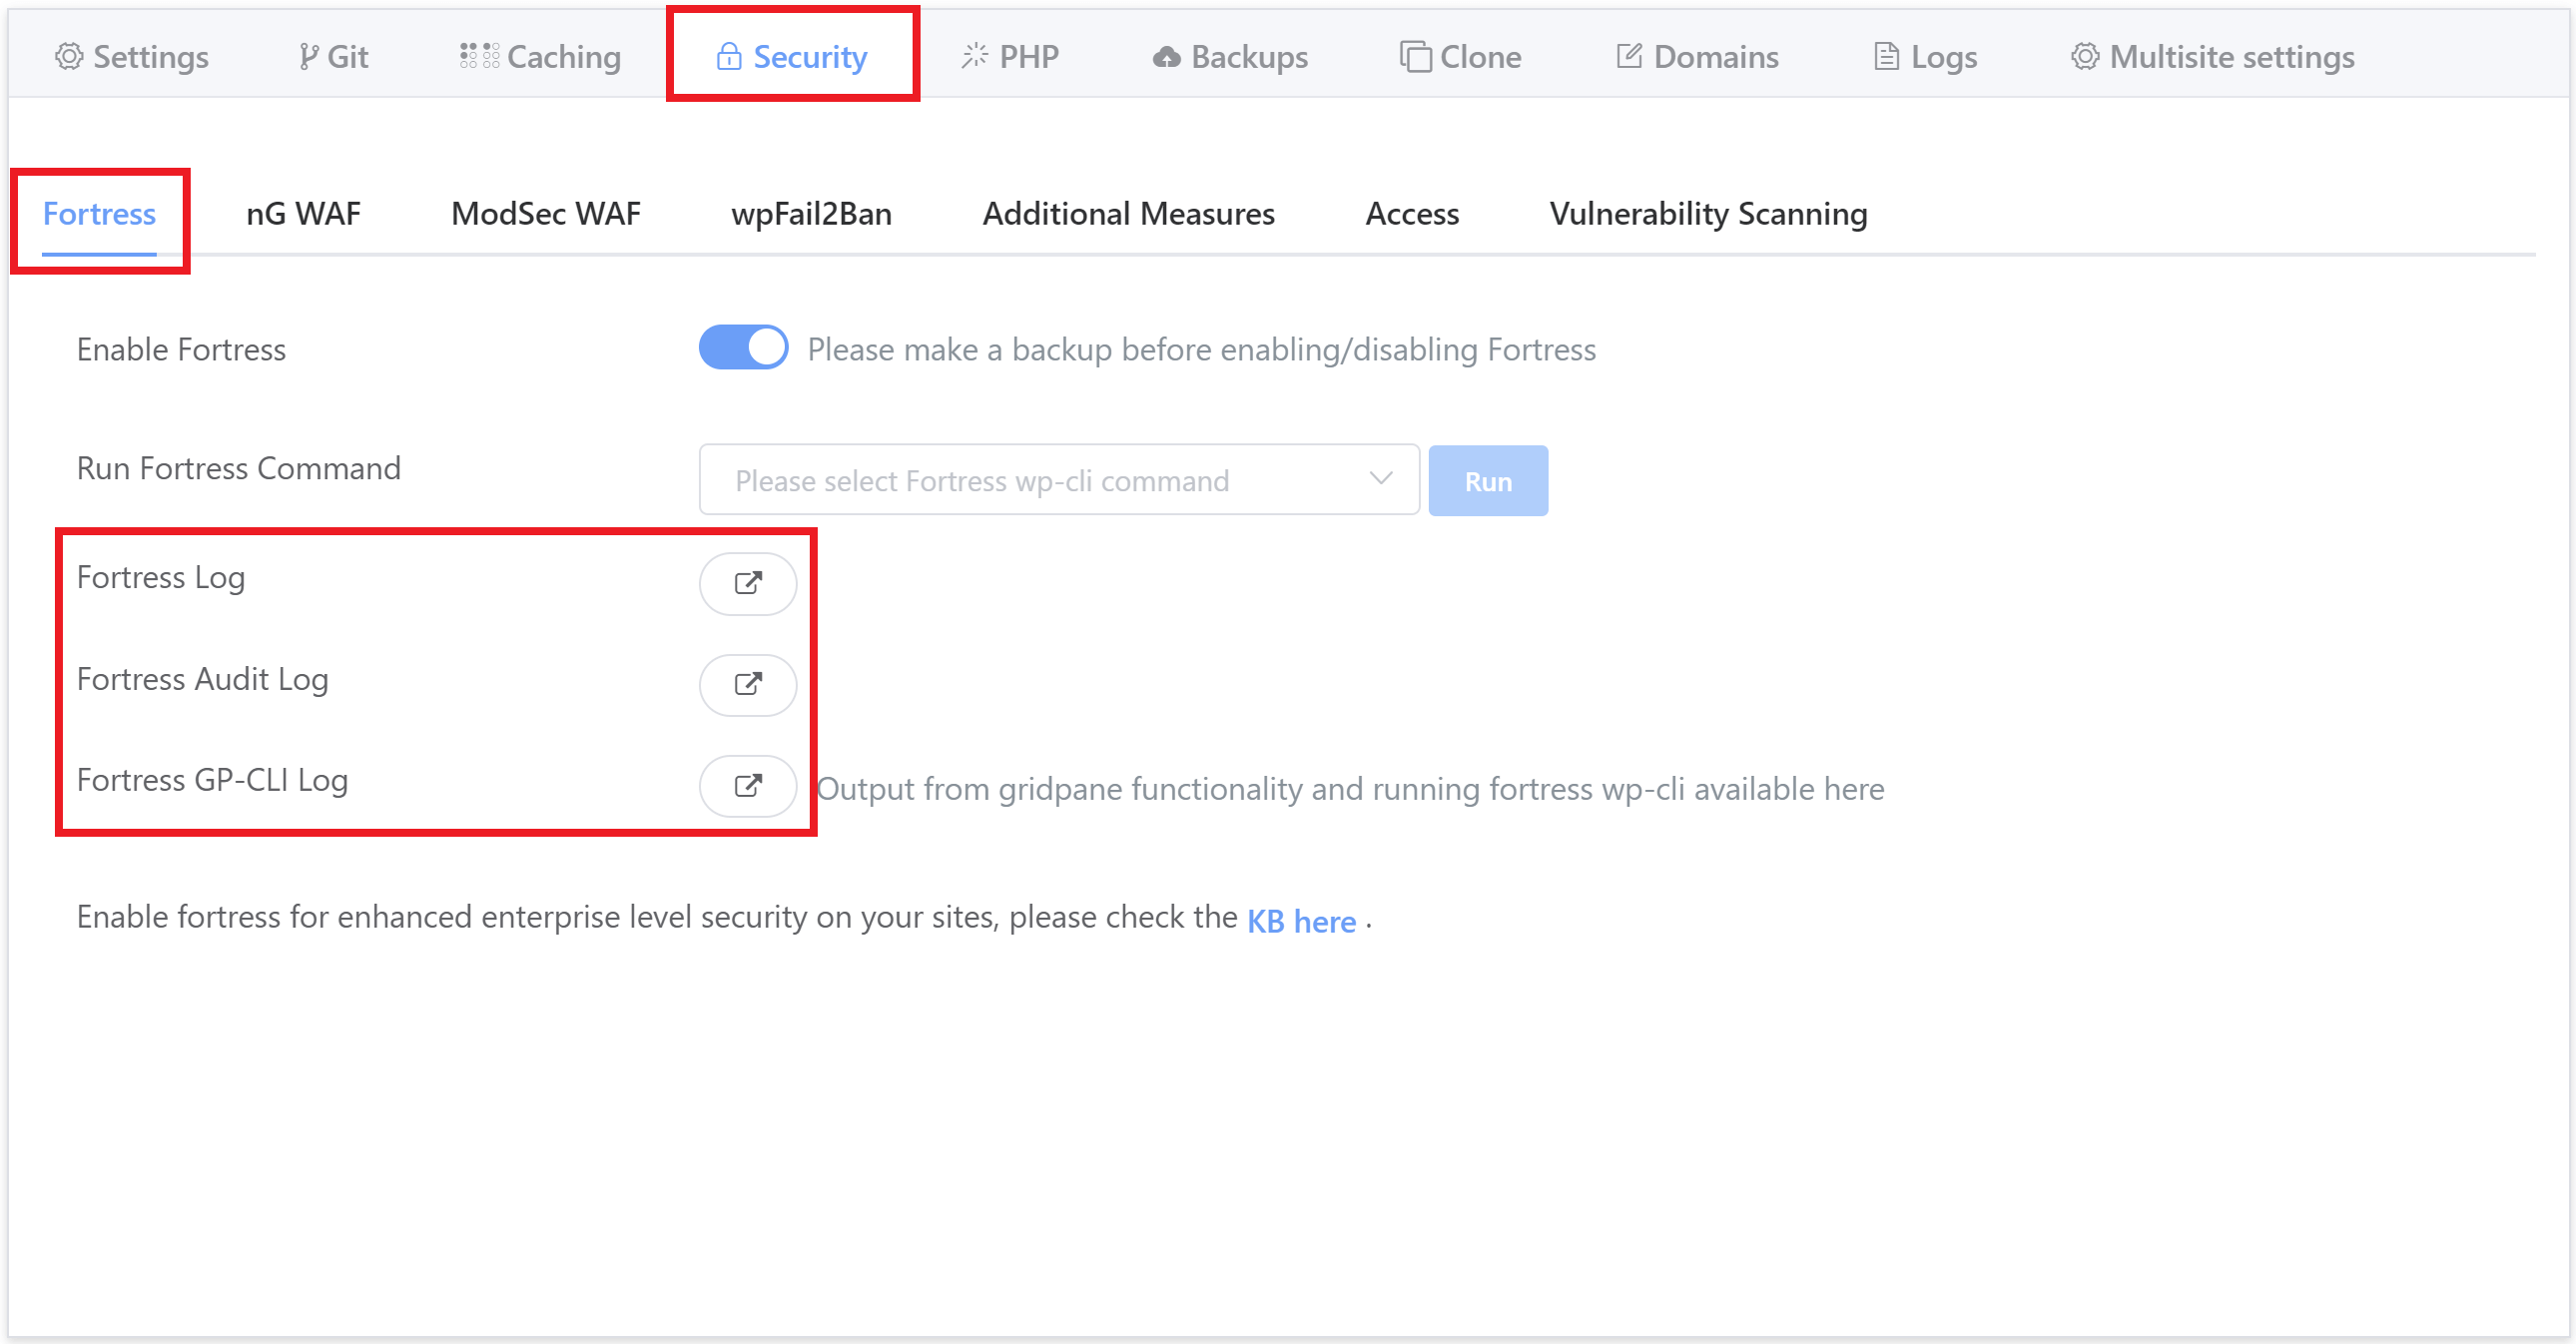
Inside your GridPane account, you can now view the following three logs:
- Fortress Log
- Fortress Audit Log
- Fortress GP-CLI Log
These can be found inside the website customizer in the security tab:

Fortress Log & Audit Log
These logs detail Fortress events and are useful for troubleshooting purposes:
- The Fortress log will detail errors and/or exceptions.
- The Audit log details what Fortress has done ( logins, 2FA activated, etc).
Fortress GP-CLI Log
All output from GridPane functionality and running Fortress WP-CLI can be viewed directly inside this log. This includes all the output from the WP-CLI commands found in the same tab in the “Run Fortress Command” dropdown.
Part 2. Specific Troubleshooting
Fortress Failed to Install
GridPane creates a log for Fortress during its installation via our GP-CLI. Our integration adds it to your websites /logs directory. The precise reason the plugin failed to install will be noted here (highly likely due to errors within your website codebase).
To view the entire log, run the following WP-CLI command (replace site.url with your website URL):
cat /var/www/site.url/logs/gpfort.log
Alternatively, you can view just the last 100 lines of the log, you can use the following command:
tail -100 /var/www/site.url/logs/gpfort.log
You can adjust “100” to be more or less, depending on your requirements.
Fortress is Showing an Error Page
If Fortress is showing an error page with an identifying error number, it means that an error is happening during Fortress request handling.

By default, these identifiers will only be shown when you’re already logged in, and there will be detailed information available in the error logs.
Full details on checking your Fortress error logs can be found in the section below.
500 Error When Entering 2FA Authentication
Nginx Servers: Make sure that if you’re using Redis Object Caching that you have replaced the GridPane Redis Object Caching plugin with the official plugin. This can be done by simply toggling object caching OFF and then back ON inside your GridPane account.
Password No Longer Works After Deactivating Fortress
The password is encrypted via Fortress. If the plan is to leave Fortress disabled passwords will need to be reset.
Manage WP Auto-Login
ManageWP installs a must-use plugin called 0-worker.php, and for any ManageWP requests, this must-use plugin executes immediately. This takes place before the GridPane Fortress must-use plugin and will break their auto-login feature.
How Things Break
ManageWP will technically log you in, but the session store is saved in the native wp_usermeta session store instead of Fortress registering it within its custom session store.
On the subsequent request after the redirect to /wp-admin, Fortress will not find your session in the custom storage, and you will then be denied access.
Unfortunately, there is nothing we can do about this.
Workable Solution
The following is accurate as of 14th November 2023.
While the support team at ManageWP stated that renaming or removing the plugin would break things, this is not currently the case in practice.
You have two options:
- Rename the file to zzz-worker.php
- Remove the mu-plugin completely
WordPress runs must-use plugins in alphabetical order, so renaming it this way will ensure it will run after Fortress.
If you delete the mu-plugin, it will run as a normal plugin without any issues.
Fortress Configuration Errors
If you’re getting an error after updating your Fortress configuration, you likely have a formatting issue.
To check, you can paste your config into the following website (or other similar JSON validators):
You can also directly ask ChatGPT why you’re getting an error and give it your config to inspect.
You Cannot Save Your Work After 30 Minutes
The issue you’re facing is likely nonce-related. This bug rarely surfaces for most people because nonces are valid for 12 hours by default within WordPress. However, this will surface every 30 minutes on Fortress sites.
The issue can occur where if a nonce is invalid, the plugin you’re using does not fetch a new one. Gutenberg, for example, does this automatically; if you’re still logged in, it fetches a new nonce when the old one becomes invalid.
Calvin created the following configuration that will allow you to get your work done while still keeping a very solid security level:
					{
  "session": {
    "idle_timeout": 7200,
    "sudo_mode_timeout": 1800,
    "rotation_timeout": 43199,
    "absolute_timeout": 43200,
    "protected_pages": [
      "/wp-admin/update-core.php",
      "/wp-admin/themes.php",
      "/wp-admin/theme-install.php",
      "/wp-admin/plugins.php",
      "/wp-admin/plugin-install.php",
      "/wp-admin/user-new.php",
      "/wp-admin/user-edit.php",
      "/wp-admin/profile.php",
      "/wp-admin/update.php",
      "/wp-admin/options-*",
      "/wp-admin/options.php",
      "/wp-admin/authorize-application.php",
      "/wp-admin/theme-editor.php",
      "/wp-admin/plugin-editor.php"
    ],
    "protected_capabilities": [
      "activate_plugins",
      "delete_plugins",
      "delete_themes",
      "delete_users",
      "edit_dashboard",
      "edit_files",
      "edit_plugins",
      "edit_themes",
      "edit_users",
      "edit_user",
      "install_plugins",
      "install_themes",
      "promote_users",
      "remove_users",
      "create_users",
      "switch_themes",
      "unfiltered_upload",
      "update_core",
      "update_plugins",
      "update_themes"
    ]
  }
}
This does the following:
- The
rotation_timeoutis effectively disabled. This should prevent the bugs in the third-party plugins (the need of having to refresh the page to get new nonces), from surfacing again. - The maximum lifetime of a session is 12 hours for non-remembered users. This brings the nonce time-limit back to the default, but you can also shorten it if you’d prefer to be stricter.
- The idle timeout is set to 2 hours. This means that if a user leaves a site for more than 2 hours without doing anything, they’ll be logged out. This can be decreased or increased based on your preference (we’d recommend a shorter limit where possible).
- Rather than removing the
sudo_timeout, this reduces what is affected by the sudo timeout down to the most critical actions like installing plugins or deleting users. Administrator users can still perform all of these actions for thirty minutes after logging in (or thirty minutes after confirming the sudo mode). Most page builders, snippet plugins, etc., should now be unaffected by the sudo mode, while one-off/rare tasks that are very critical are still protected.
Implementation
The above configuration can be added to either an individual website or all websites on a server by adding it directly to your JSON configuration file. Please see our part 4 article for details:
Fortress Security Part 4. JSON Configs & Creating a Server-Level Configuration
