BitNinja Part 1: Access and Installation Guide

8 min read

Table of Contents

  1. Introduction
  2. BitNinja’s Feature Set
  3. BitNinja Account Setup and Access
  4. Installing BitNinja
  5. Enable Automatic Updates
  6. Configure BitNinja SenseLogs
  7. About BitNinja’s Installation
  8. Uninstalling BitNinja

Introduction

BitNinja is a Linux server security platform that includes both server and site-level protection.

Their suite of tools that an AI-powered malware scanner, robust IP reputation, advanced WAF, and a dynamic defense network.

GridPane & BitNinja Partnership

Our partnership with BitNinja includes its use on up to 3 servers for our Developer Plus plan, and it will be available as an add-on in the future. 

This partnership includes the following benefits:

  1. Your servers will not be limited by the standard BitNinja system user policy and will be available for ALL system users (and, therefore, ALL sites) on your servers.
  2. Access to your own dashboard directly inside of BitNinja

BitNinja’s Feature Set

Below are the 10 primary features that BitNinja offers for your servers. Each is linked to their respective pages on the BitNinja website for easy reference:

  1. Anti-Malware Suite
  2. Web Application Firewall
  3. AI-Powered File Patching
  4. Outbound Spam Detection
  5. Realtime IP Reputation Protection
  6. Site Protection

The following four features are detailed on the same page here.

  1. SQL Scanner
  2. DoS Detection
  3. Web / Port Honey Pots
  4. Log Analysis

BitNinja Account Setup and Access

BitNinja is a separate service from GridPane, and as such, all management takes place directly within BitNinja’s dashboard.

If you’re on our Developer Plus account plan, we will create your account upon request. To get started, please submit a new support ticket, and we’ll create your account within 1 business day.

Installing BitNinja

Connecting to your servers

To install BitNinja, you will need to connect to your server via SSH. If this is your first time connecting to one of your servers, please see the following guides to get started:

Pre-installation: Disable Maldet

If you have Maldet running on your server, before installing BitNinja you must first uninstall it. You can do so with the following command:

gp stack maldet -uninstall

Once done, you can proceed with the steps below.

Step 1. Copy your installation command

Inside your BitNinja account, you’ll be provided with your installation code (which includes your license) immediately upon logging in to your account:

Once you’ve created your first server, you can add more by visiting the Servers page inside your BitNinja account and clicking the “Add new server” box at the bottom of the page.

Step 2. Run command on server

Connect to your server and run the command, for example:

curl https://get.bitninja.io/install.sh | sudo /bin/bash -s - --license_key=XXXXXXXXXXXXXXX

The installation will begin automatically and you’ll see the following:

				
					  ____  _ _   _   _ _        _         ___ ___            _           _        _ _ 
 | __ )(_) |_| \ | (_)_ __  (_) __ _  |_ _/ _ \          (_)_ __  ___| |_ __ _| | | 
 |  _ \| | __|  \| | | '_ \ | |/ _` |  | | | | |  _____  | | '_ \/ __| __/ _` | | | 
 | |_) | | |_| |\  | | | | || | (_| |_ | | |_| | |_____| | | | | \__ \ || (_| | | | 
 |____/|_|\__|_| \_|_|_| |_|/ |\__,_(_)___\___/          |_|_| |_|___/\__\__,_|_|_| 
                          |__/ 

Welcome to the one-step BitNinja linux client installer!
First we check your Linux distribution and then we run the automatic
installation steps. The result is equivalent with the manual steps (but more convenient)
 + determining Linux distribution..
 + updating apt repositories, please wait...
 + installing https download transport for APT package, please wait...
 + installing dirmngr for APT-KEY package, please wait...
 + adding apt source /etc/apt/sources.list.d/bitninja.list
 + downloading bitninja gpg key...
 + updating apt repositories, please wait...
 + installing BitNinja and its dependencies, please wait...
 + running tests...
 + setting WAF to transparent mode...
 + configuring BitNinja provision key
 + starting BitNinja service


Congratulations, BitNinja is now installed on your server! 
A malware scan will be started to clean previous infections. 
You can find a readme.txt and an install.log containing more information in the following directory: /var/lib/bitninja. 
Stay Ninjastic! 


You’ll also be able to see the progress on the installation directly within your BitNinja account dashboard. 

Enable Automatic Updates

Official BitNinja Documentation: Automatic Updates

To enable automatic updates for BitNinja you will need to edit your unattended upgrades file with the following steps. 

Step 1. Edit unattended upgrades

You can open the file for editing with the following command:

nano /etc/apt/apt.conf.d/50unattended-upgrades

Step 2. Add your code

You’ll find the following block near the top of the file:

Unattended-Upgrade::Allowed-Origins {
"${distro_id}:${distro_codename}";
"${distro_id}:${distro_codename}-security";
// Extended Security Maintenance; doesn't necessarily exist for
// every release and this system may not have it installed, but if
// available, the policy for updates is such that unattended-upgrades
// should also install from here by default.
"${distro_id}ESM:${distro_codename}";
"LP-PPA-ondrej-php:jammy";
//maxmind-server-repo-placeholder
//mysql-repo-placeholder
//gridpane-repo-placeholder
//-repo-placeholder
// "${distro_id}:${distro_codename}-updates";
// "${distro_id}:${distro_codename}-proposed";
// "${distro_id}:${distro_codename}-backports";
};

Add the following highlighted code to enable automatic updates for BitNinja:

Unattended-Upgrade::Allowed-Origins {
"${distro_id}:${distro_codename}";
"${distro_id}:${distro_codename}-security";
// Extended Security Maintenance; doesn't necessarily exist for
// every release and this system may not have it installed, but if
// available, the policy for updates is such that unattended-upgrades
// should also install from here by default.
"${distro_id}ESM:${distro_codename}";
"LP-PPA-ondrej-php:jammy";
//maxmind-server-repo-placeholder
//mysql-repo-placeholder
//gridpane-repo-placeholder
//-repo-placeholder
// "${distro_id}:${distro_codename}-updates";
// "${distro_id}:${distro_codename}-proposed";
// "${distro_id}:${distro_codename}-backports";
// Bitninja Repository
"bitninja:${distro_codename}";
};

You can now hit Ctrl+O and then press Enter to save the file. Then Ctrl+X to exit nano.

Step 3. Restart SystemD

To complete the setup, you will need to restart the SystemD process with the following command:

systemctl restart unattended-upgrades

Configure BitNinja SenseLogs

In order for the malware scanner to work, you will need to edit the SenseLog settings. This can either be done inside your BitNinja account dashboard or directly on your server.

Option 1: Edit the SenseLog via the BitNinja Dashboard

You can edit the SenseLog settings in your account via:

Configuration > Log Analysis > Scroll down to Advanced  Settings.

These settings will apply to all servers, so you will add both your Nginx and OpenLiteSpeed logs here. The log locations are:

  • Nginx Access: /var/log/nginx/*access.log
  • Nginx Error: /var/log/nginx/*error.log
  • OpenLiteSpeed Access: /var/www/*/logs/*access.log
  • OpenLiteSpeed Error: /var/www/*/logs/*error.log

Note that OpenLiteSpeed logs are added to the Apache log settings. There is no LiteSpeed/OpenLiteSpeed option.

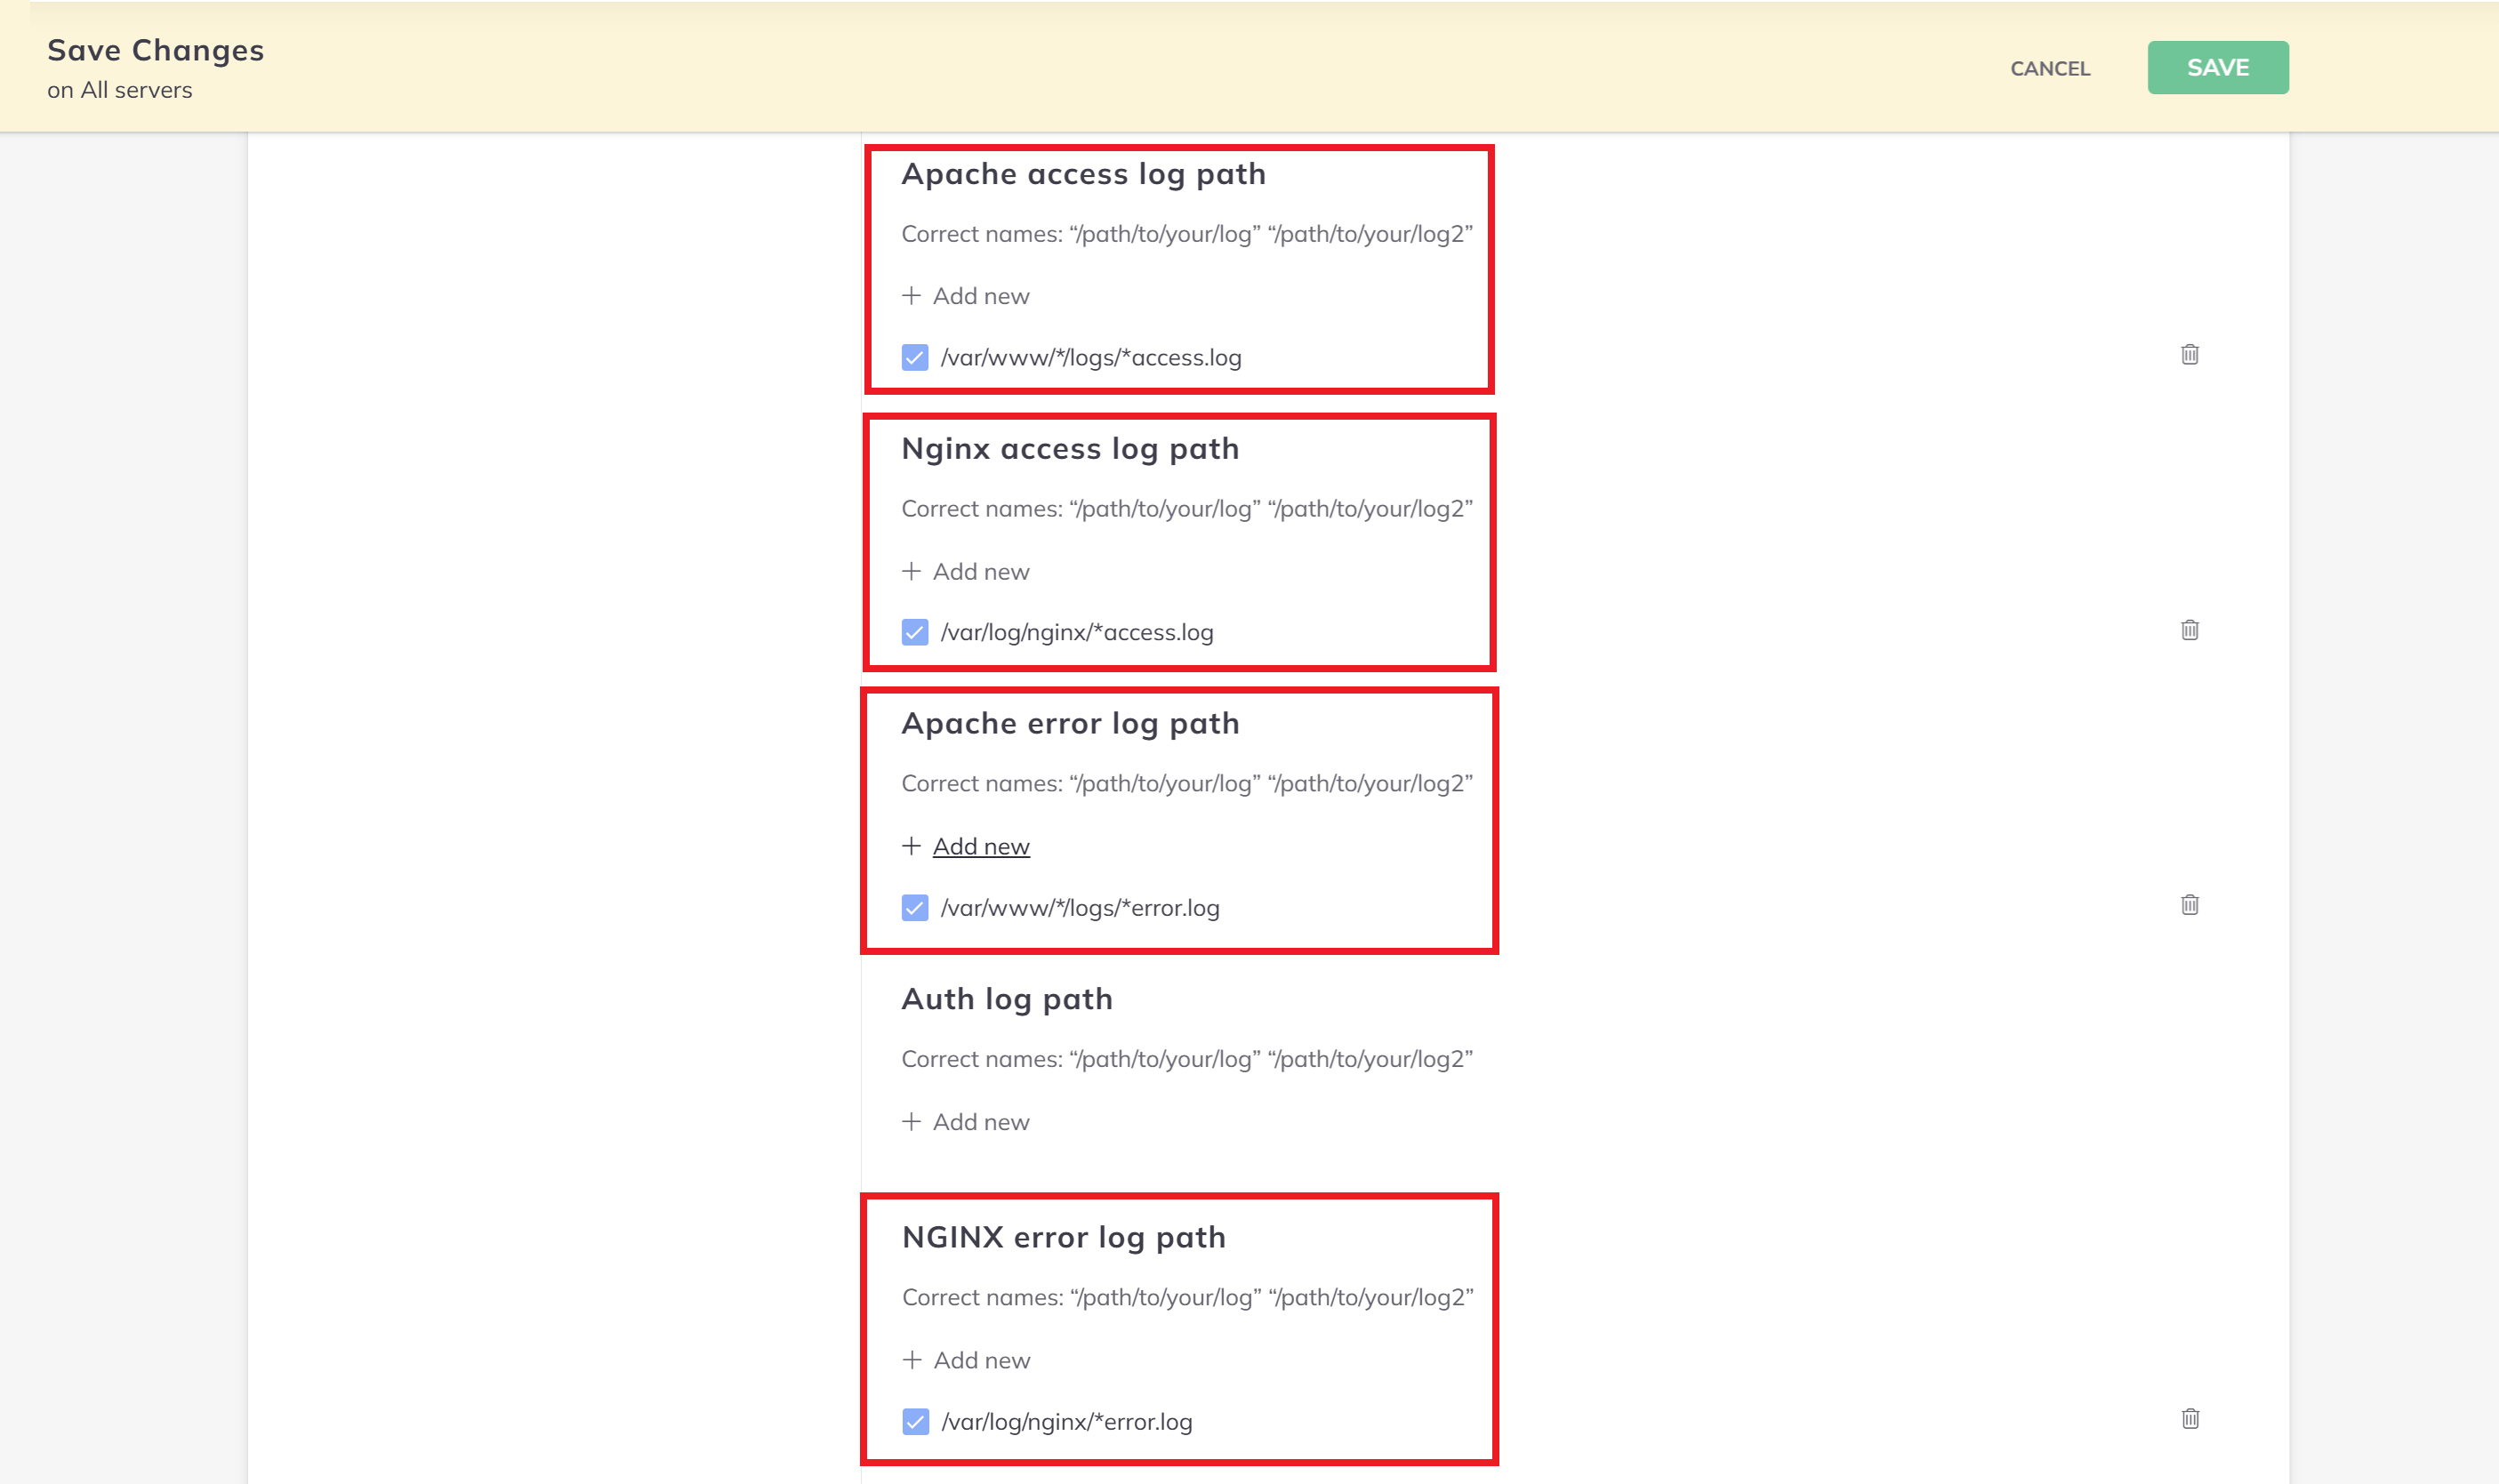
The Nginx Error log is actually further down in the settings than shown in the image aboove.

Once everything is set, click the green Save button and confirm:

Your settings will then be pushed out to your servers.

Option 2: Edit via Terminal

You can edit the Senselog config.ini file directly on your server if this is your preference. You can edit the config.ini with this command:

nano /etc/bitninja/SenseLog/config.ini

You can then add your website access and error log locations. These differ for Nginx and OpenLiteSpeed.

All other log settings are pre-configured.

Nginx Logs

You  can add the following wildcard log locations to the file under their headers – you will see [NginxAccess] and [NginxError] are already in the file:

[NginxAccess]
log_paths[]='/var/log/nginx/*access.log'
[NginxError]
log_paths[]='/var/log/nginx/*error.log'

OpenLiteSpeed Logs

You  can add the following wildcard log locations to the file under their headers – you will see [ApacheAccess] and [ApacheError] are already in the file:

[ApacheAccess] 
log_paths[]='/var/www/*/logs/*access.log'
[ApacheError] 
log_paths[]='/var/www/*/logs/*error.log'

Sync & Reload

Once you’ve added your log file locations, you can save the file with CTRL+O followed by Enter. You can then exit nano with CTRL+X.

Now you can sync the new log locations and relation the SenseLog module to complete the set up:

bitninjacli --syncconfigs
bitninjacli --module=SenseLog --reload

About BitNinja’s Installation

Once installed, BitNinja adds the following to your servers.

BitNinja Files

BitNinja primarily installs to this location:

/opt/bitninja

And also adds the following:

/usr/sbin/bitninjacli
/usr/sbin/bitninja-config
/etc/bitninja/*
/etc/systemd/system/bitninja.service
/etc/init.d/bitninja
/etc/cron.hourly/logrotate-bitninja
/etc/logrotate.d/bitninja
/etc/logrotate.d/bitninja-inotify
/etc/logrotate.d/bitninja-wafmanager

UFW Edits

BitNinja edits the Linux UFW to open up the ports it requires. These edits have the following note next to them: # Rule added by Bitninja

You can view the UFW rules with the following command:

ufw status

Uninstalling BitNinja

Official BitNinja Documentation: Stopping and Uninstalling

Important

The following is correct at the time of writing, however, please refer to the official documentation linked directly above to confirm the current uninstall process is the same as detailed below (Ubuntu is a Debian based Linux distribution).

Step 1. Stop BitNinja

To uninstall BitNinja from a server you first need to deactivate it with the following command:

service bitninja stop

Step 2. Remove Automatic Updates

If you’ve set automatic updates for BitNinja, you can remove them by following the steps detailed in the section above here – just remove the highlighted code and restart SystemD.

Step 3. Uninstall BitNinja

Once the above two steps have been completed, you can now remove BitNinja with the following command:

apt-get purge 'bitninja*'

Step 4. Remove BitNinja SSL certifcates

Use the following command to remove BitNinja’s SSL certificates:

rm -R /opt/bitninja-ssl-termination

Step 5. Remove BitNinja Logs

Use the following command to remove the BitNinja logs folder:

rm -R /var/log/bitninja

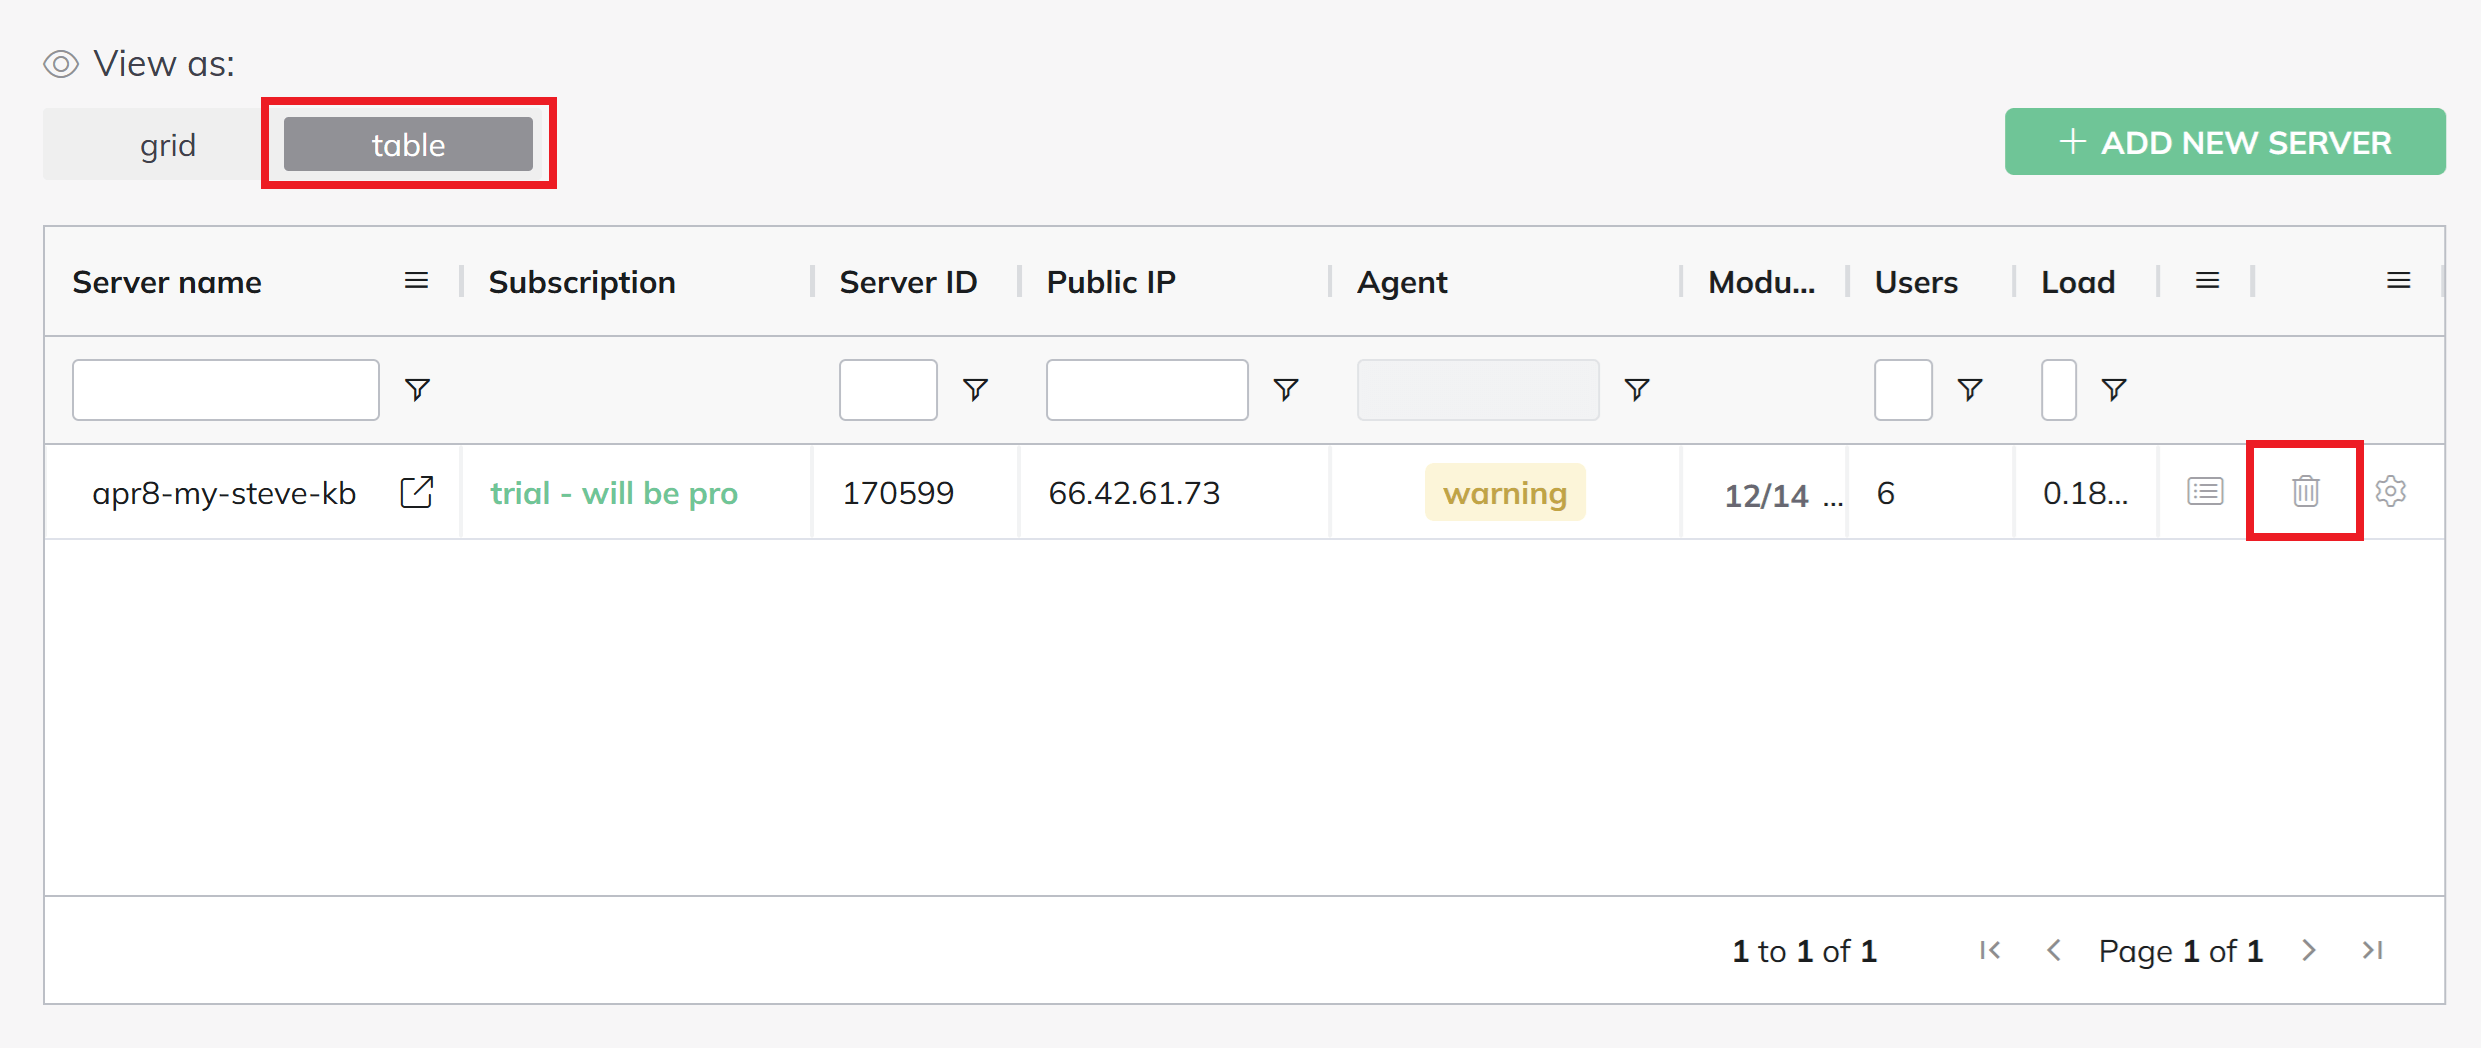
Step 6. Delete server from your BitNinja Dashboard

To complete the process you now just need to remove the server within your BitNinja account. This can be done on the Servers page in your account by switching the view to table mode and click the bin icon as shown in the image below: