Introduction
Here at GridPane, we’ve opted to use InnoDB as the default storage engine for SQL. It’s typically more performant than other storage engines like MyISAM. However, it does have one flaw:
As you add data, the InnoDB table file is allocated more space, and the file physically grows in size on the server. The InnoDB table handler does not reclaim that allocated space when data inside that file is deleted. You might have a 5GB table with only 100MB of actual data.
Below are a few different ways you can optimize your WordPress database.
Important: Always Backup Your Database!
Before running any kind of optimizations, repairs, or direct changes to your WordPress database, please be sure to create a backup before proceeding. You may also want to do a test run on a staging website first before implementing on your live website.
Checking Database Sizes
If Monit is reporting that your MySQL memory usage is high, there’s a quick way to check all of the sizes for each of your individual WordPress databases.
First you’ll need to connect to your server. If this is your first time doing so, please see the following articles to get started:
Step 1. Generate your SSH Key
Step 2. Add your SSH Key to GridPane (also see Add default SSH Keys)
Step 3. Connect to your server by SSH as Root user (we like and use Termius)
Once connected, copy and paste the following command:
cd /var/lib/mysql
Now you can list your databases by size by copying and pasting this command:
du -h --max-depth=1 | sort -h
1. WP-CLI
This WP-CLI command can optimize your WordPress tables from the command line. It’s simple and easy to use, and I’d recommend you do so using our GP WP-CLI wrapper (more information on using WP-CLI on GridPane servers can be found here).
GP WP-CLI
gp wp site.url db optimize
WP-CLI
You can also run the command as regular WP-CLI, but you’ll first need to navigate to your htdocs directory with the following (replace site.url with your websites URL):
cd /var/www/site.url/htdocs
And then running the command via sudo as follows (replace mysystemuser with your websites system user):
sudo -u mysystemuser wp db optimize
Learn More
You can learn more useful WP-CLI commands in this article:
Useful WP-CLI Commands for WordPress Websites
And view the official WP-CLI documentation here:
WordPress Developer Tools: WP-CLI – DB Optimize
2. Optimization Plugins
The following are all freely available plugins that you can install directly from the WordPress repository. As such, please take note of our usual support notice below.
WP Optimize
The extremely popular WP Optimize plugin (1+ million active installs) is usually the first recommendation you’ll see for database optimization/cleanup. It also offers other optimization functionality as well and is regularly updated. (https://wordpress.org/plugins/wp-optimize/).
WP Sweep
My personal go-to has always been WP Sweep. Its sole focus is database optimization/cleanup, and in my own experience, it’s been excellent. There are a few plugins it doesn’t work with which are detailed on the WordPress.org page. It has 100,000+ active installs and is actively maintained.
(https://wordpress.org/plugins/wp-sweep/)
LiteSpeed Cache (LSCache)
LiteSpeed’s excellent caching plugin offers more than just caching configuration on OpenLiteSpeed servers. You can also use its built-in tools for database optimization and cleanup. You can learn more about the LSCache database options in our knowledge base article:
OpenLiteSpeed Caching and the LiteSpeed Cache Plugin: Database Management
Database Cleaner
This plugin was sent over to me by Sridhar Katakam, and while not as well known as the others on this list, it offers a powerful set of database cleaning tools, easy and expert clean up modes, and reportedly works well even on very large databases. There’s a free and a paid version available, and you can learn more here:
https://meowapps.com/database-cleaner/
3. PHPMyAdmin
Finally, PHPMyAdmin can accomplish this too.
Step 1. Connect to PHPMyAdmin
To begin, locate your website on the Sites page of your GridPane account and click the database icon to connect to your database via PHPMyAdmin:
Step 2. Select Your Tables
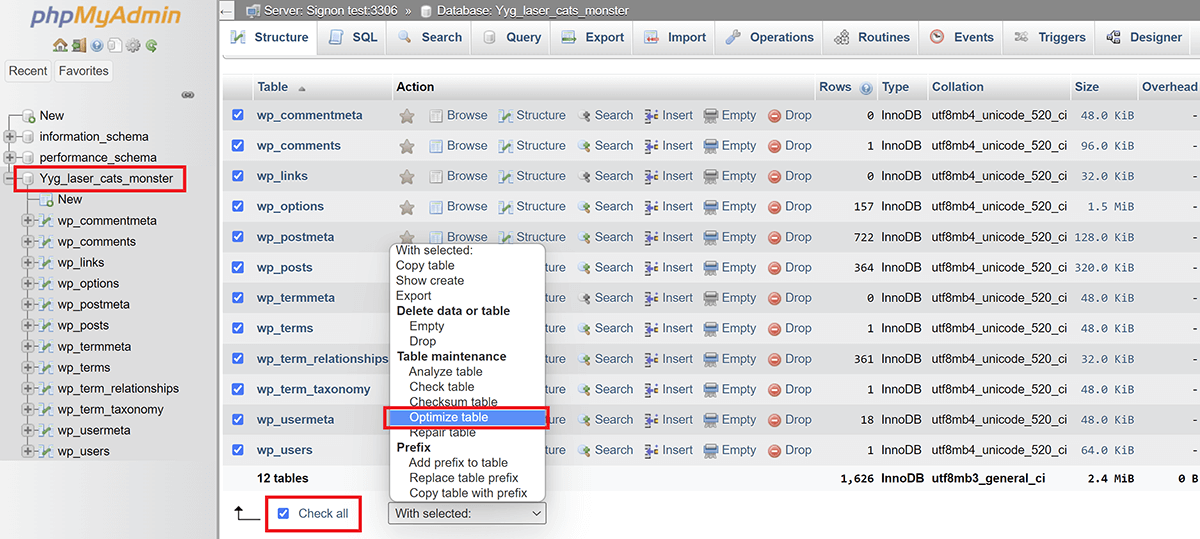
Now inside PHPMyAdmin:
- Select your database from the left-hand side
- Select all database tables by checking the “Check all” box
- Select “Optimize table” and your optimization will automatically begin
Alternatively, you can optimize tables in batches or just specific tables.


