Using staging sites on GridPane

9 min read

Multisite

Multisite staging isn't currently available.

Table of Contents

Introduction

Staging sites are an excellent way for you to develop and test a clone of your production website directly on your production server. GridPane includes the option to easily create a staging website for your primary website, and/or turn a staging website on or off at any point.

We also offer a much more comprehensive set of staging features than most other hosts (some of which don’t allow you to push your live site to staging). This article will cover our staging features from start to finish, and fill you in on the details you should be aware of when working with your staging sites. 

About GridPane Staging Sites

GridPane staging is available to all paid plans as well PeakFreq servers. Our advanced push options are available on our Developer and Agency plans.

Our staging feature can be used to push the live site to staging, and the staging site to live, and it offers the following options:

  1. Push all website files and the full database
  2. Push all files and only specific database tables (partial database push)
  3. Push only the website files*
  4. Push only the database*
  5. Push only specific database tables*

*Options 3-5 are our advanced staging options.

Force Login Plugin

These are created with the popular “Force Login” plugin installed and active, so you won’t be able to view them without first signing in.

Please note that if you’re importing your website via a plugin and overwriting the database, then by default the force login plugin will no longer be active once the import has completed (unless you installed it on your site before migrating it in).

This will also override the default login credentials.

Force Login Plugin

The Force Login plugin is active on all staging websites by default. If you want to turn it off, simply deactivate the plugin.

Staging Sites and SEO

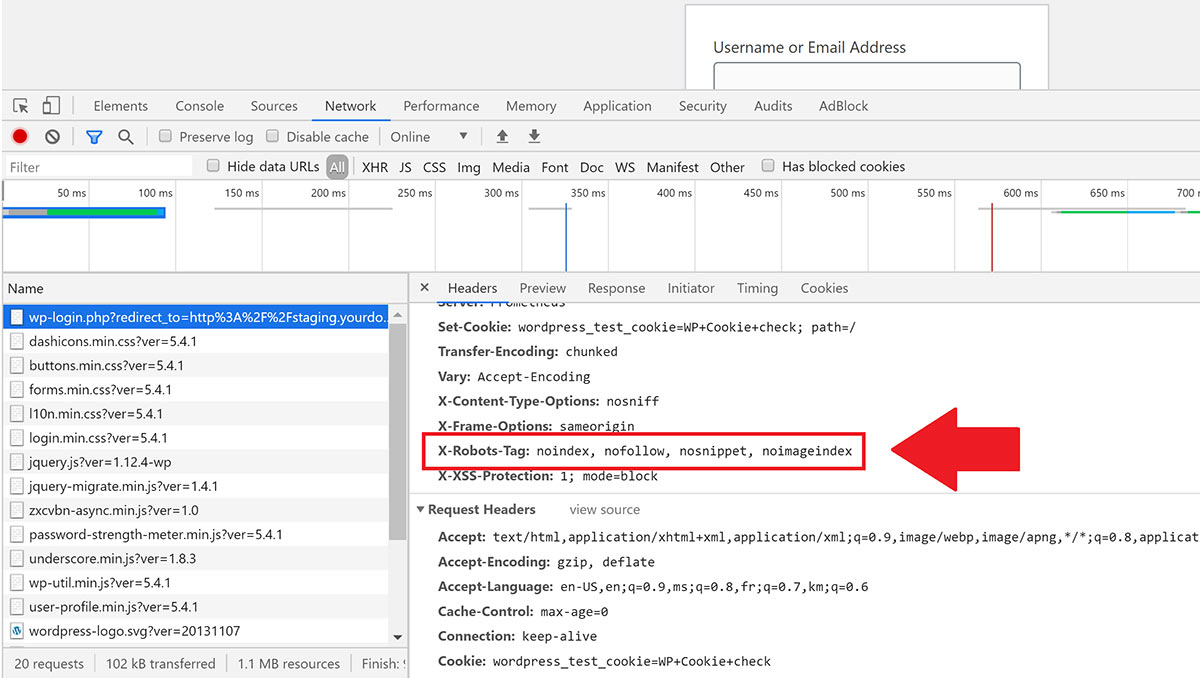
Our staging sites also include the following HTTP response header to prevent search engines from indexing them and potentially causing duplicate content issues/penalties: 

X-Robots-Tag: noindex, nofollow, nosnippet, noimageindex

Website Level Settings that Transfer During Staging Pushes

When pushing your site from Live to Staging or Staging to Live, the site’s configuration settings will also be pushed to the destination site. This means that the process will match the following settings:

  • An SSL will be attempted if the origin site has one and the destination site does not
  • All general customizer settings, including caching settings
  • The PHP version
  • All PHP INI and PHP worker settings
  • All Security customizer settings
  • Routing (www, root, or none)

It’s important to ensure that when pushing from Staging to Live, your caching, routing, security, and PHP settings are all set the way you want for your Live site.

Note: PHP Worker Settings

If your primary website has a large PHP worker count and is set to Static, please ensure that you adjust your work settings accordingly. For example, when pushing from Live > Staging, reduce the worker count on the staging site, and when pushing Staging > Live, make sure the appropriate settings are re-applied on the live site after the push has completed. This will ensure you don't run into RAM related performance issues, or end up with too few workers on your production site.

Staging Use Case Examples

Developer and Agency plans include the ability to do partial database pushes. This requires you to select your database tables, so it’s only applicable if you know what specific database tables you want to replace. Please be careful with this option.

Partial Database Push Use Case Example

Use cases for this might be that you have a high-traffic blog with lots of new comments or a WooCommerce store with regular orders, and you need to do some development work on staging and then push it live. This is great if you know exactly which tables to push, as it allows you to do your testing, confirm all’s good, and then push your changes live without overwriting any important data.

All Files No Database Use Case Example

If you’re on our developer plan or higher, you also have the option to push all files but not touch the database. This can be useful if you’ve been testing on staging with different software or images, etc., but don’t want/need the data associated with the testing.

Database/Partial Database Only Use Case Example

Or push database changes only (full or partial) without pushing any theme, plugin, or media library files. This option is great if you know exactly what you’re doing and just need to push some site tweaks that don’t require any files.

Creating a Staging Website

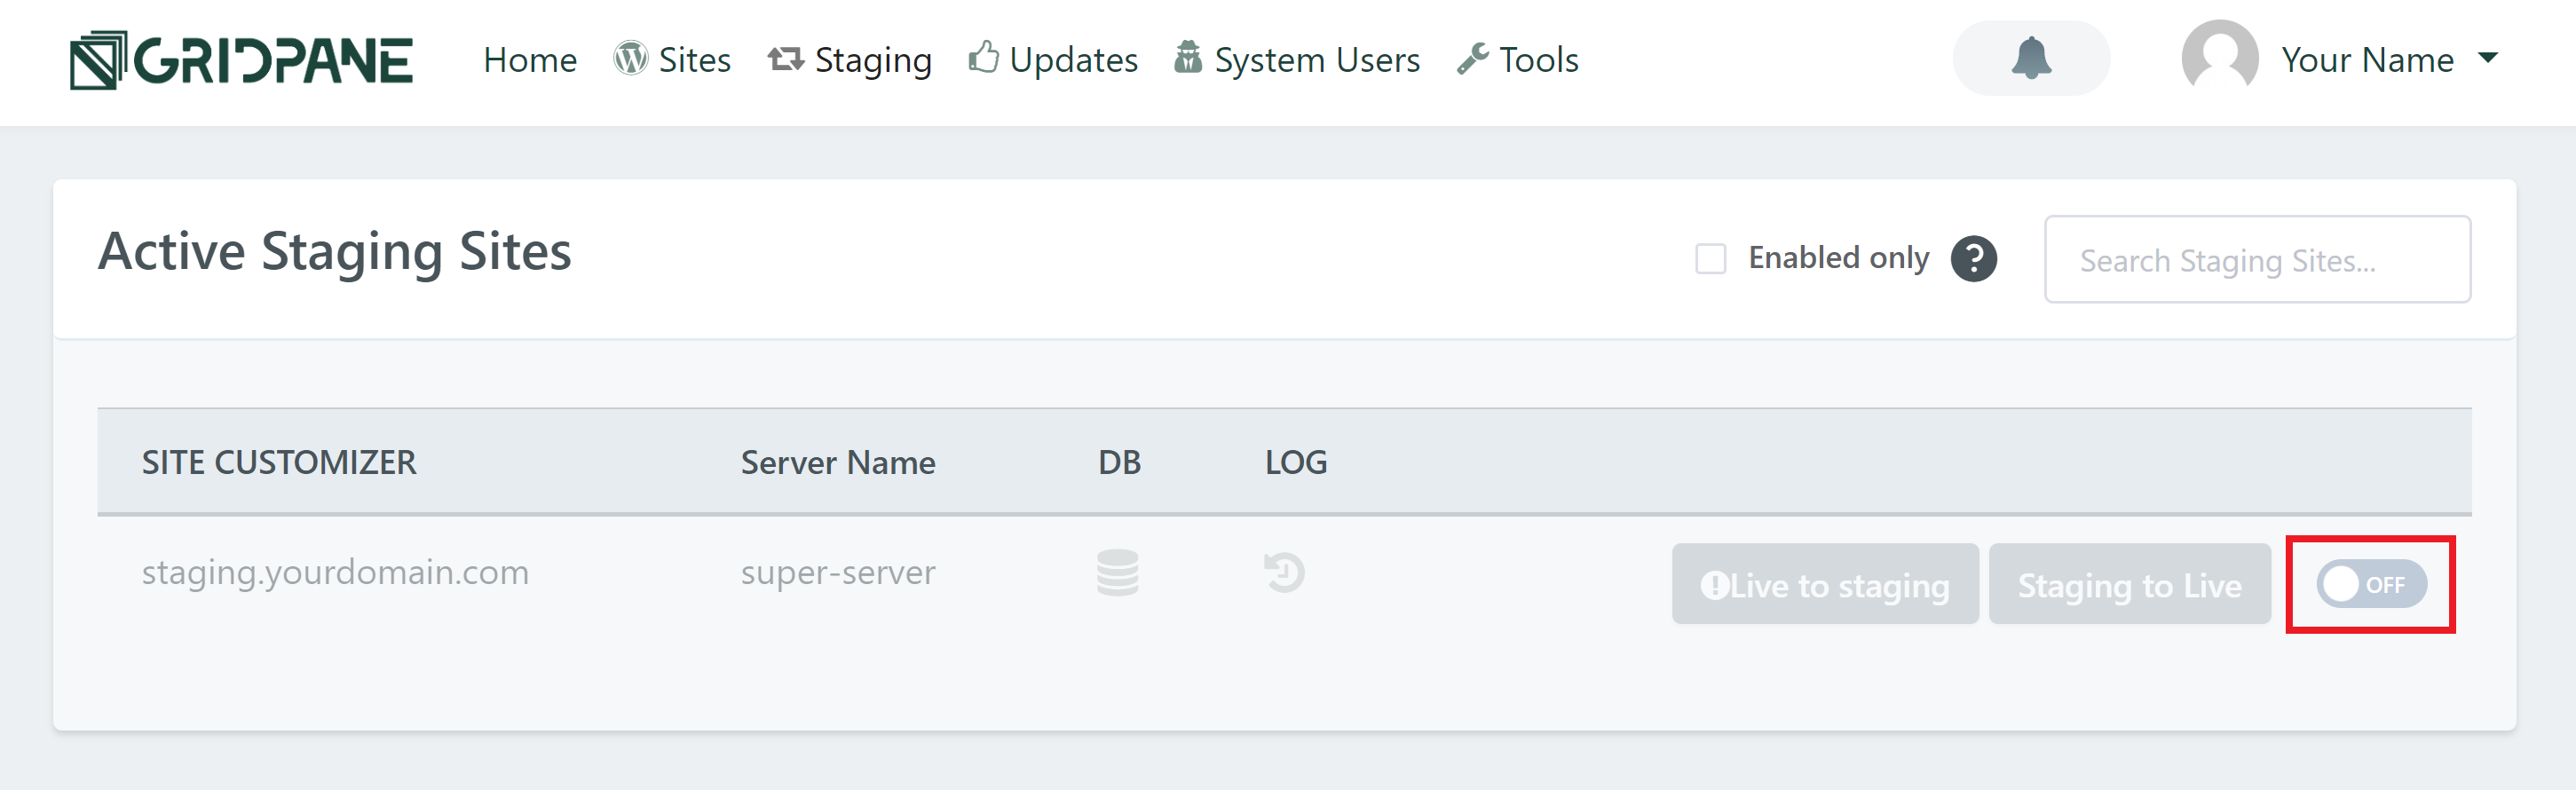
Staging websites can be created or deleted from the Staging page inside your GridPane account at any time.

Simply navigate to the Staging page, locate the site you want to work on or delete, and then toggle the site ON or OFF:

You can also create staging sites when you create your primary website by checking the Staging Site checkbox in the site build form:

Pushing a Website from Staging > Live or Vice Versa

You can push your live website to your staging site (or vice versa) anytime with just a few clicks. This section will walk you through the process.

Important: Deactivate WP_DEBUG First

If you've had WP_DEBUG active, be sure to deactivate it before you proceed as it may cause a fatal error on the destination site.

Staging and Backups

Previously, when pushing from live to staging or vice versa for the first time, it required a backup of both your live site and your staging site if one didn’t already exist. This is no longer required and is now taken care of automatically. If a backup fails, then the push process will cease to run, and the process will exit. 

You also now have the option to skip taking a backup when pushing from Live -> Staging.

For Staging -> Live pushes, a backup is mandatory and will automatically occur. 

Backups here are mandatory to prevent your sites from being lost forever if you accidentally push the wrong way. The skip option above will only work when pushing to your staging sites, but please always proceed with caution and run backups when you need to.

Optional: Preparation for Database Rewrites

You can reduce the time the search and replace operation takes by ensuring both the live and staging websites have an SSL certificate before the push begins and ensuring that the routing (none/root/www) on the staging website is the same as on the live site before you make the push.

If both domains have an SSL certificate before the swap/push, the system doesn’t need to check for HTTP/HTTPS URLs and can use a simpler compound regex.

You can learn more about GridPane search and replace functions in this article:

GridPane Database Rewrites and Workflow

Step 1. Open your Staging Site Customizer

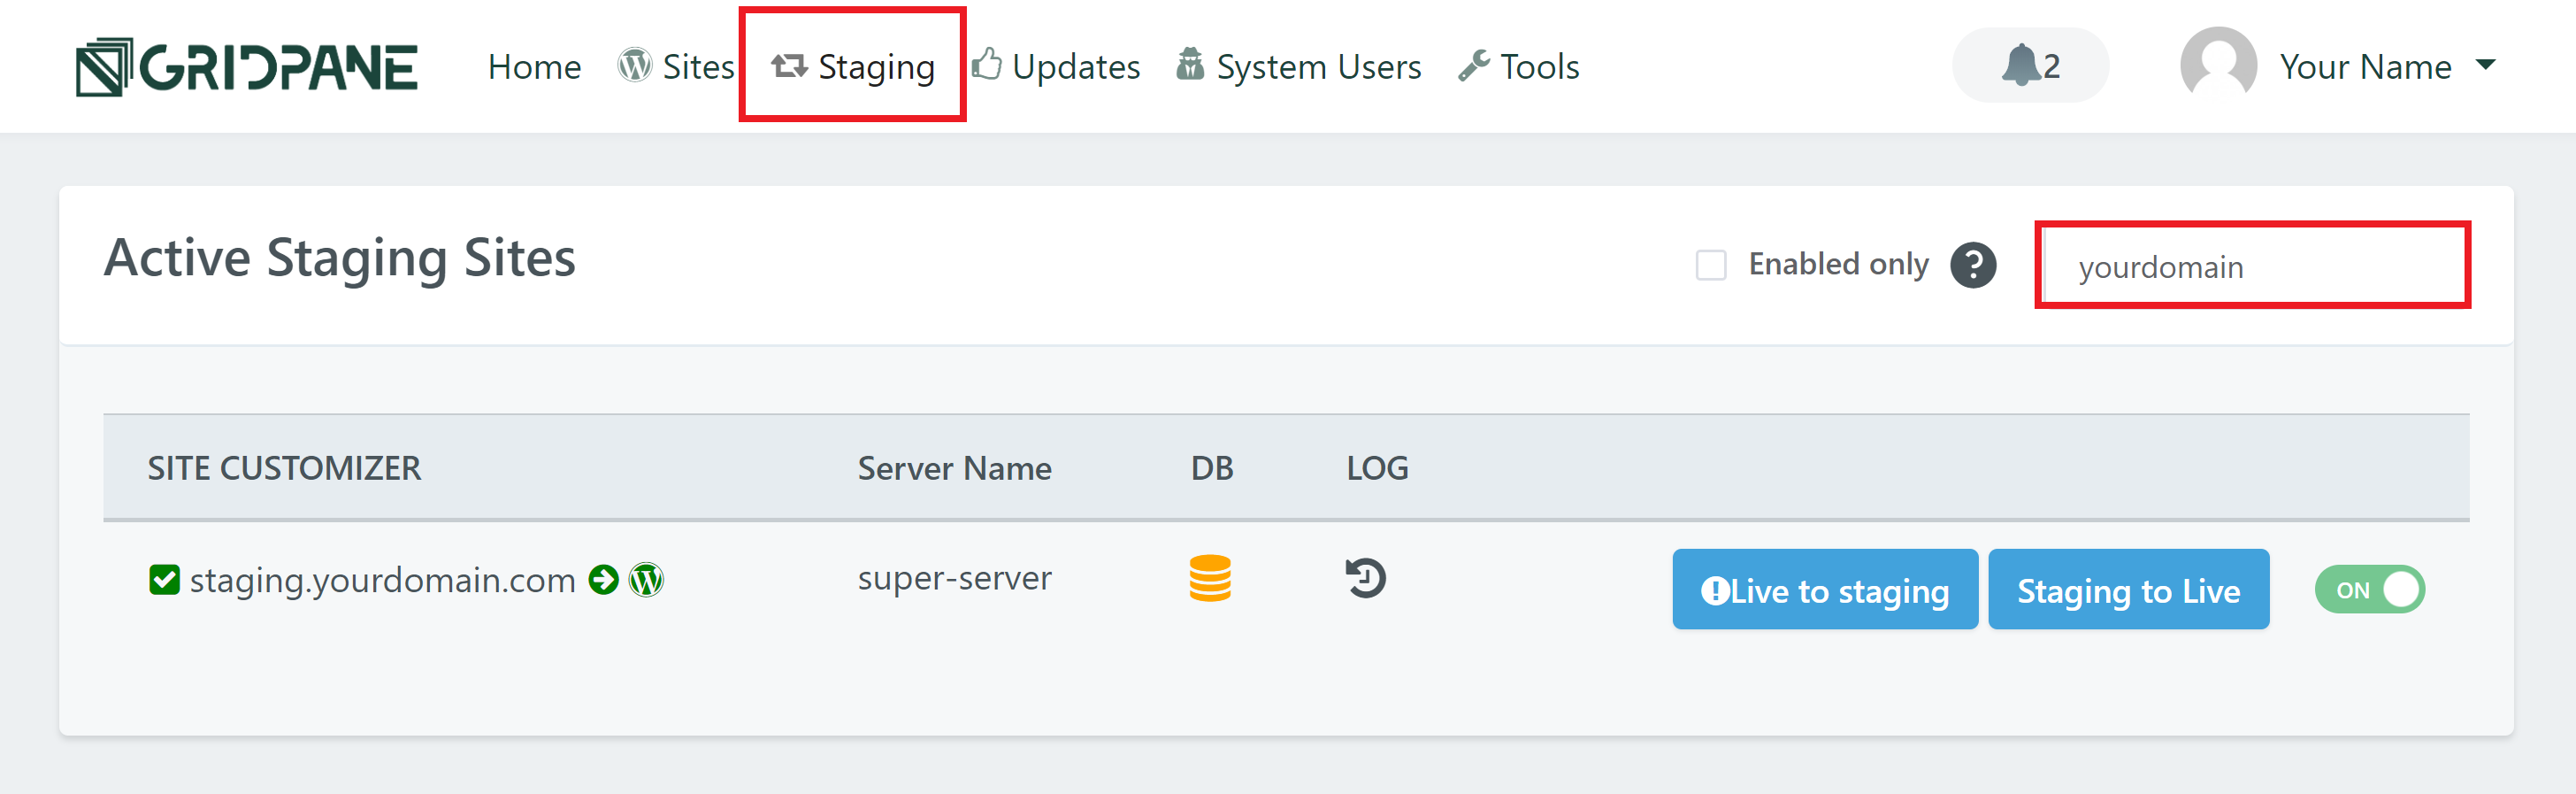
Navigate to your Staging page and locate your domain’s staging site. Click on your staging site’s domain to open up the customizer:

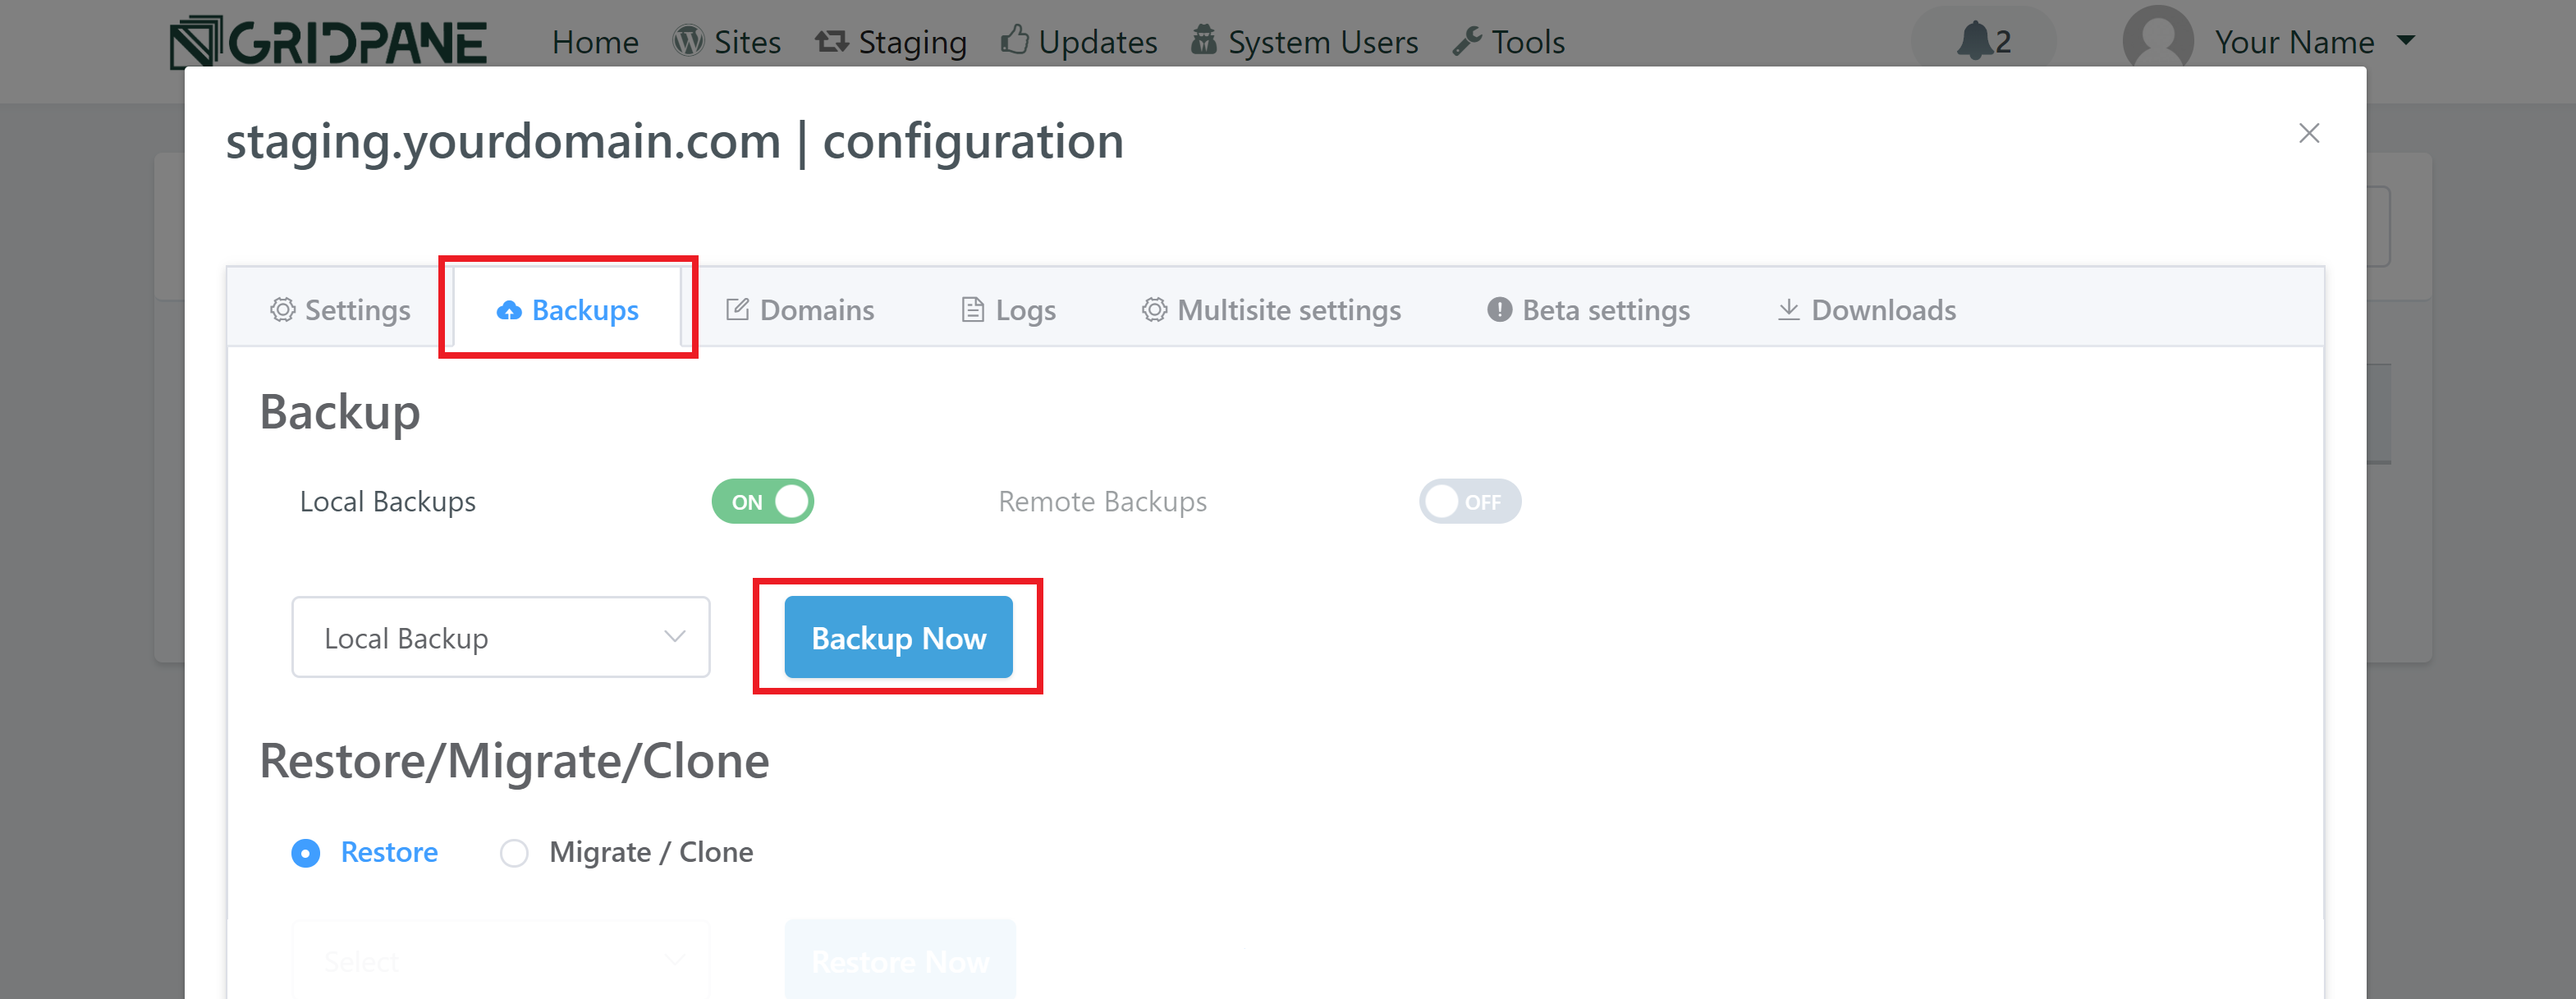
If your staging site is brand new, first take a manual backup by clicking on the website name to open up the configuration modal and then opening up the backups tab. Click “Backup Now”. If your staging site isn’t brand new, this may not be necessary.

Step 2. Choose Your Staging Push Option

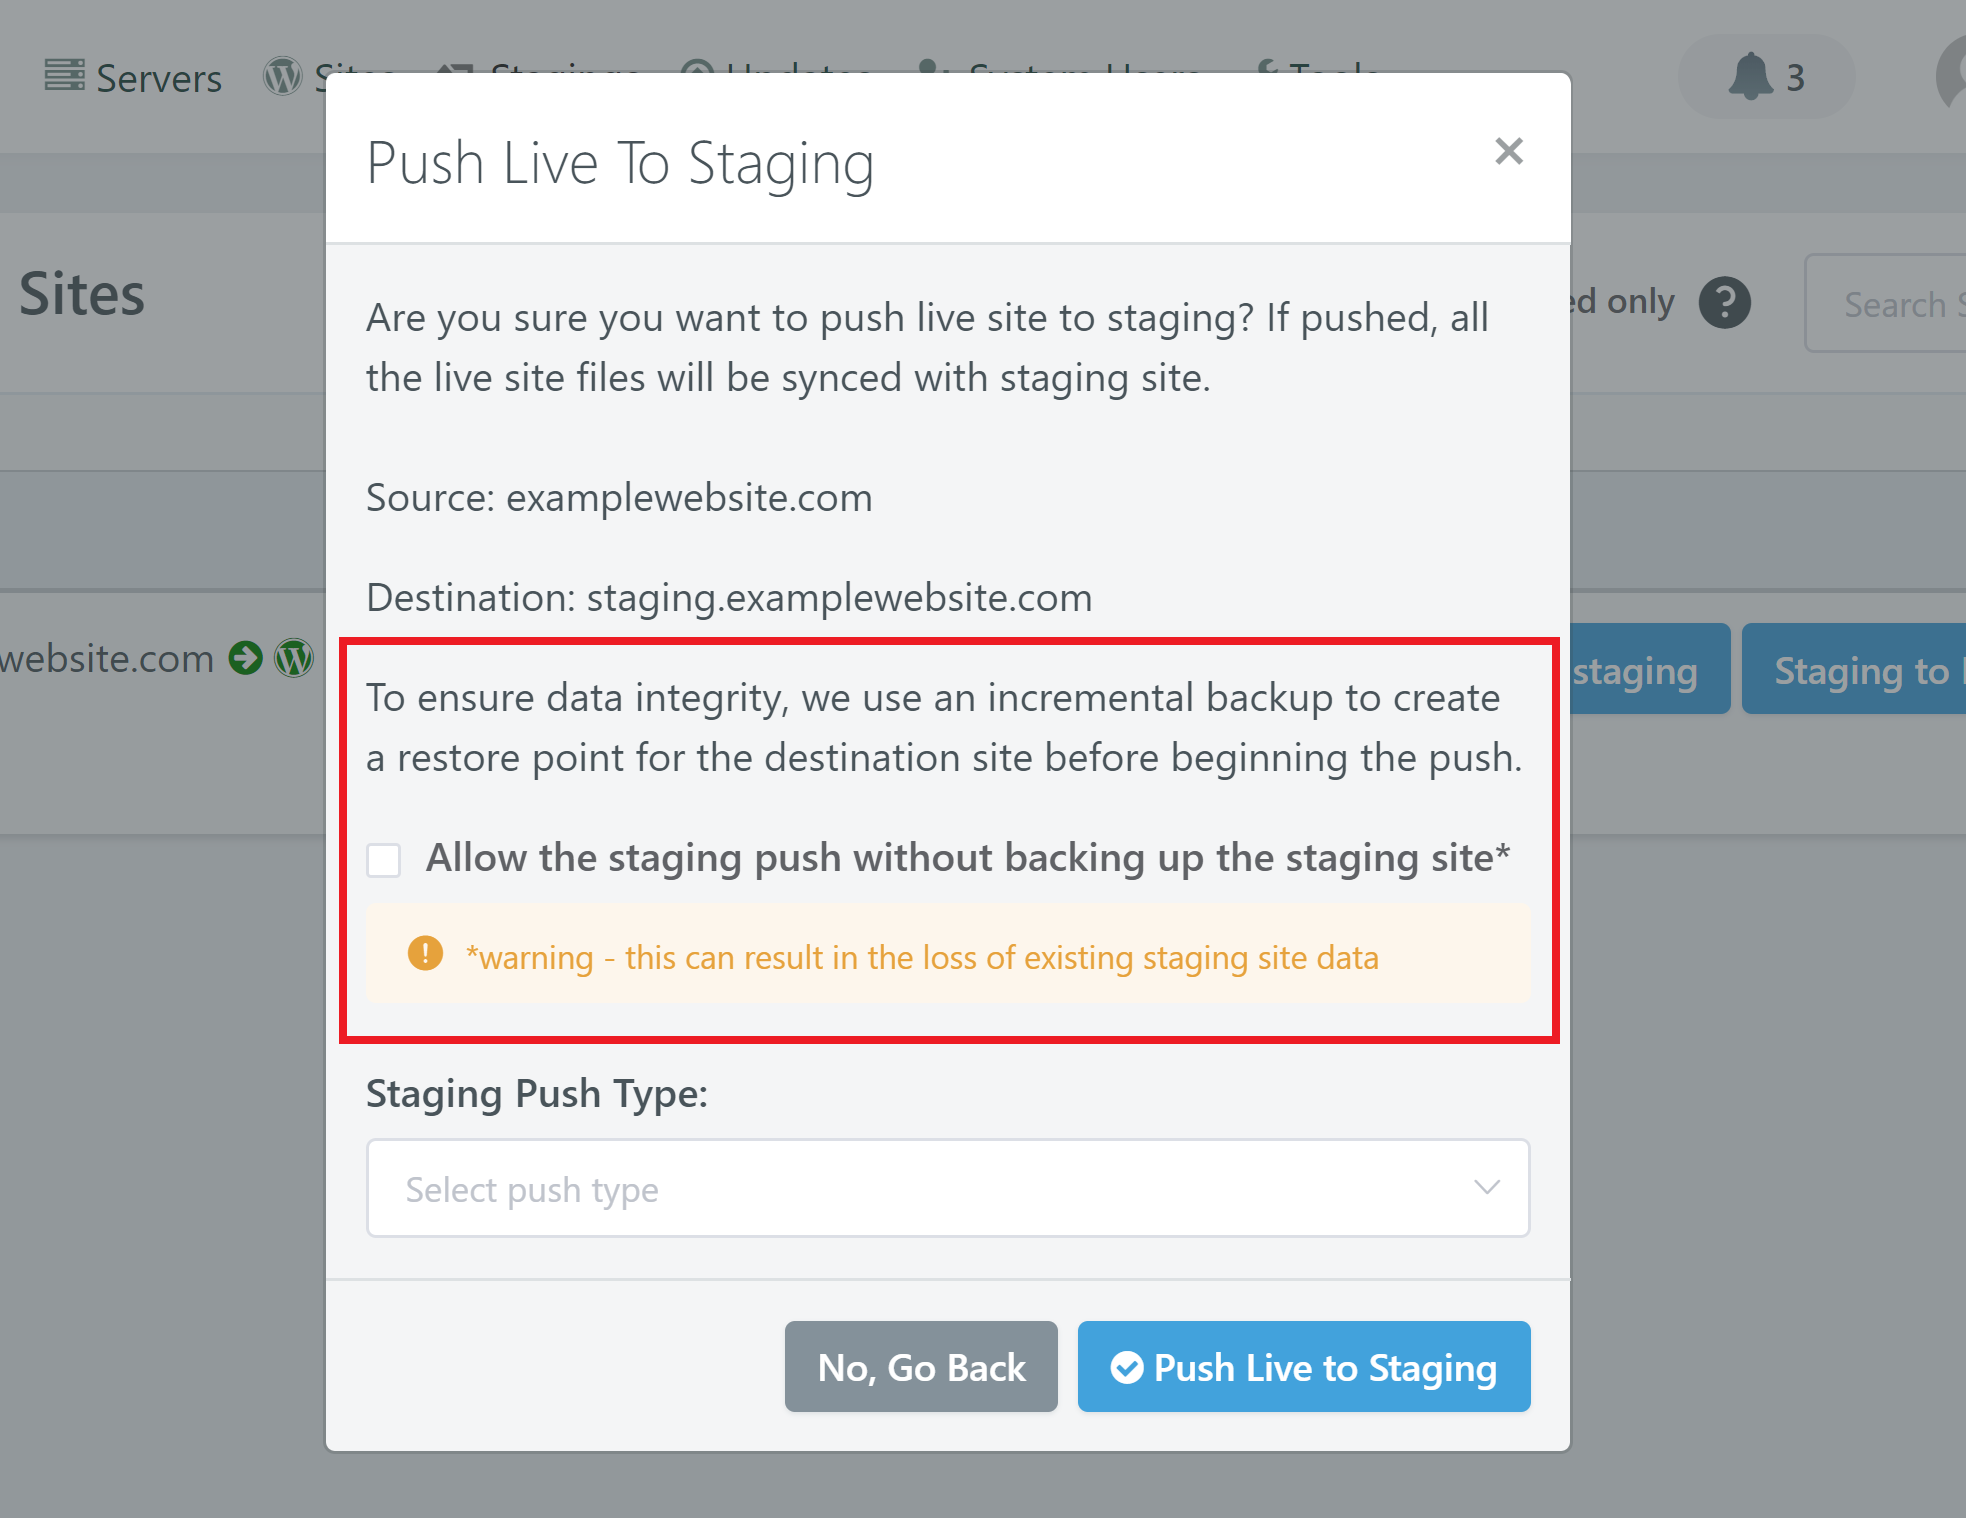
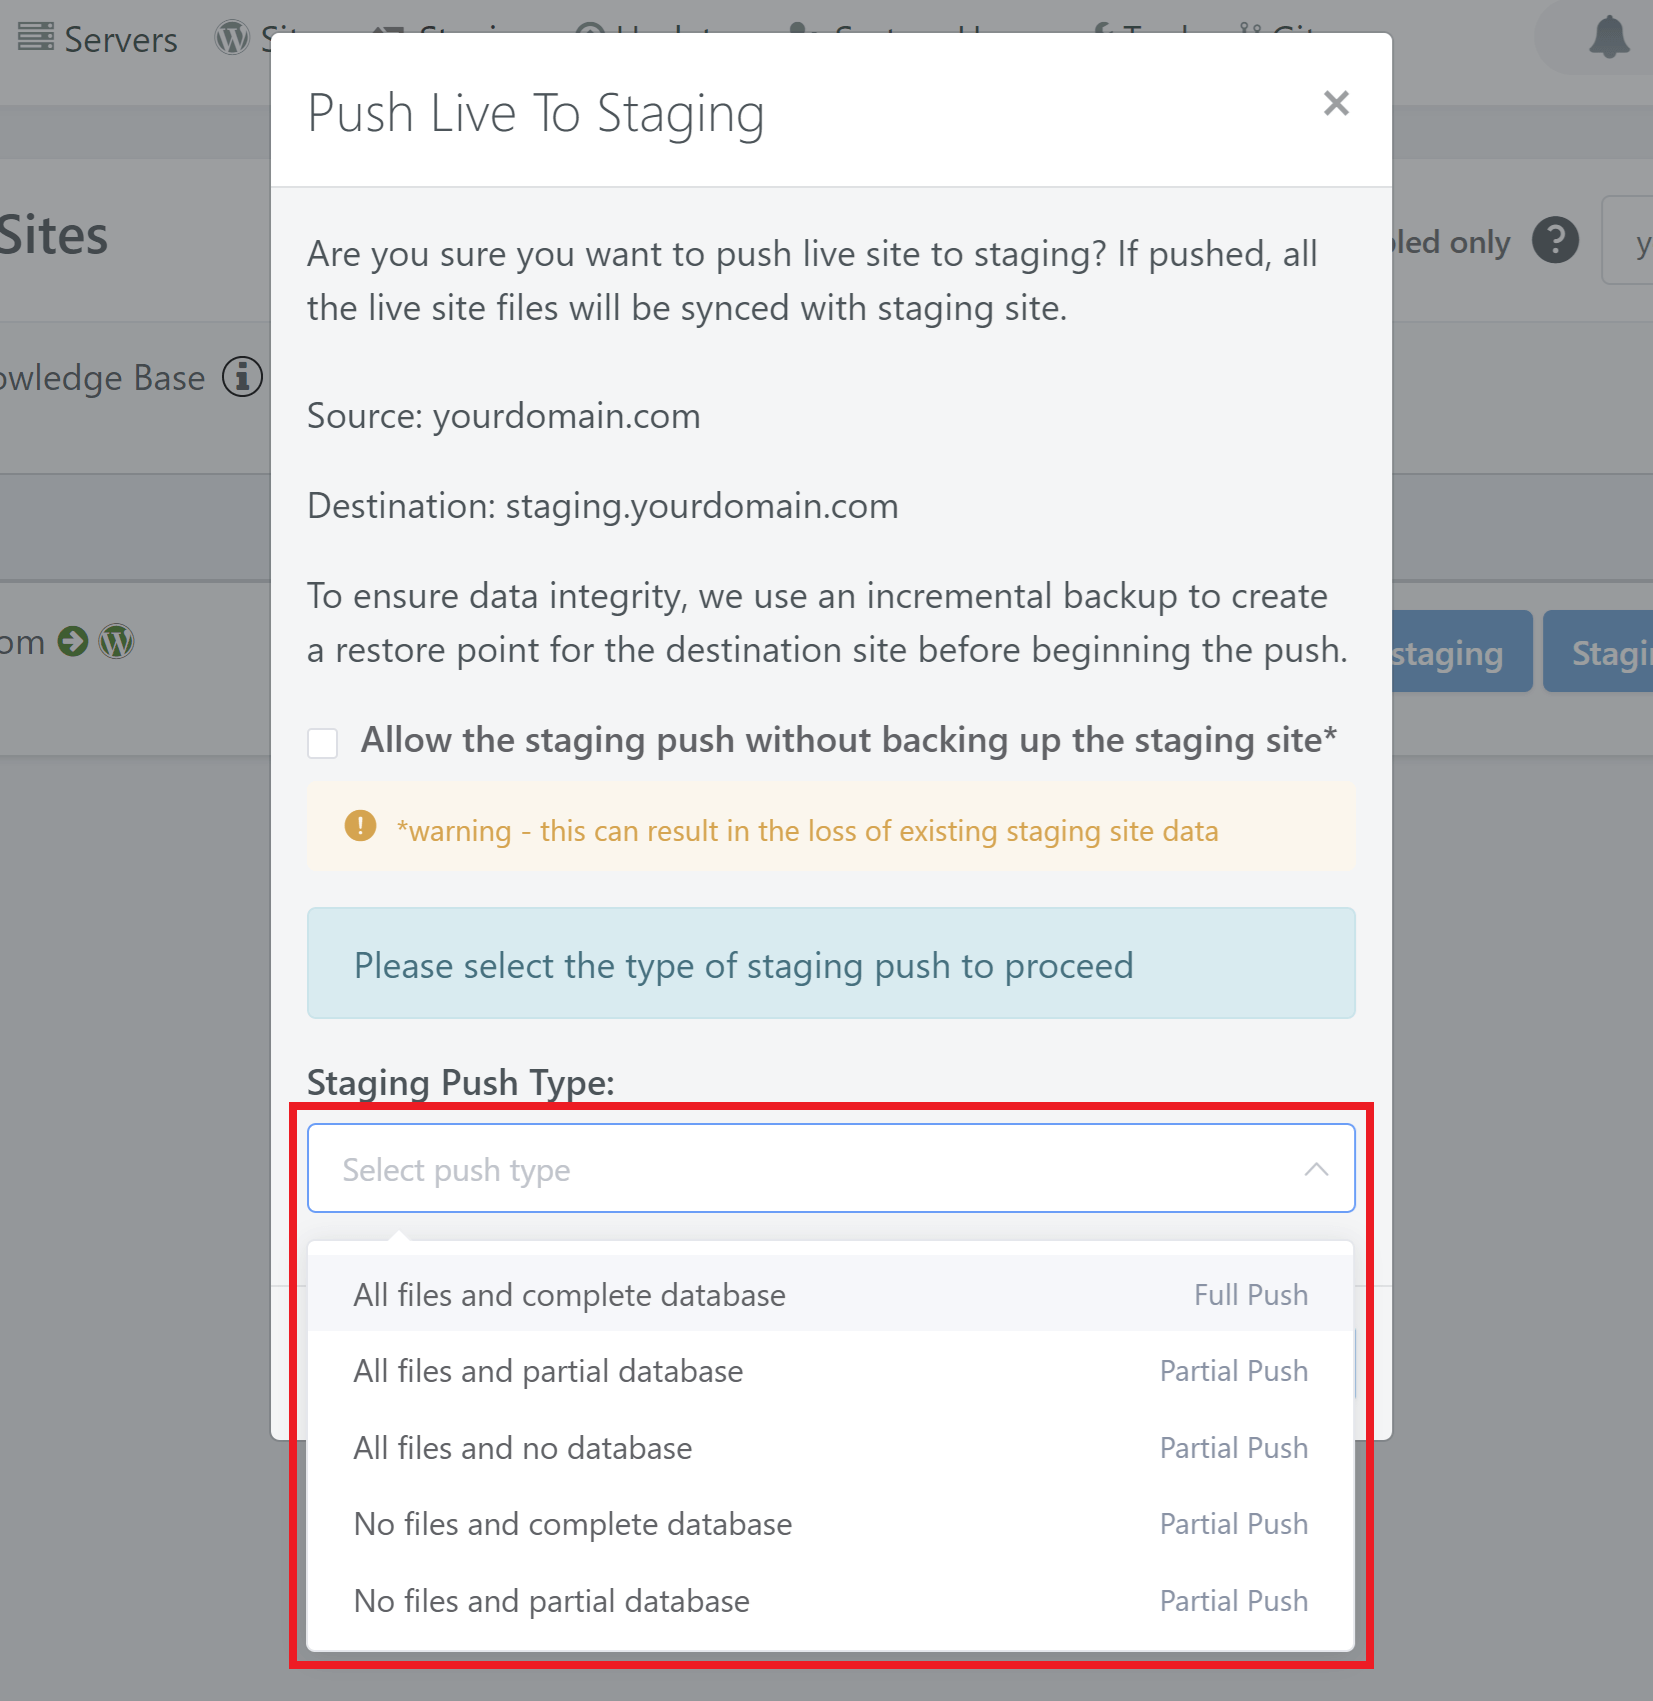
Click on the appropriate button for your push (live to staging or staging to live). Be sure to select the correct option so you don’t overwrite the wrong website. This will open up a modal, as shown below.

Choose your staging push option from the dropdown and click the “Push Live to Staging” / “Push Staging to Live” button:

Step 3. Settings Check and Confirmation (Staging to Live Only)

When pushing from Staging to Live, you will see the following checklist table:

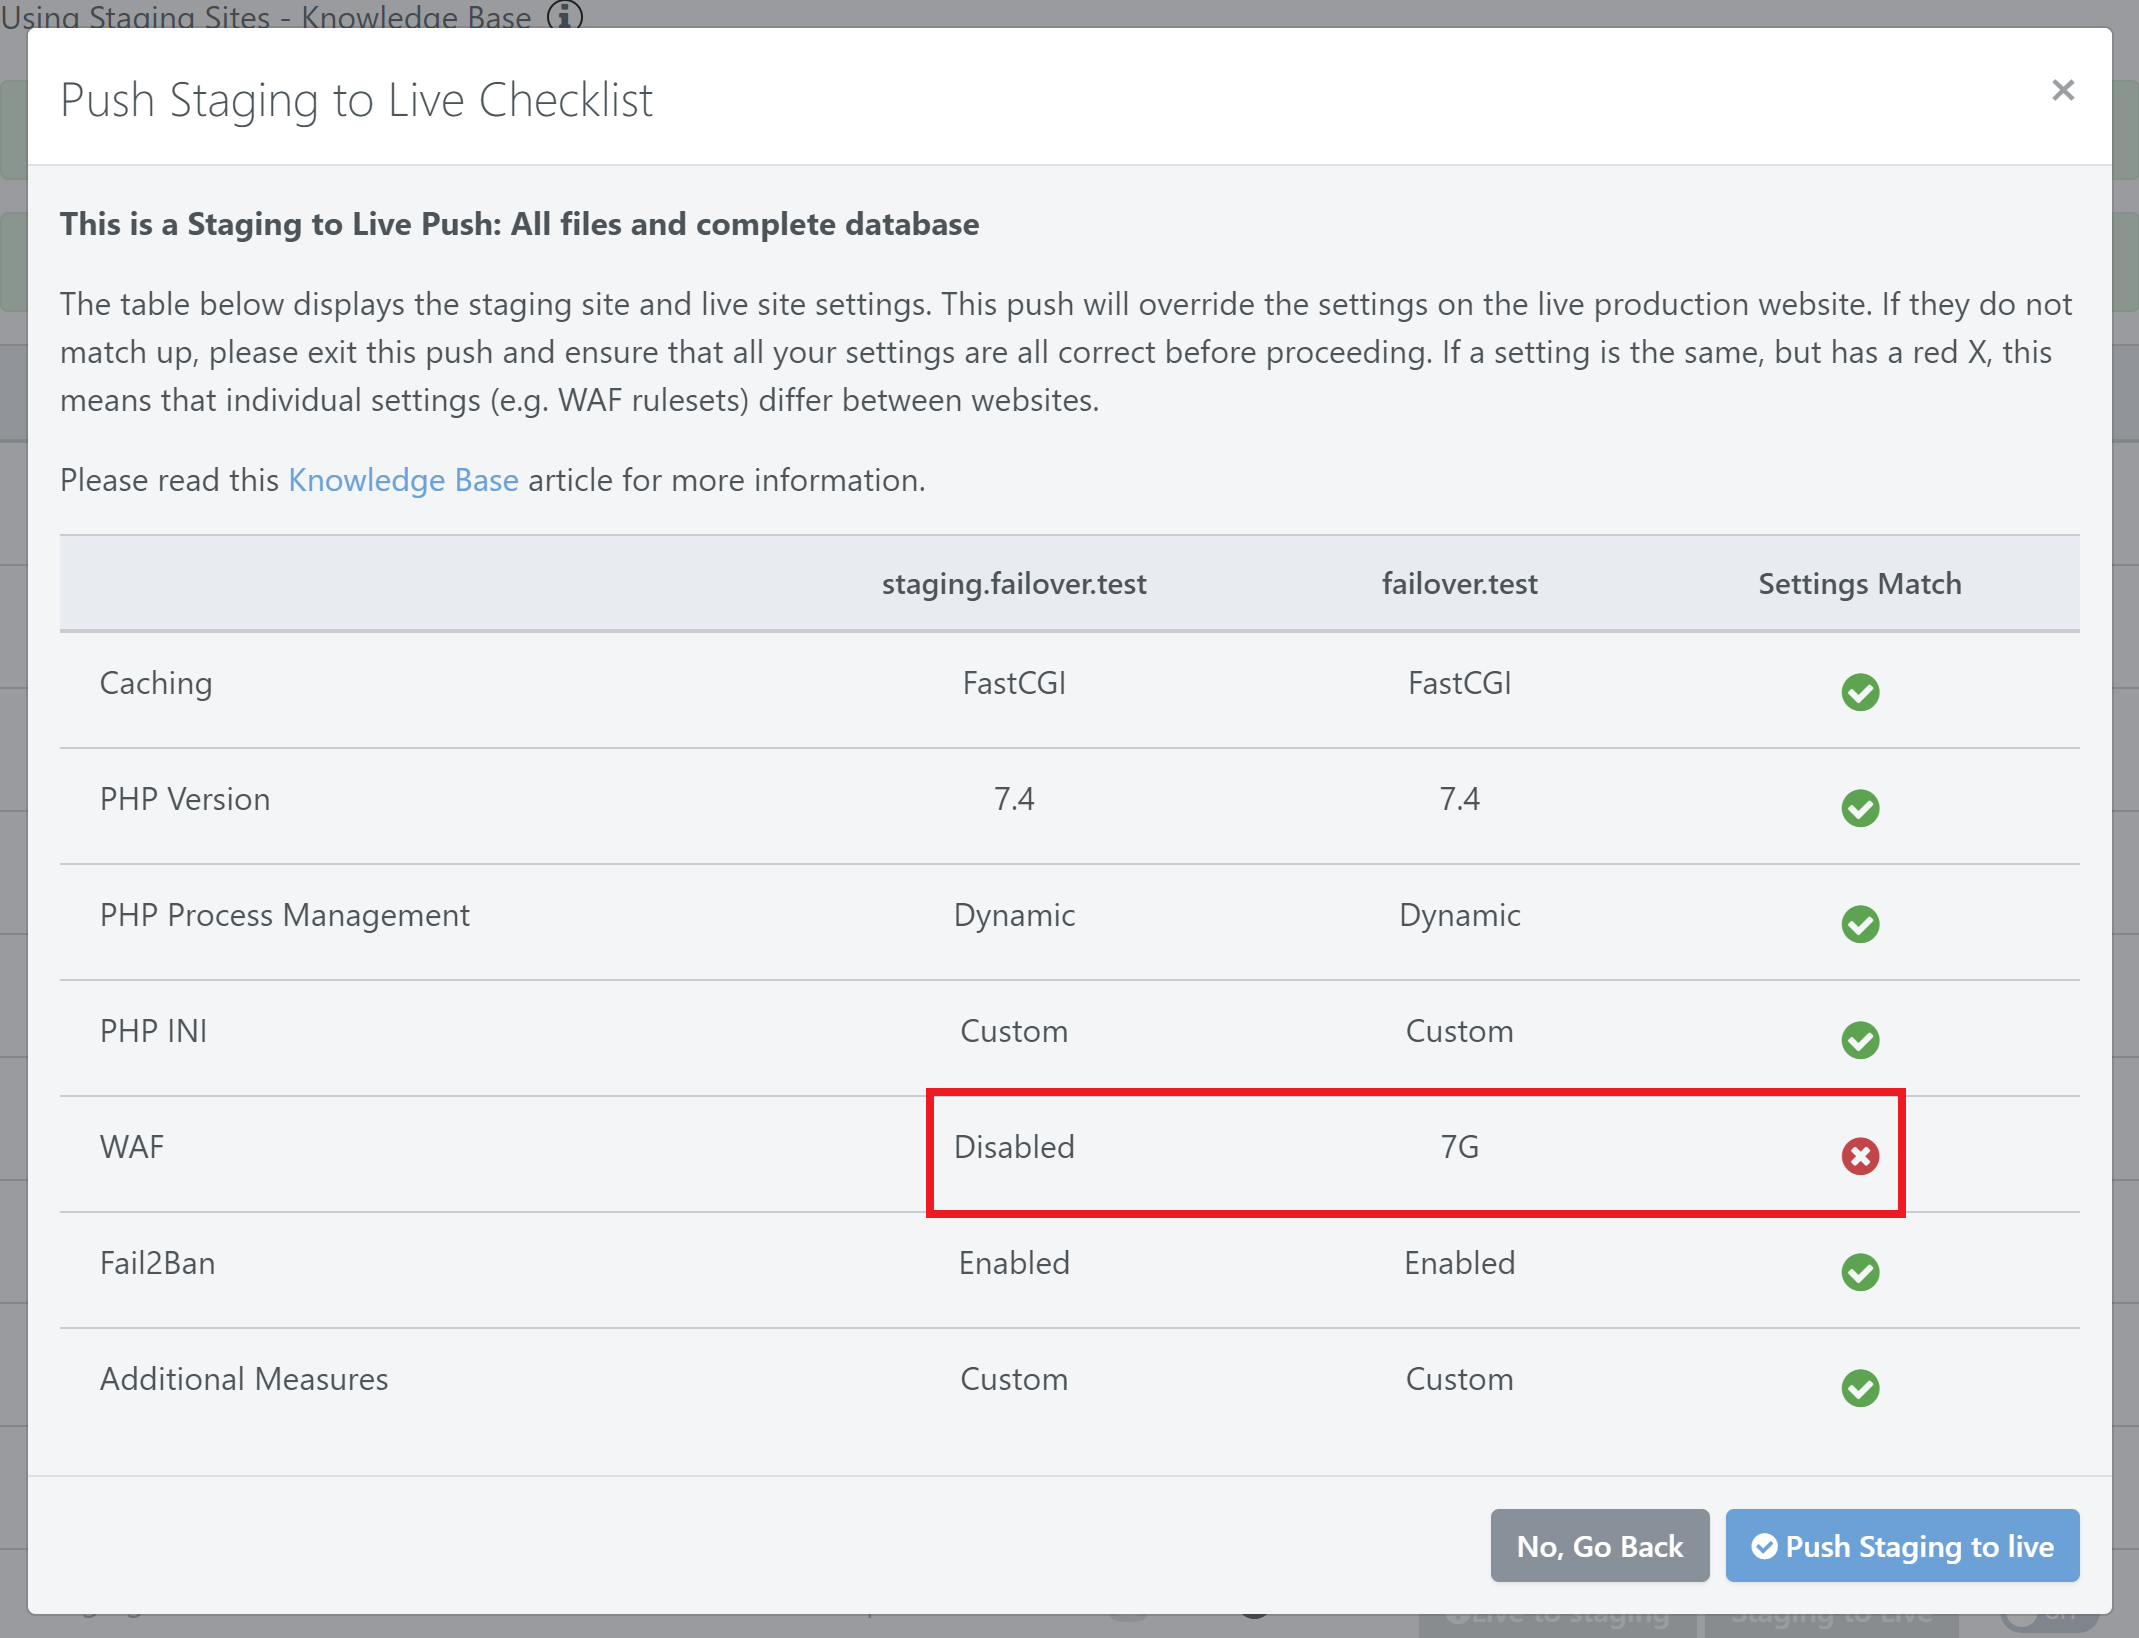
This table lets you quickly see if any of your site’s caching, routing, security, and PHP settings don’t match between the current live site and the staging site. Please review them carefully and ensure that these are the settings that you desire for your production website.

If they aren’t, simply click the X in the top right to cancel, set the correct settings on your staging site, then repeat the above process again and proceed with your staging push.

Wrapping Up

Once your push has completed, you will see the following notifications, and you can now check out the changes.

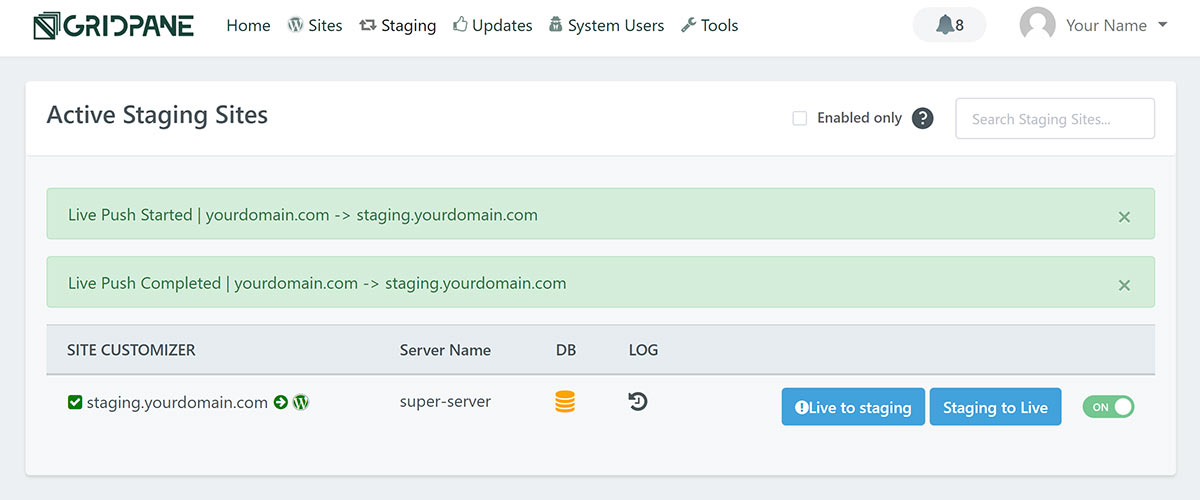
On completion, a full cache clear will occur on the new website, so you should be able to view the website correctly without a pre-stored version showing in its place via the cache.

Partial Database Staging Pushes

The process of making an advanced staging push follows most of the same steps, except here, you also have the option to choose a partial database push. When you select this option, you’ll be presented with a list of all of your websites database tables:

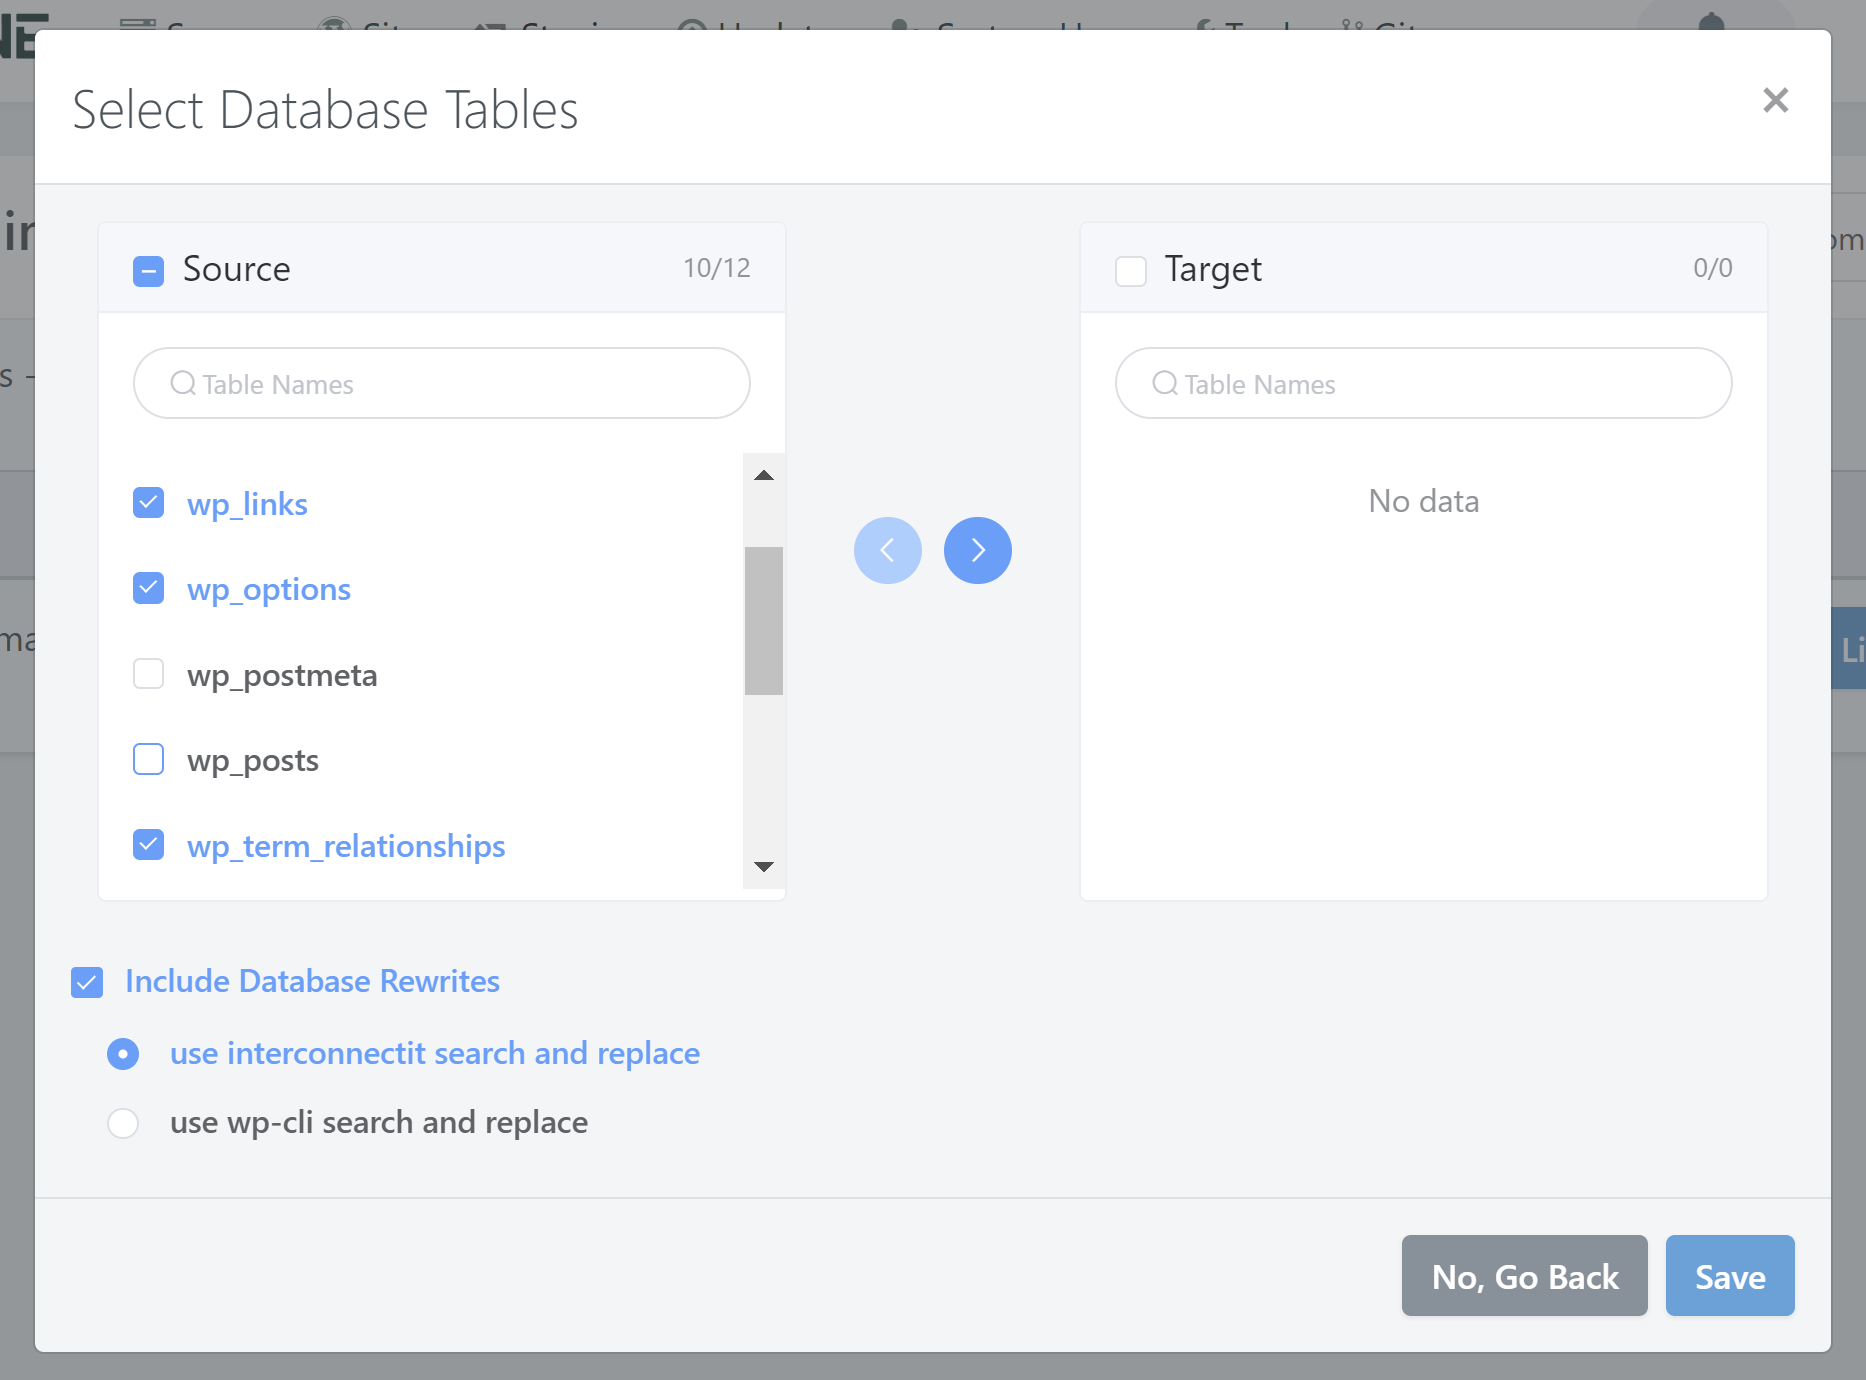
Here, you can select the tables you want to include in the staging push and leave the tables you don’t want to push unchecked.

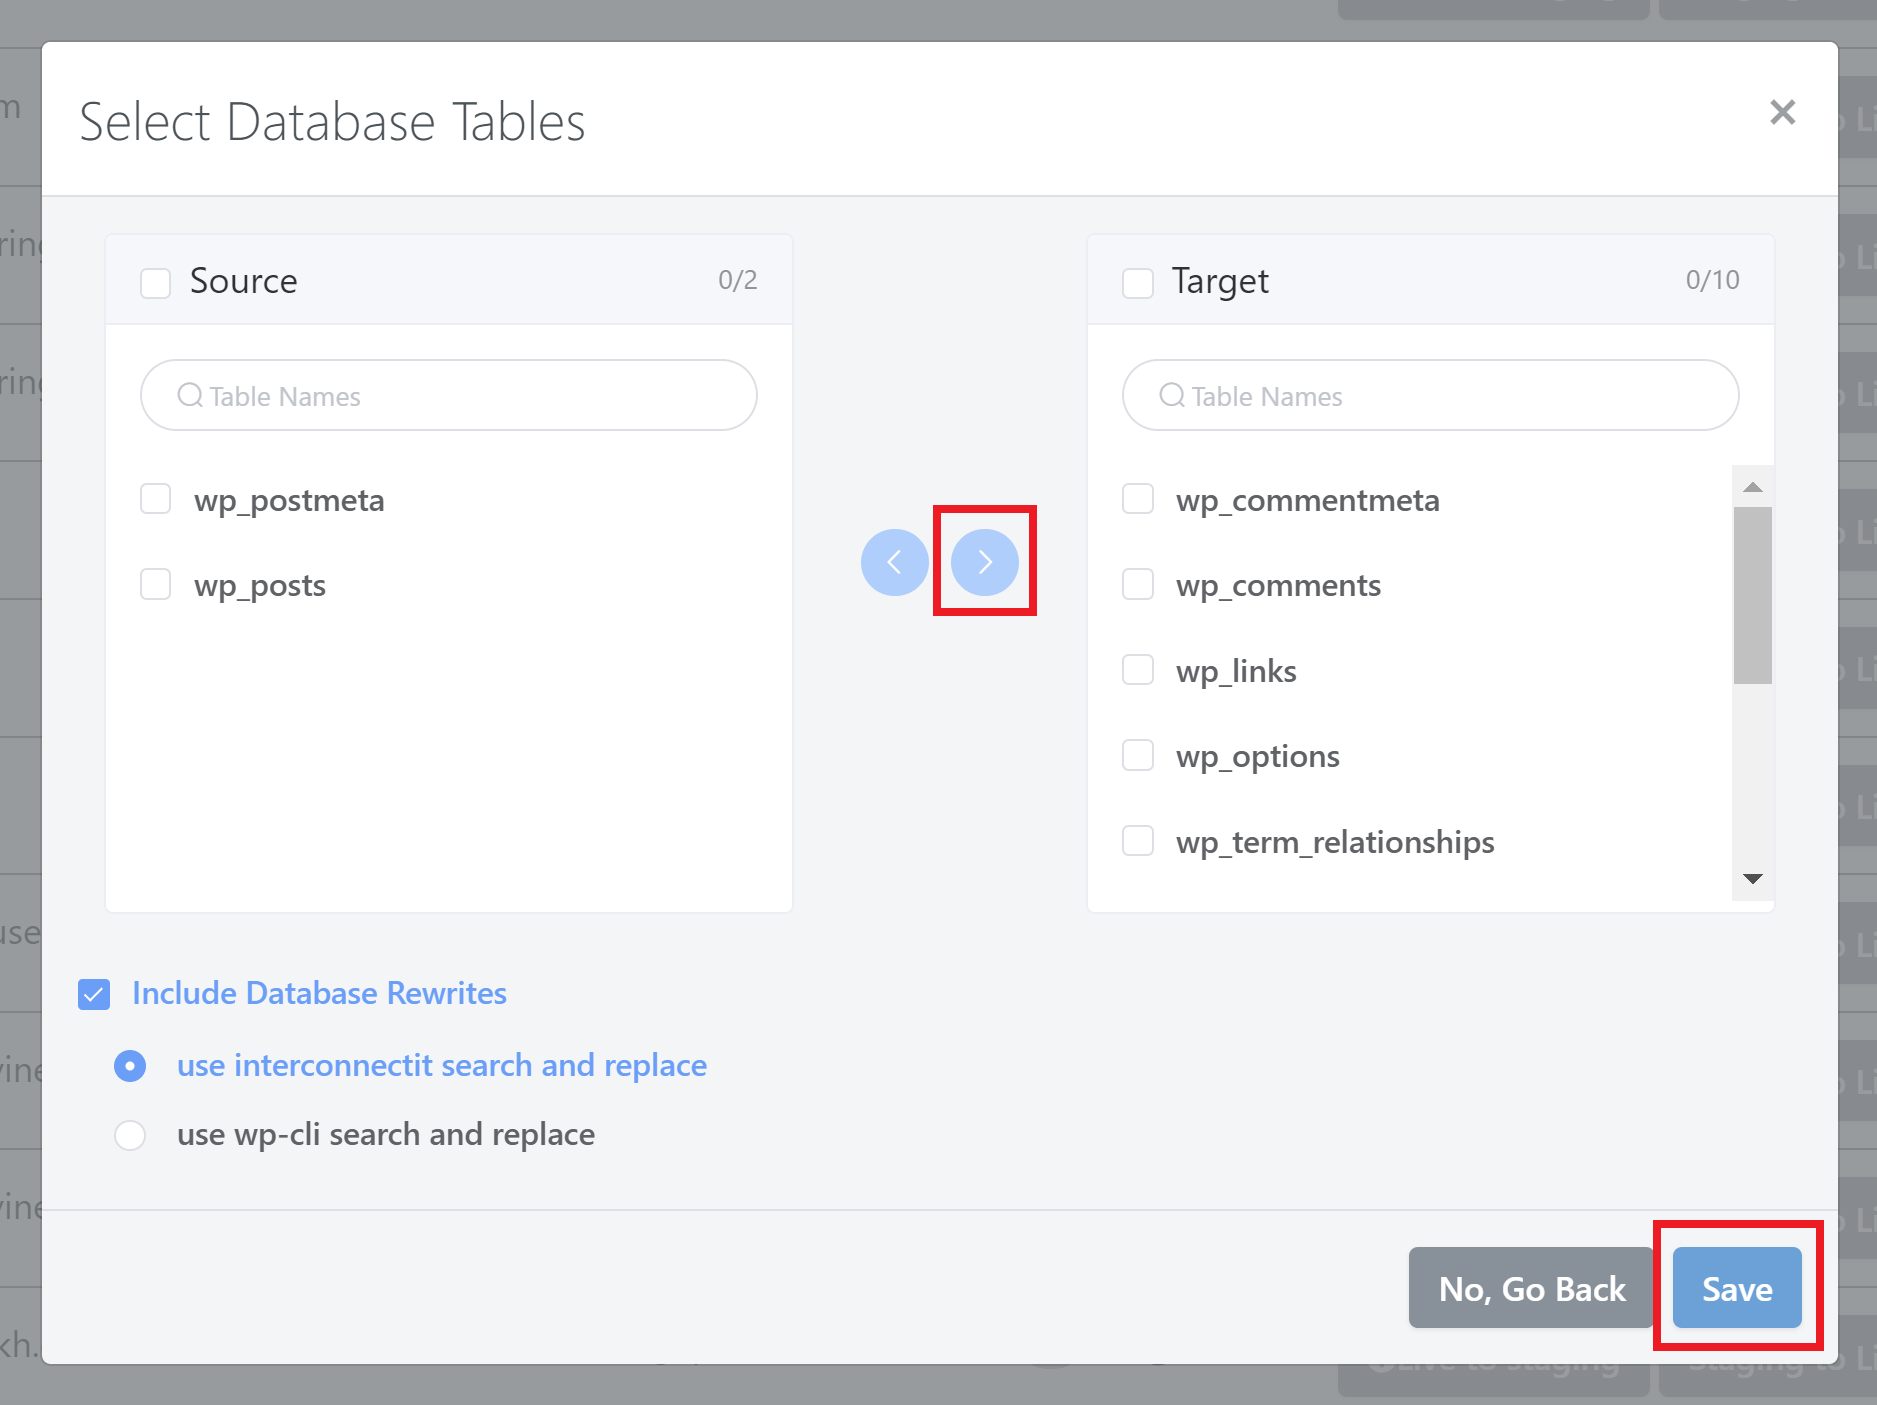
Once you’ve selected your database tables, use the arrow button to add the tables to the target column:

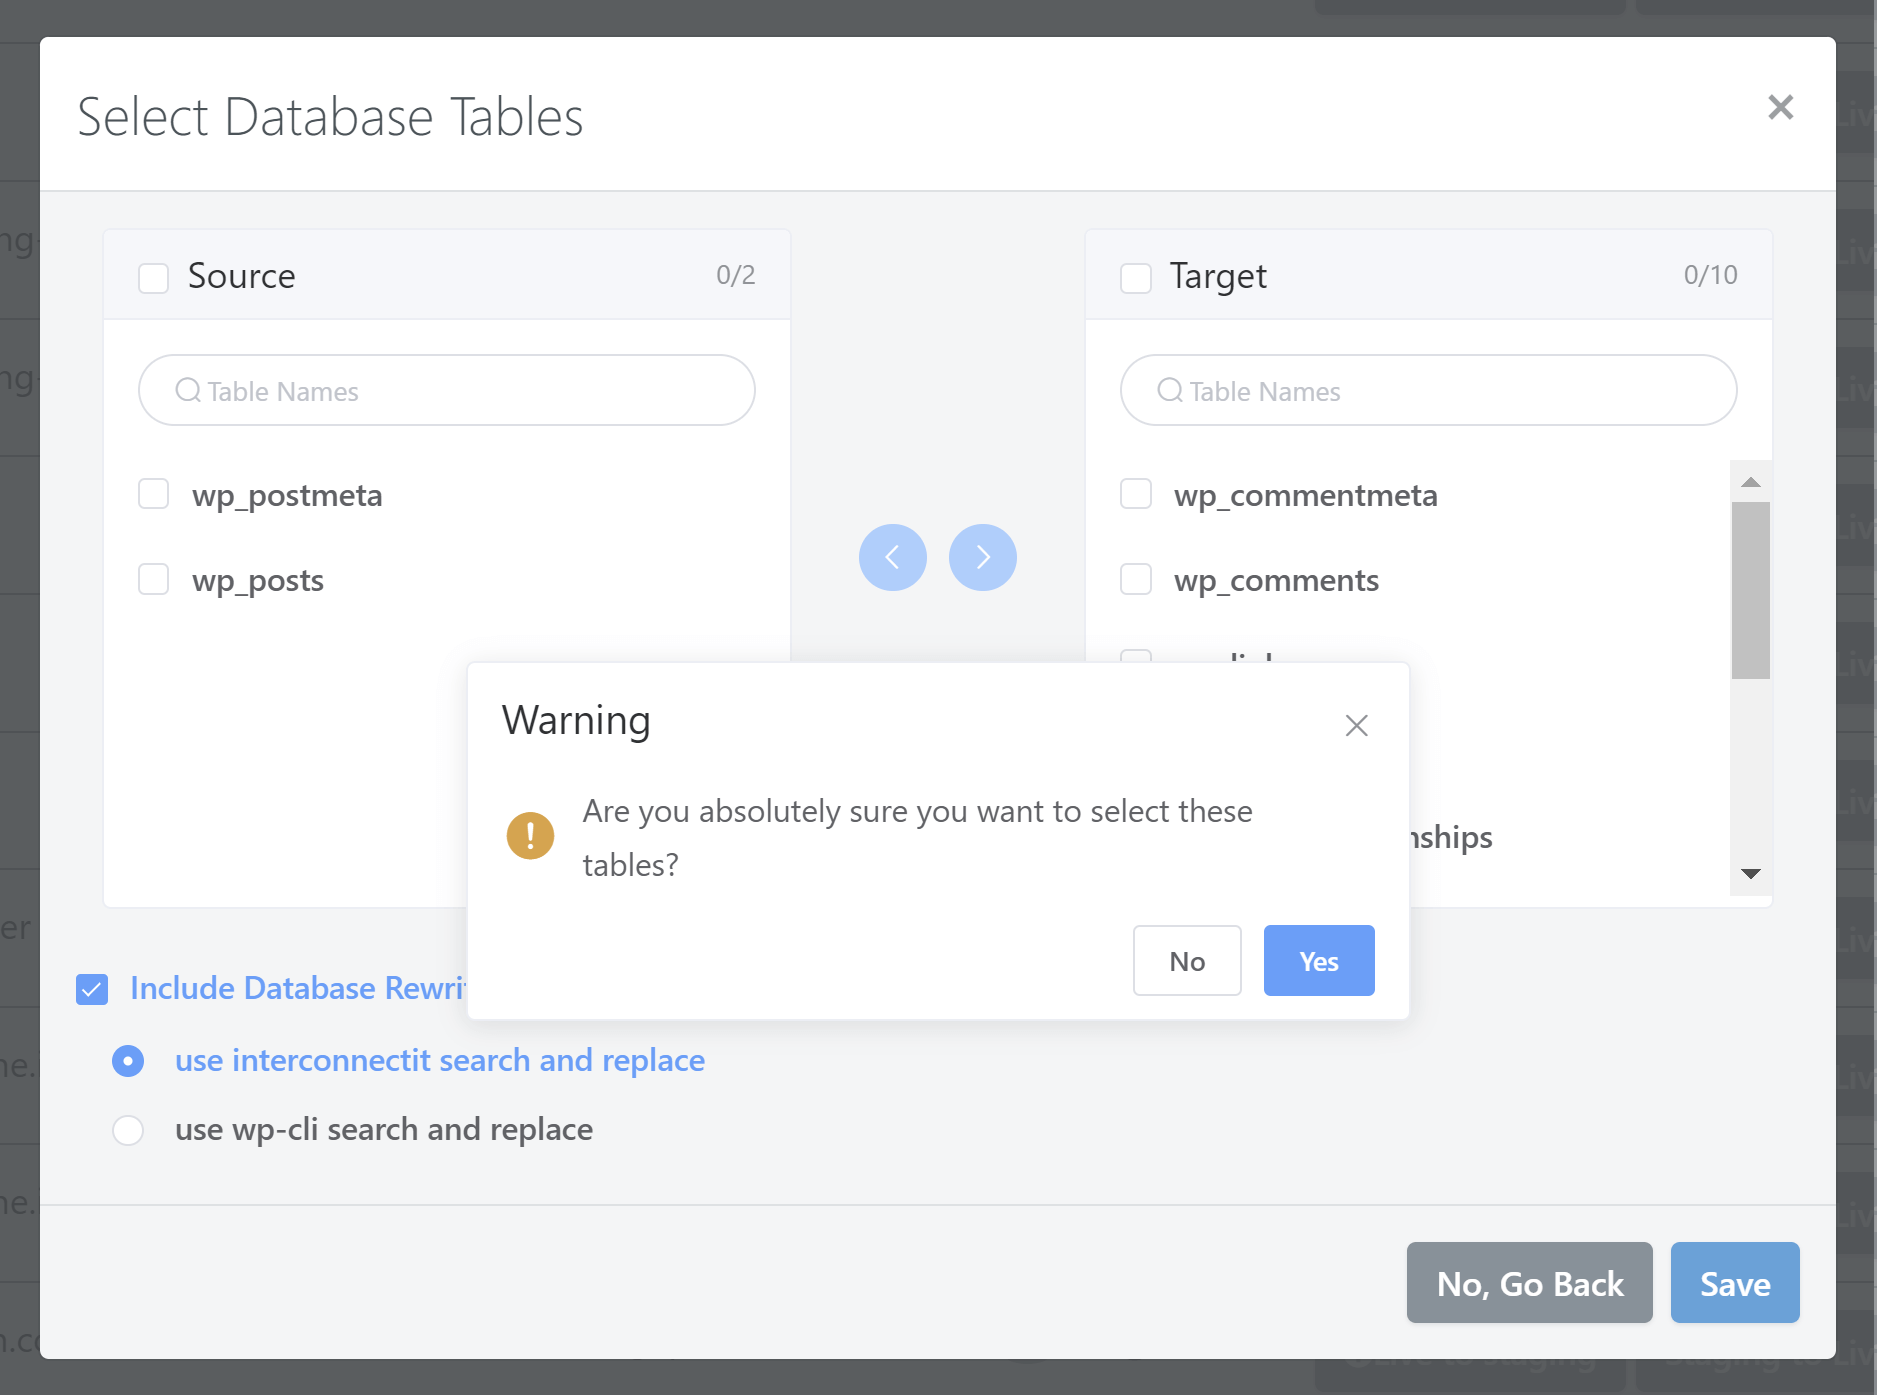
Once you’re ready to proceed, click the Save button. You’ll then be prompted to confirm one final time, and then your staging push will begin:

Troubleshooting

Troubleshooting Tip 1

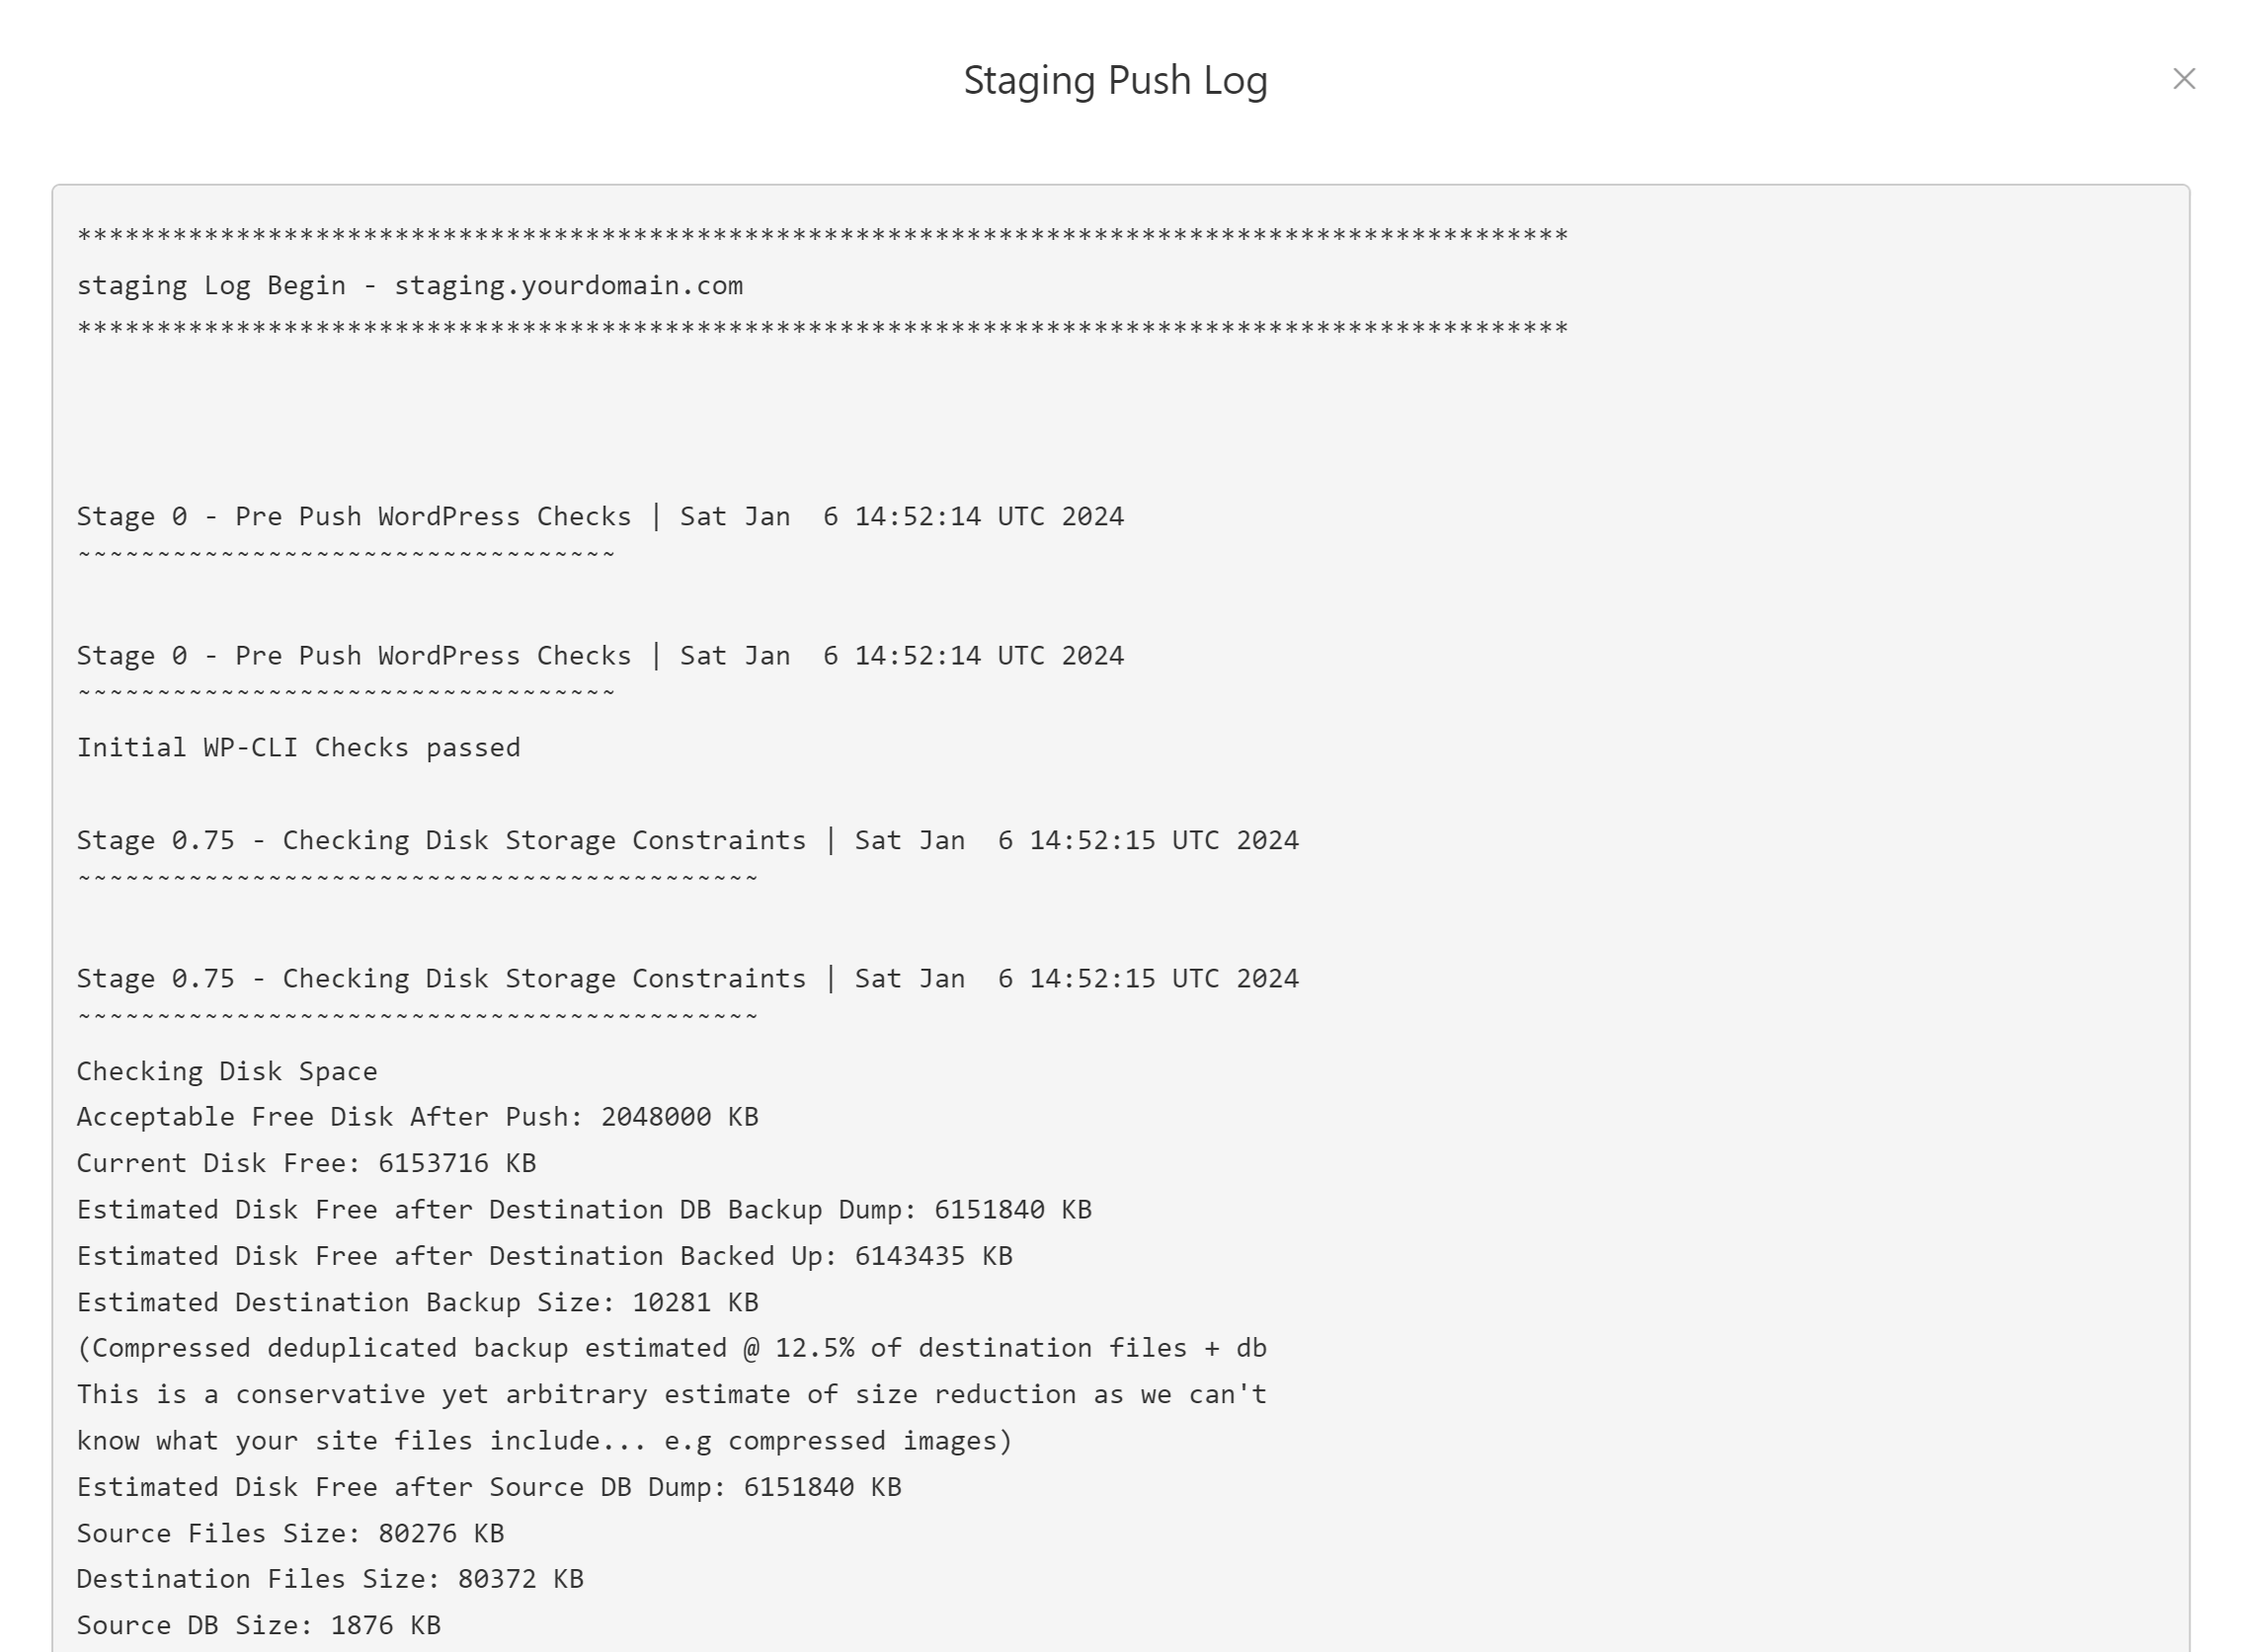
If your staging push failed, you can check your staging push log. This is located in the primary domain’s logs tab here:

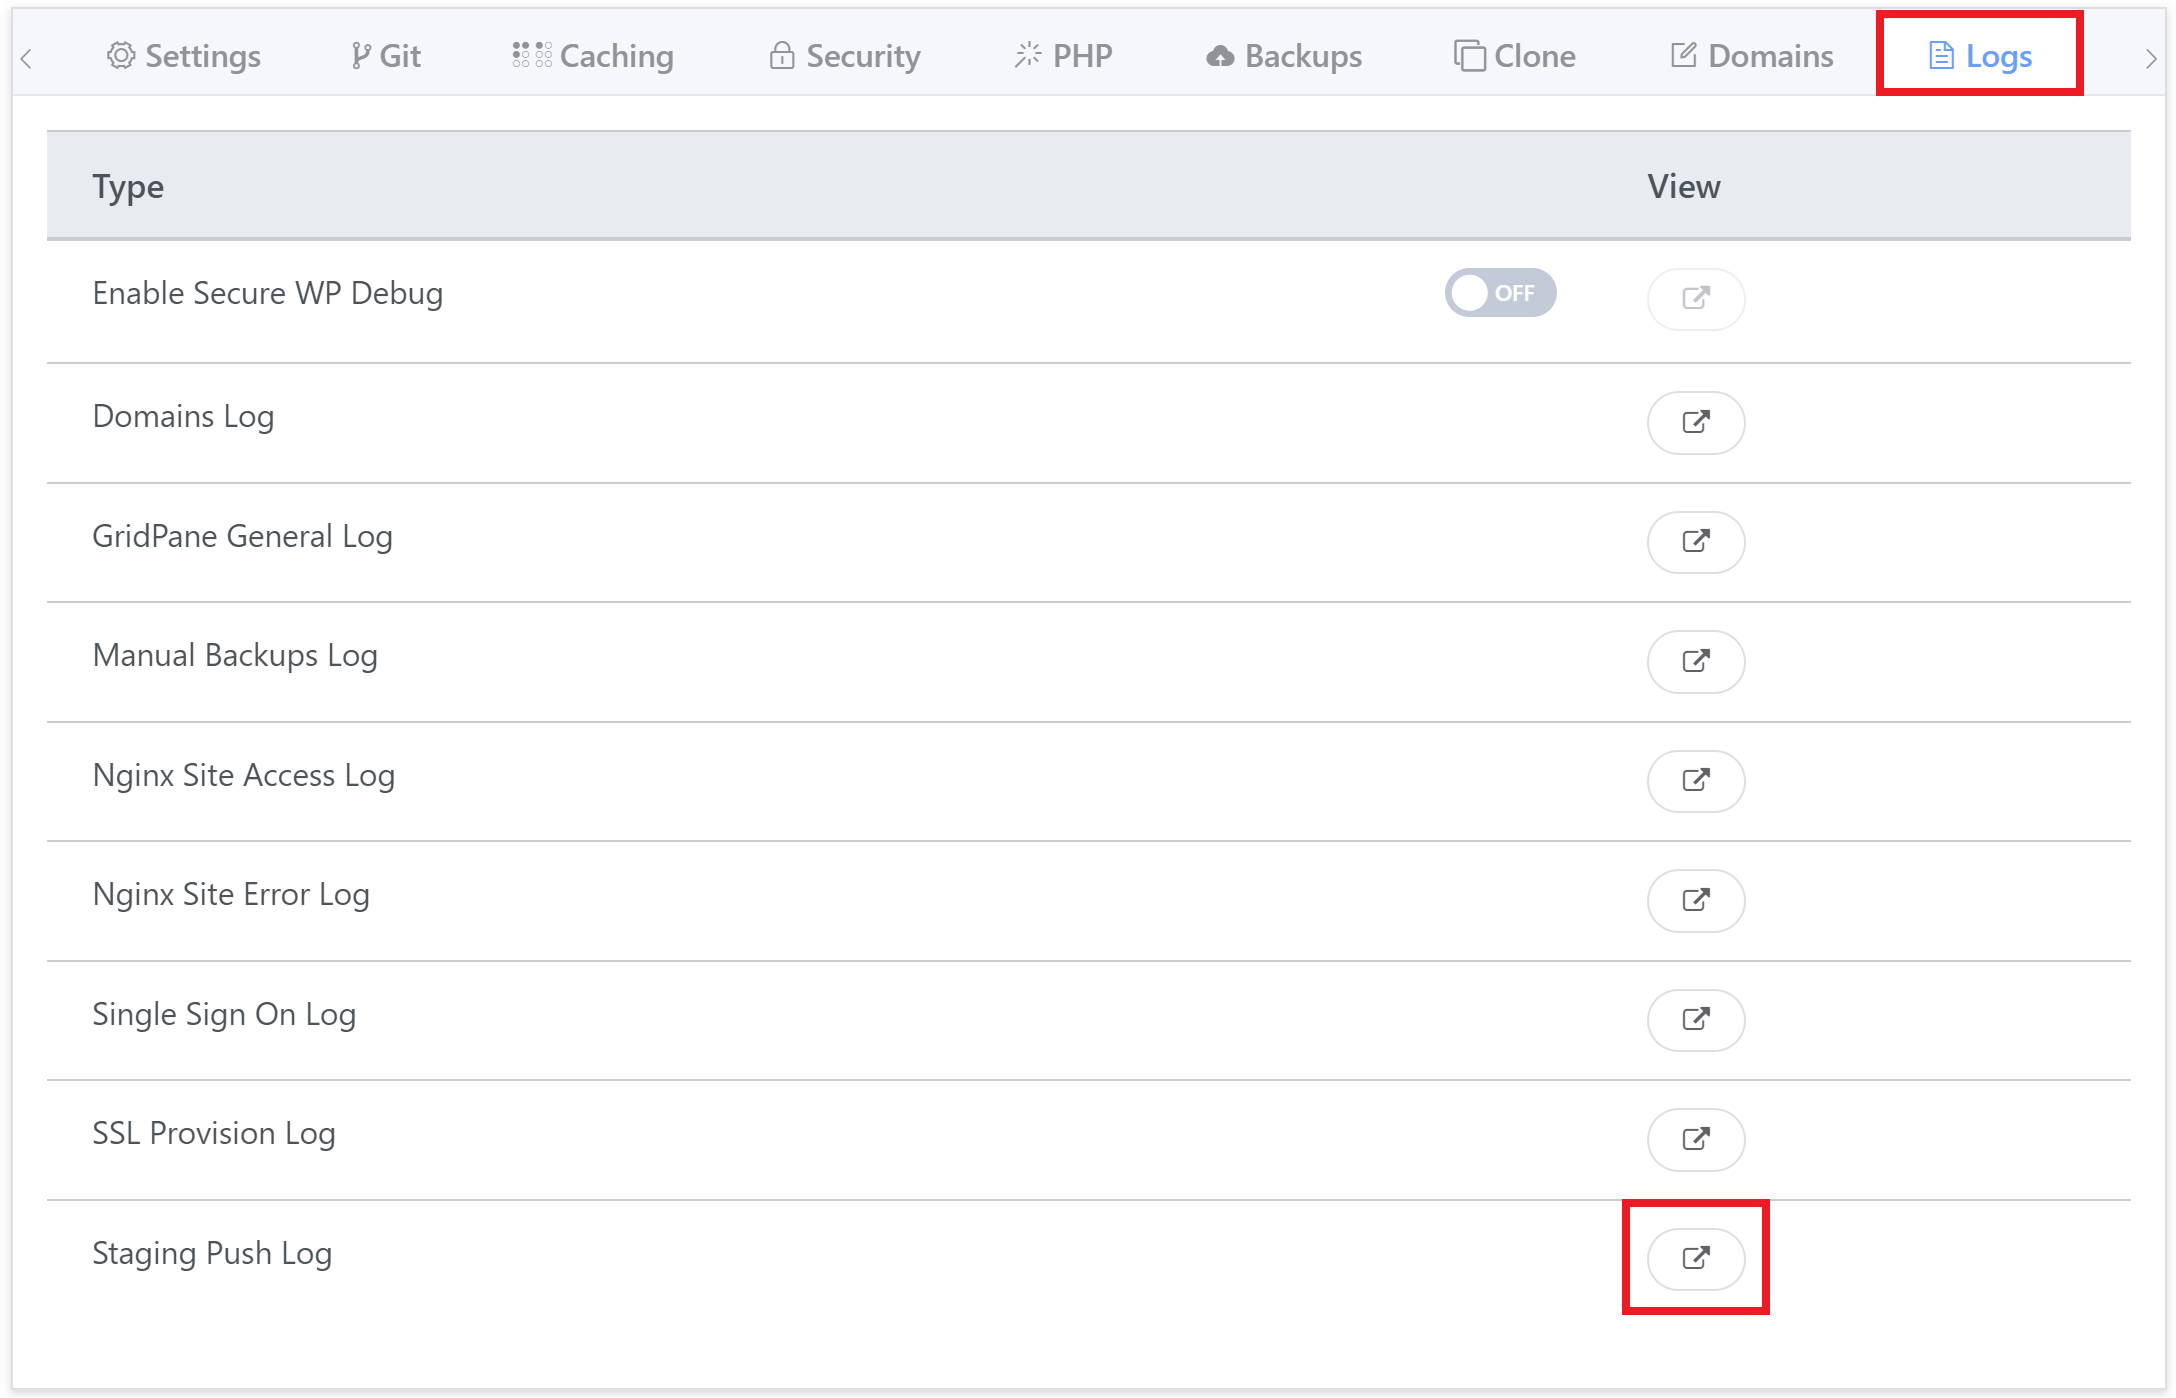
This allows you to view the results of your push, and it will detail the reason it failed to go through:

Troubleshooting tip 2

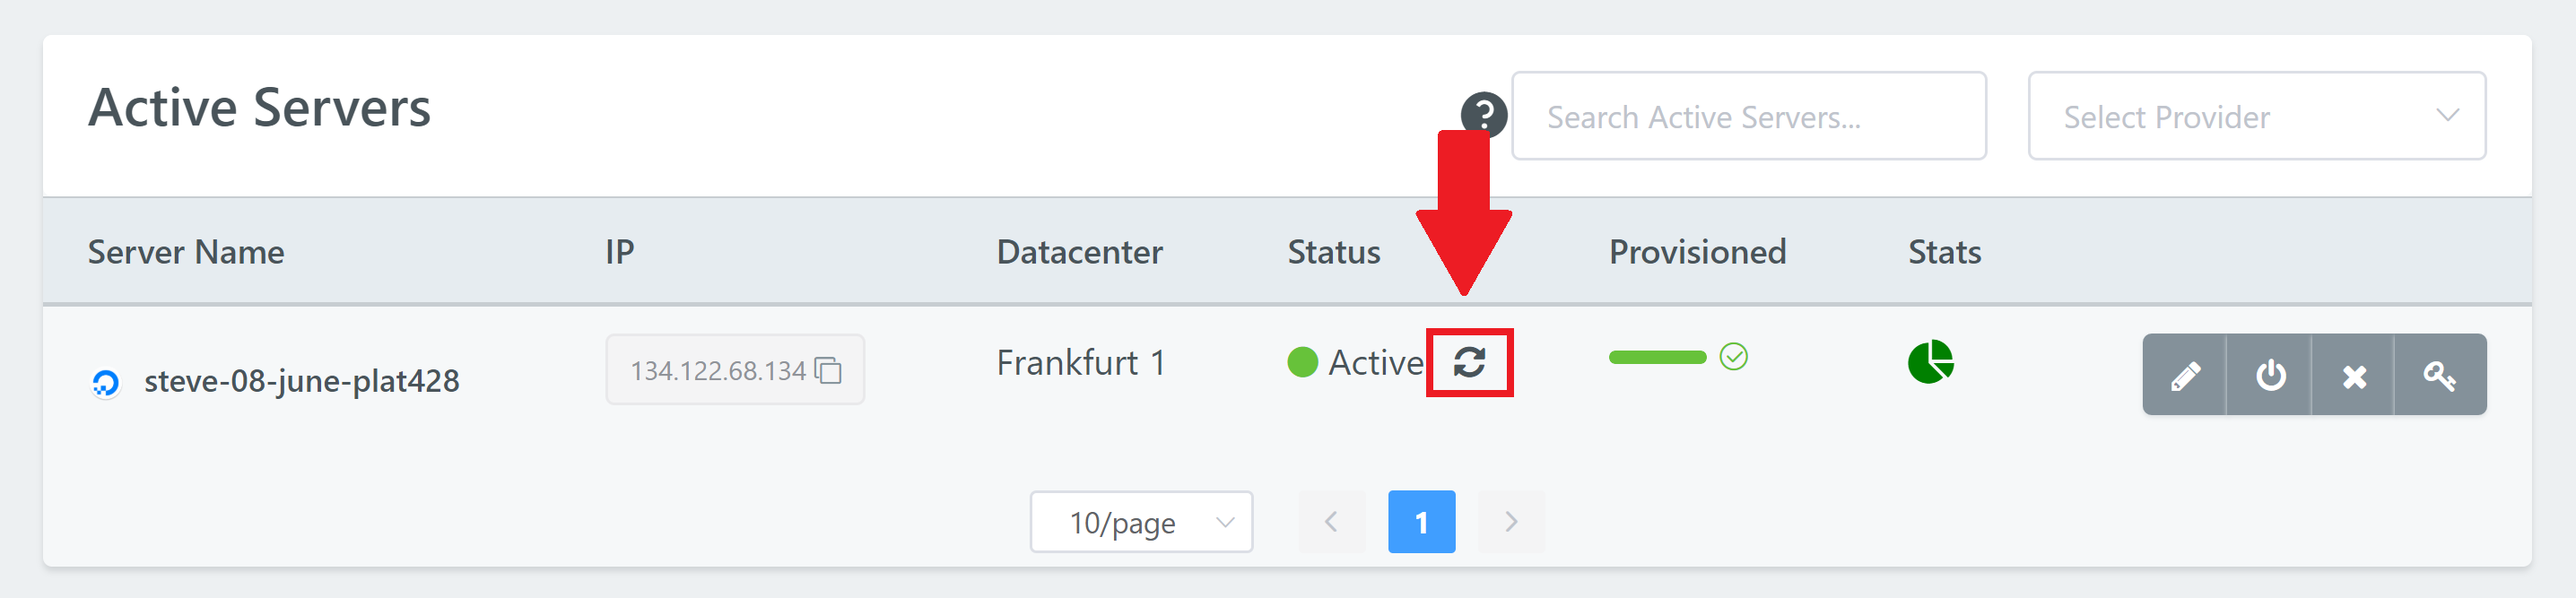
If you’re finding that your staging push is hanging (nothing’s happening), it may be due to your backup token being out of sync. Head to your servers page in your account and hit the refresh button under “Status” to sync things up, and then try your push again.

ManageWP

ManageWP (and potentially other plugins that have staging features) has issues when making staging pushes. If you have ManageWP on your website and the staging push isn’t working, you may see the following error in the staging log:

** (myloader:1692): CRITICAL **: 11:13:54.241: Error restoring Nui_staging_website_com.wp_options from file website_com.wp_options.sql: Duplicate entry 'mwp_communication_keys' for key 'wp_options.option_name'

Unfortunately, there is not an easy fix for this. Deactivating the plugin may be necessary for the push to proceed.

Staging sites and SendGrid

Note: SendGrid is not available on staging sites. It is available only on the production sites.