Introduction
Snapshot Failover™ is our proprietary high availability setup that allows you to clone all of the sites on one server over to another server, and set a syncing schedule for those paired servers of as little as one hour.
Couple this with automatic DNS failover that will switch your DNS records to your backup server if your primary server goes down, and you can ensure that your websites stay up and running even when your provider has an outage that impacts an entire datacenter.
This feature is available on Developer accounts.
Table of Contents
Multisite Update
Multisite failover is now fully operational!
How Does Failover Work?
This article details how to set up Snapshot Failover works in conjunction with DNS Made Easy.
GridPane’s role is to do the cloning and ensure that the websites on your primary server are cloned over to your backup server, on the schedule that you set inside your dashboard. This is done using rsync, and it includes syncing all your files, settings, and SSL certificates each time a sync takes place.
A note on SSL certificates: As long as the primary website has renewals, the synced servers will also get updated with these renewed certificates.
DNS Made Easy’s role is to monitor your primary server and if it sees it down, automatically adjust your DNS records to point to your backup server.
For the specifics of how DNS Made Easy Failover works, below is their video overview, and they also have an article that you can check out here:
Part 1. Setting up Snapshot Failover™ Inside GridPane
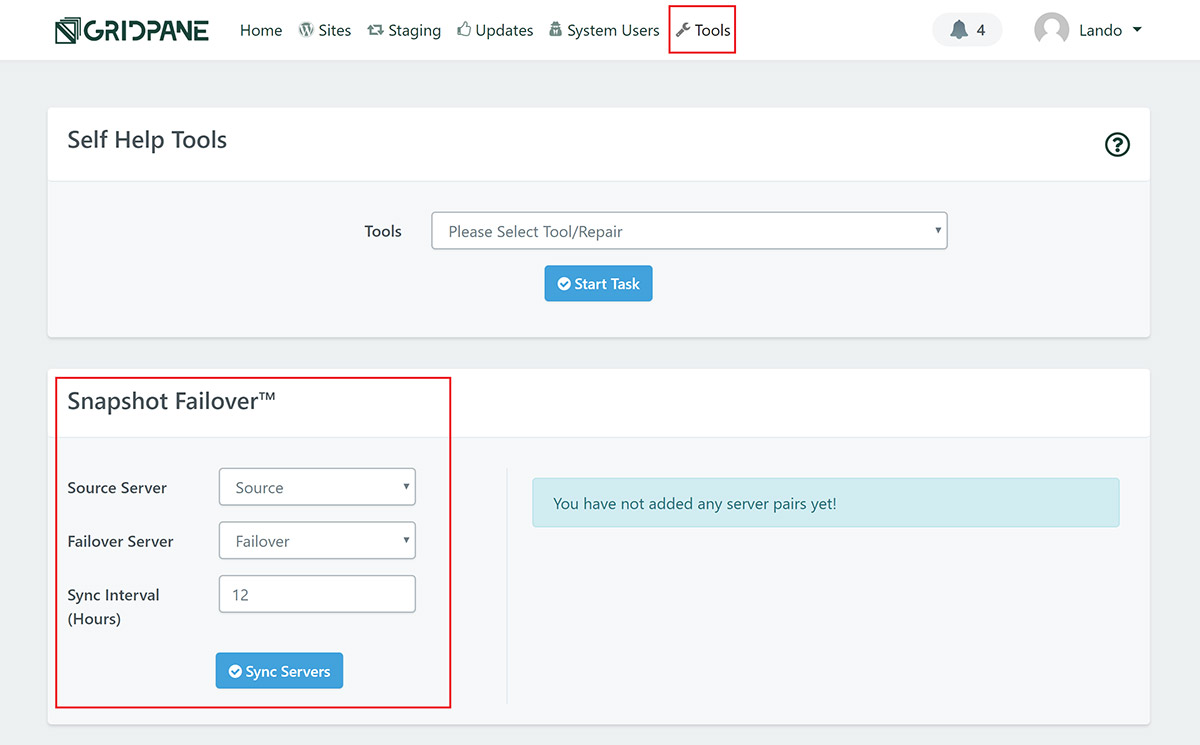
First, navigate to the “Tools” page inside your dashboard. Snapshot Failover™ lives directly below the Self Help Tools.

Here we need to set the source server, failover server, and sync interval.
- Source Server: Select the server you wish to backup
- Failover Server: Select the server you wish to use as your backup
- Sync Interval (Hours): Select how frequently you want the cloning to take place. E.g. For the servers to sync every four hours, type “4”. You can set syncing to take place anywhere between 1 hour and 72 hours.
Once you’ve set the details, click the “Sync Servers” button.
The sites will all be cloned over from your primary server to your failover server. The cloning process will match all the main control panel settings including:
- WordPress Core
- WordPress Database structure
- SSL
- System User (this will be created if it doesn’t already exist)
- PHP version and settings
- All General customizer settings including caching
- All Security customizer settings
- SMTP
- Routing (www or none/root)
If you change any of the above settings down the line, these will all sync over to the failover server at the interval you’ve specified.
We will also duplicate your site-specific PHP in settings and PHP process manager settings that GP-CLI manages, alongside the GP-CLI adjusted site-specific Nginx settings and any includes in your site-level Nginx directory.
Part 2: Setting Up Failover at DNS Made Easy
This article assumes you have a DNS Made Easy account and already have your domain name’s setup and pointing to your primary server. Here is DNS Made Easy’s short video on how to set up DNS records:
Step 1: Navigate to the Managed DNS Page
In the main menu at the top of the website, hover over DNS and select “Managed DNS” from the dropdown.

Step 2: Find the Domain Name You Wish to Edit
On the Managed DNS page, below the title is a search box. Start typing the first few letters of your domain name until your desired domain appears and select it. This will automatically take you through to that domain’s setting’s page.

Step 3: Setting up Failover
If it’s not already open, select the records tab. You’ll see this handy little table and here is where we edit the DNS records. In this case, we already have our DNS records set up to point to our primary server. What we want to do now is set up our Failover records. In the far right column of the table labeled “SM / FO” (this stands for System Monitoring and Failover) is where we select the domain we wish to set up Failover for.
The item with no name is the root domain. Staging is a subdomain. The root domain is the row we need to set Failover records for. You can do this for staging domains, however, it may be better to keep your Failover allowance and only activate it for the primary, live website.
To get started, click on “off” as outlined in red in the image below.

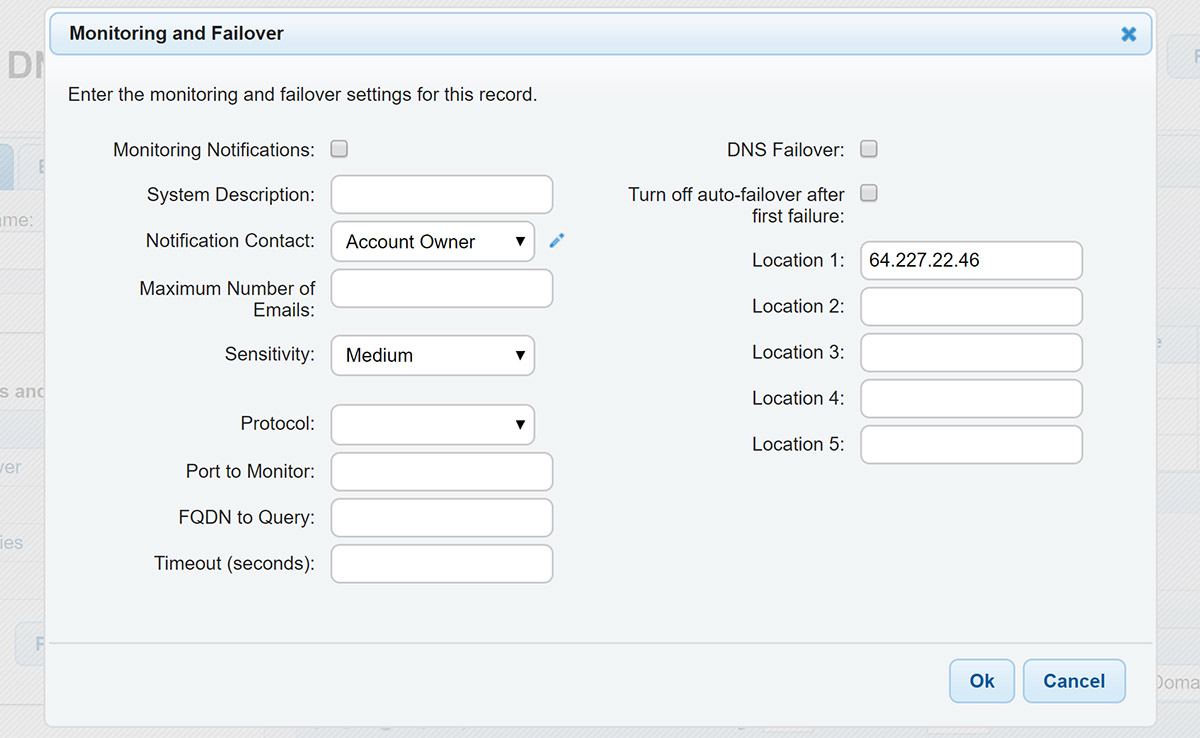
This will open up the System Monitoring and Failover modal.

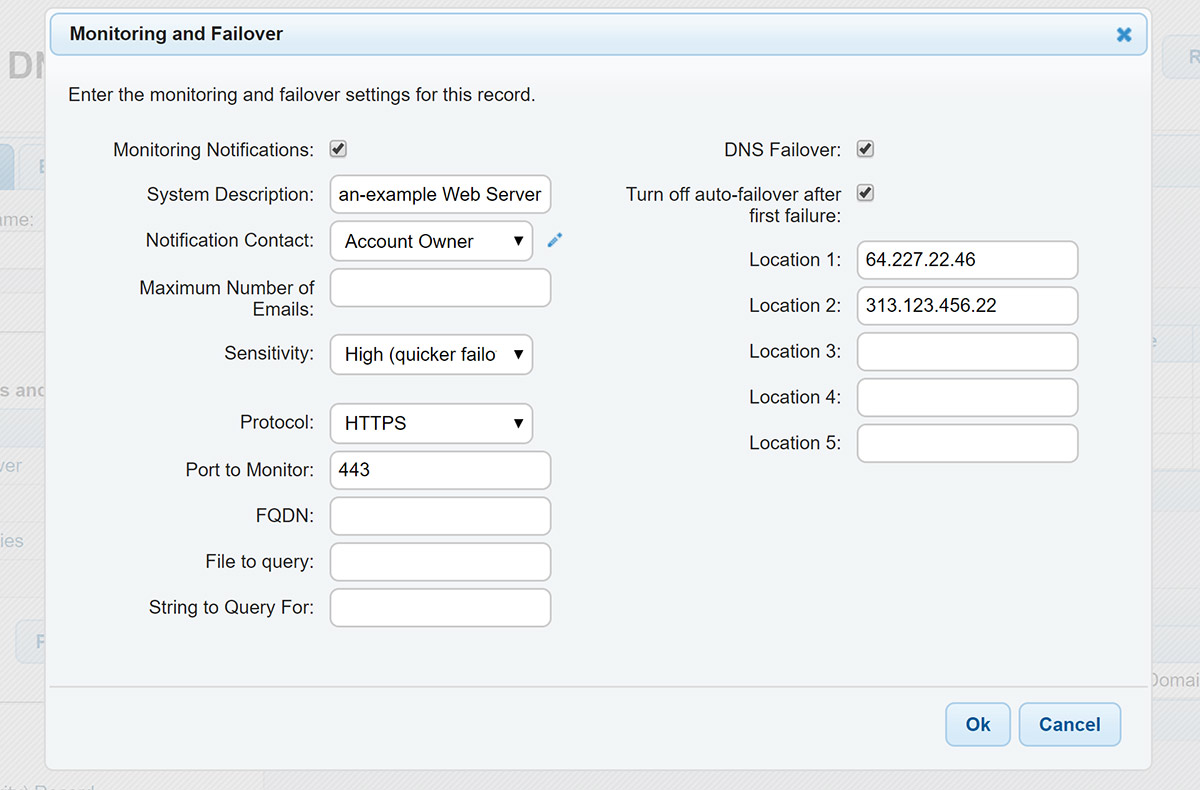
Here is where we set our Failover information and activate it. Below is a rundown of each of the options in the modal and how to set them. When you get to “Protocol” (number 6), options 7, 8, and 9 below will change to what’s in our list here: –
- Monitoring Notifications: Select the check box to enable notifications
- System Description: domain.com Web Server is a good choice, but feel free to choose whatever makes this server easily identifiable to you
- Notification Contact: Select the contact you wish to be notified. You can add new contacts by clicking on the pencil next to the dropdown.
- Maximum Number of Emails: Select the max number of emails you want to receive about your web server status
- Sensitivity: Select how quickly you wish DNS Made Easy to perform checks – “High” for the fastest setting, “Low” for the slowest setting. We recommend selecting “High”.
- Protocol: Select “HTTPS” and make sure the port option that appears below is set to “443”
- FQDN: Leave this blank
- File to query: Leave this blank
- String to Query For: Leave this blank
- DNS Failover: Ensure this checkbox is checked
- Turn off auto-failover after first failure: Check this box
- Location 1: This is your primary server’s IP address and should be pre-filled in when you open the modal. Inside the GP dashboard, this is the “source server”. Leave this as it is
- Location 2: Enter the IP address of your backup server (the failover server inside the GP dashboard).
- Locations 3 – 5: Leave blank.
The completed table will look similar to this:

Click the “OK” button, and you’ve now completed your Snapshot Failover setup.
To turn off monitoring and Failover at any point in the future, open up the modal and deselect the Monitoring Notifications checkbox and the DNS Failover checkbox and click the “OK” button.
To watch a video of DNSME configuring Failover, click here.

