How to Disable Weak SSL Cipher Suites

4 min read

Table of Contents

Introduction

On occasion, website owners ask our users about their SSL certificate and why a third party software like Qualsys SSL Labs  is reporting “weak cipher suites”.

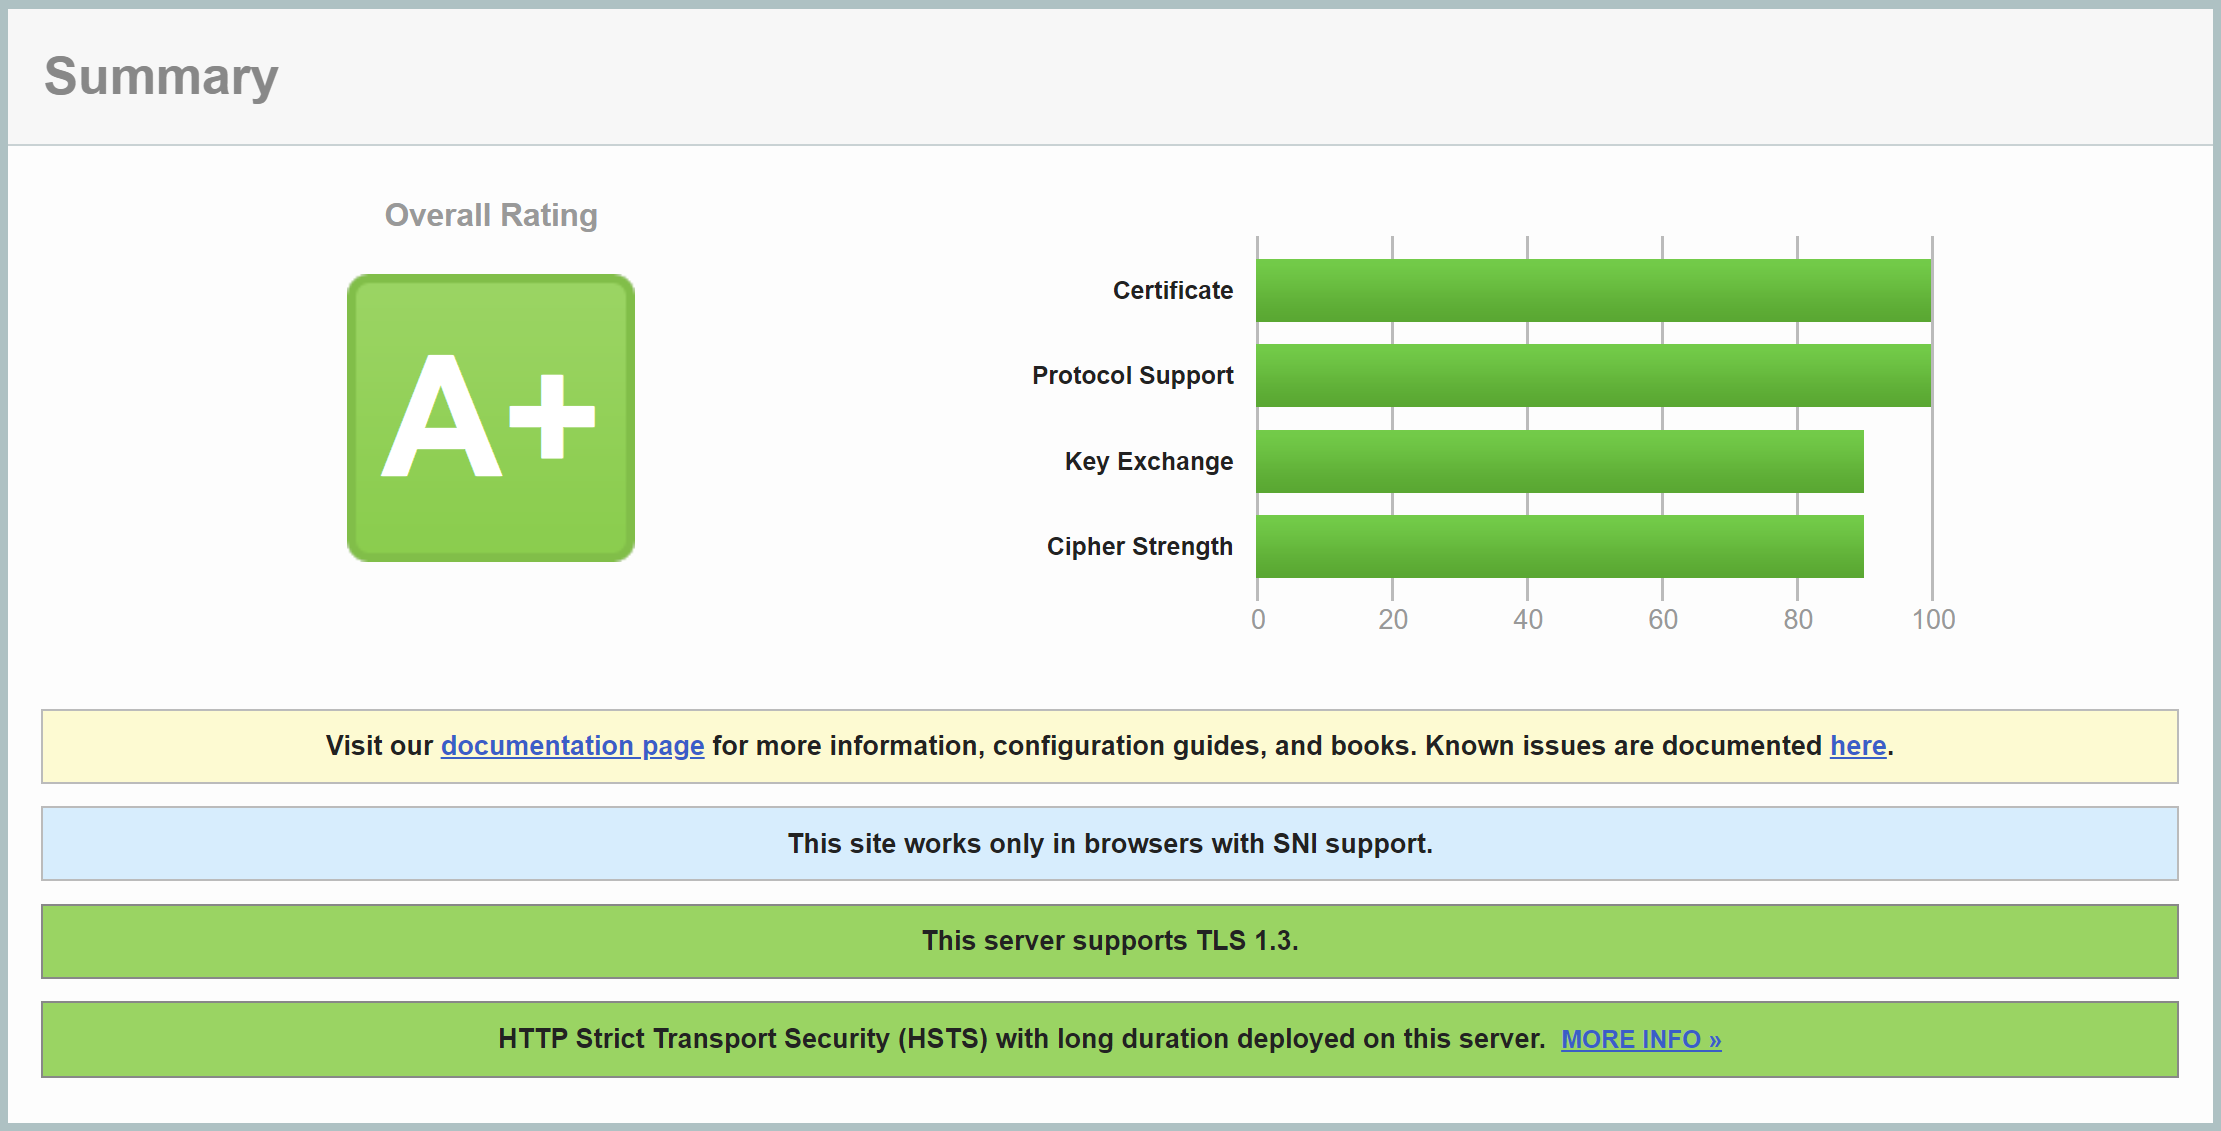
This question may even come when they have an A+ SSL rating, which is easily achieved on GridPane:

This article will walk you through how to disable weak cipher suites on your GridPane servers if you absolutely need to do so.

However, please bare in mind that this change can only be made server-wide, and so if the website is on a shared server, you will need to move it to it’s own server OR handle this at the DNS layer instead.

Additional note: If your SSL certificate doesn’t have an A+ rating, please see the following article: 
How to Get an A+ SSL Rating

About SSL Cipher Suites

In a nutshell, SSL cipher suites are algorithms used to used to secure the connection during the SSL/TLS handshake when your website is loaded.

The default cipher suites provided with Universal SSL certificates are “meant for a balance of security and compatibility”. We recommend SSL Labs for checking your sites:

https://www.ssllabs.com/ssltest/analyze.html

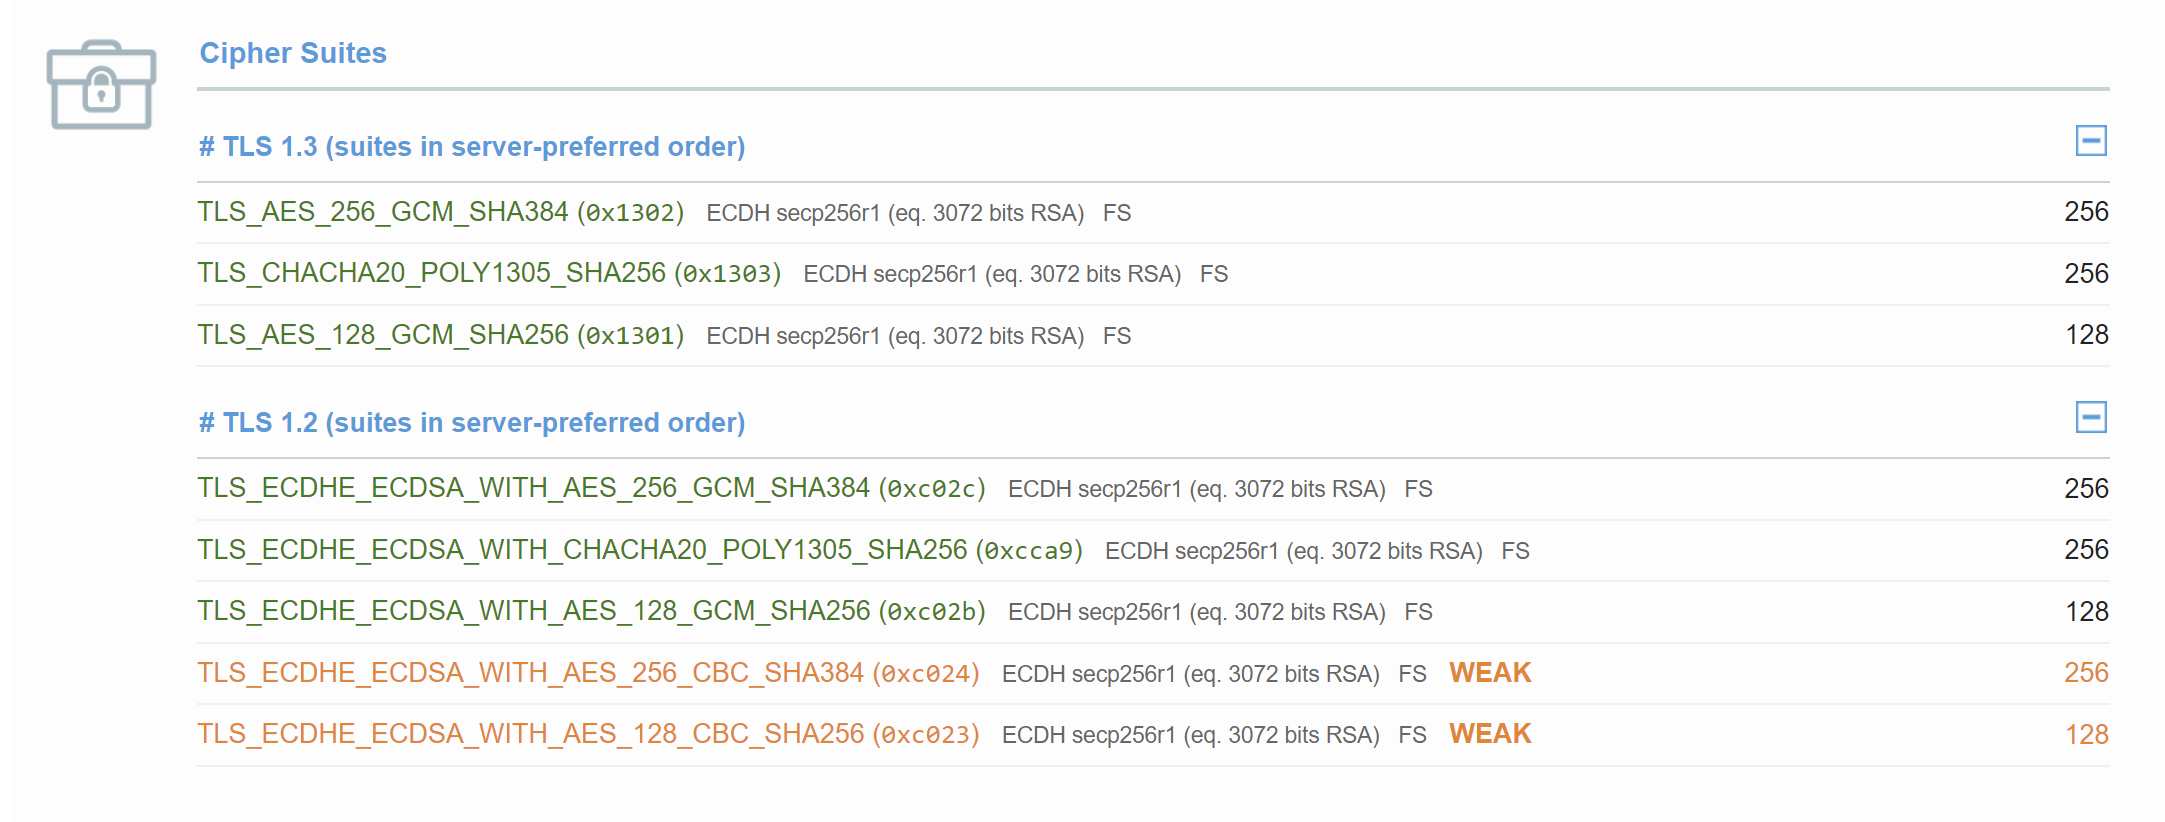
You will see weak cipher suites reported in the results:

Consequences

Removing may result in [potentially] a lot devices being unable to visit the website anymore – specifically, any device with an OS below the following won’t be able access the site:

  • Windows 10
  • Android 7
  • iOS 11

You’ll be able to see a table called “Handshake Simulation” with more specifics by running the website through SSL Labs.

Talking to Your Clients

Before you make any changes, please ensure they’re OK with this before making any modifications. This may be a good opportunity to upsell them to a new server if they wish to proceed.

Important

Making this modification will apply to all sites on a server, not just your clients site. If this site is sharing a server with other sites and cannot be moved to it's own server, you should check out the Cloudflare article linked in the introduction and handle this at the DNS layer instead.

Step 1. Backup your ssl.conf

Connect to your server and make a copy of your ssl.conf incase you need to revert it:

cp /etc/nginx/common/ssl.conf /etc/nginx/common/ssl.conf.backup

Step 2. Edit the ssl.conf and remove weak ciphers

Run the following to display the contents of the ssl.conf file:

nano /etc/nginx/common/ssl.conf

It will look as follows – here we’ve highlighted the ssl_ciphers you’ll be editing:

#ssl_protocols TLSv1.3;
ssl_protocols TLSv1.2 TLSv1.3;
#ssl_protocols TLSv1.1 TLSv1.2 TLSv1.3;
ssl_session_tickets on;
ssl_session_timeout 10m;
ssl_session_cache shared:SSL:20m;
ssl_dhparam /etc/ssl/dhparam.pem;
ssl_ecdh_curve prime256v1:secp384r1:secp521r1;
ssl_prefer_server_ciphers on;
ssl_ciphers 'TLS13-CHACHA20-POLY1305-SHA256:TLS13-AES-256-GCM-SHA384:TLS13-AES-128-GCM-SHA256:ECDHE-ECDSA-AES256-GCM-SHA384:ECDHE-ECDSA-CHACHA20-POLY1305:ECDHE-RSA-AES256-GCM-SHA384:ECDHE-RSA-CHACHA20-POLY1305:ECDHE-ECDSA-AES128-GCM-SHA256:ECDHE-RSA-AES128-GCM-SHA256:ECDHE-RSA-AES256-SHA384:ECDHE-RSA-AES128-SHA256:ECDHE-RSA-AES128-SHA:ECDHE-RSA-AES256-SHA:ECDHE-ECDSA-AES256-SHA384:ECDHE-ECDSA-AES128-SHA256:ECDHE-RSA-AES128-SHA256:!aNULL:!eNULL:!EXPORT';
ssl_stapling on;
ssl_stapling_verify on;
resolver 1.1.1.1 1.0.0.1 8.8.8.8 8.8.4.4 valid=360s;
resolver_timeout 10s;

Copy the line from your terminal and paste it into a text editor where it will be easier for you to edit.

Remove the following:

ECDHE-RSA-AES256-SHA384:ECDHE-RSA-AES128-SHA256:ECDHE-RSA-AES128-SHA:ECDHE-RSA-AES256-SHA

And/or:

ECDHE-ECDSA-AES256-SHA384:ECDHE-ECDSA-AES128-SHA256:ECDHE-RSA-AES128-SHA256:

Edit the File

Now edit the file with:

nano /etc/nginx/common/ssl.conf

Replace the ssl_ciphers line with your edited version.

Save the file with CTRL+O followed by Enter, then exit nano with CTRL+X.

Now test your Nginx syntax with:

nginx -t

If all good, proceed below.

Step 3. Ensure your changes persist

To make sure that your changes are not overwritten when GridPane updates Nginx configurations at global level you will need to copy this file to the _custom directory with the following command:

cp /etc/nginx/common/ssl.conf /etc/nginx/common/_custom/ssl.conf

Step 4. Check and reload Nginx

Test your Nginx syntax again with:

nginx -t

If there are no errors present, reload nginx with the following command:

gp ngx reload

Retesting 

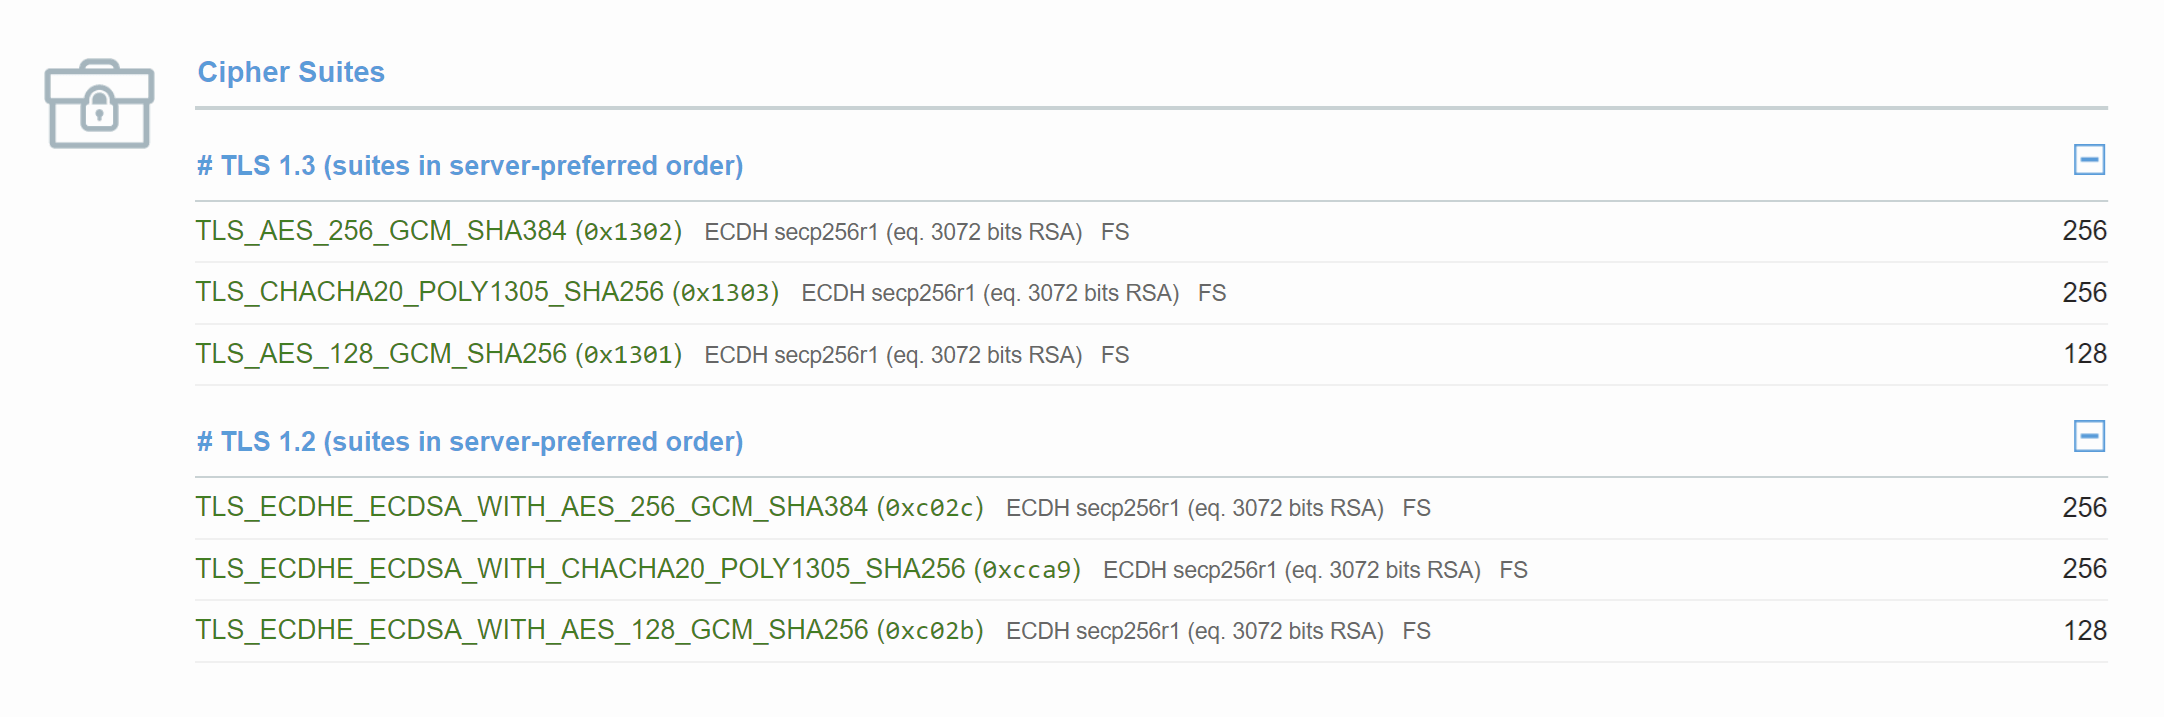
Once you’ve completed the server side set up you can retest your SSL. Please note that SSL Labs may require a little time before they all you to re-test. In the results you will see the following:

The Handshake Simulation table will also be updated.